- Made by AppCoda
- Contact us / Support
- Tweet this book
- Preface
- 1. Introduction to SwiftUI
- 2. Getting Started with SwiftUI and Working with Text
- 3. Working with Images
- 4. Layout User Interfaces with Stacks
- 5. Understanding ScrollView and Building a Carousel UI
- 6. Working with SwiftUI Buttons and Gradient
- 7. Understanding State and Binding
- 8. Implementing Path and Shape for Line Drawing and Pie Charts
- 9. Basic Animations and Transitions
- 10. Understanding Dynamic List, ForEach and Identifiable
- 11. Working with Navigation UI and Navigation Bar Customization
- 12. Playing with Modal Views, Floating Buttons and Alerts
- 13. Building a Form with Picker, Toggle and Stepper
- 14. Data Sharing with Combine and Environment Objects
- 15. Building a Registration Form with Combine and View Model
- 16. Working with Swipe-to-Delete, Context Menu and Action Sheets
- 17. Using Gestures
- 18. Displaying an Expandable Bottom Sheet Using Presentation Detents
- 19. Creating a Tinder-like UI with Gestures and Animations
- 20. Creating an Apple Wallet like Animation and View Transition
- 21. Working with JSON, Slider and Data Filtering
- 22. Building a ToDo app with Core Data
- 23. Integrating UIKit with SwiftUI Using UIViewRepresentable
- 24. Creating a Search Bar View and Working with Custom Binding
- 25. Putting Everything Together to Build a Real World App
- 26. Creating an App Store like Animated View Transition
- 27. Building an Image Carousel
- 28. Building an Expandable List View Using OutlineGroup
- 29. Building Grid Layout Using LazyVGrid and LazyHGrid
- 30. Creating an Animated Activity Ring with Shape and Animatable
- 31. Working with AnimatableModifier and LibraryContentProvider
- 32. Working with TextEditor to Create Multiline Text Fields
- 33. Using matchedGeometryEffect to Create View Animations
- 34. ScrollViewReader and Grid Animation
- 35. Working with Tab View and Tab Bar Customization
- 36. Using AsyncImage in SwiftUI for Loading Images Asynchronously
- 37. Implementing Search Bar Using Searchable
- 38. Creating Bar Charts and Line Charts with the Charts Framework
- 39. Capturing Text within Image Using Live Text APIs
- 40. How to Use ShareLink for Sharing Data Like Text and Photos
- 41. Using ImageRenderer to Convert SwiftUI Views into Images
- 42. Creating PDF Documents Using ImageRenderer
- 43. Using Gauge to Display Progress and Create a Speedometer
- 44. Creating Grid Layout Using Grid APIs
- 45. Switching Layout with AnyLayout
- Published with GitBook
Chapter 23
Integrating UIKit with SwiftUI Using UIViewRepresentable
There are two common questions developers ask about SwiftUI. First, it is the question of how to implement Core Data and SwiftUI. The other common question is how to work with UIKit views in SwiftUI projects. In this chapter, you will learn this technique by integrating a UISearchBar in the Todo app.
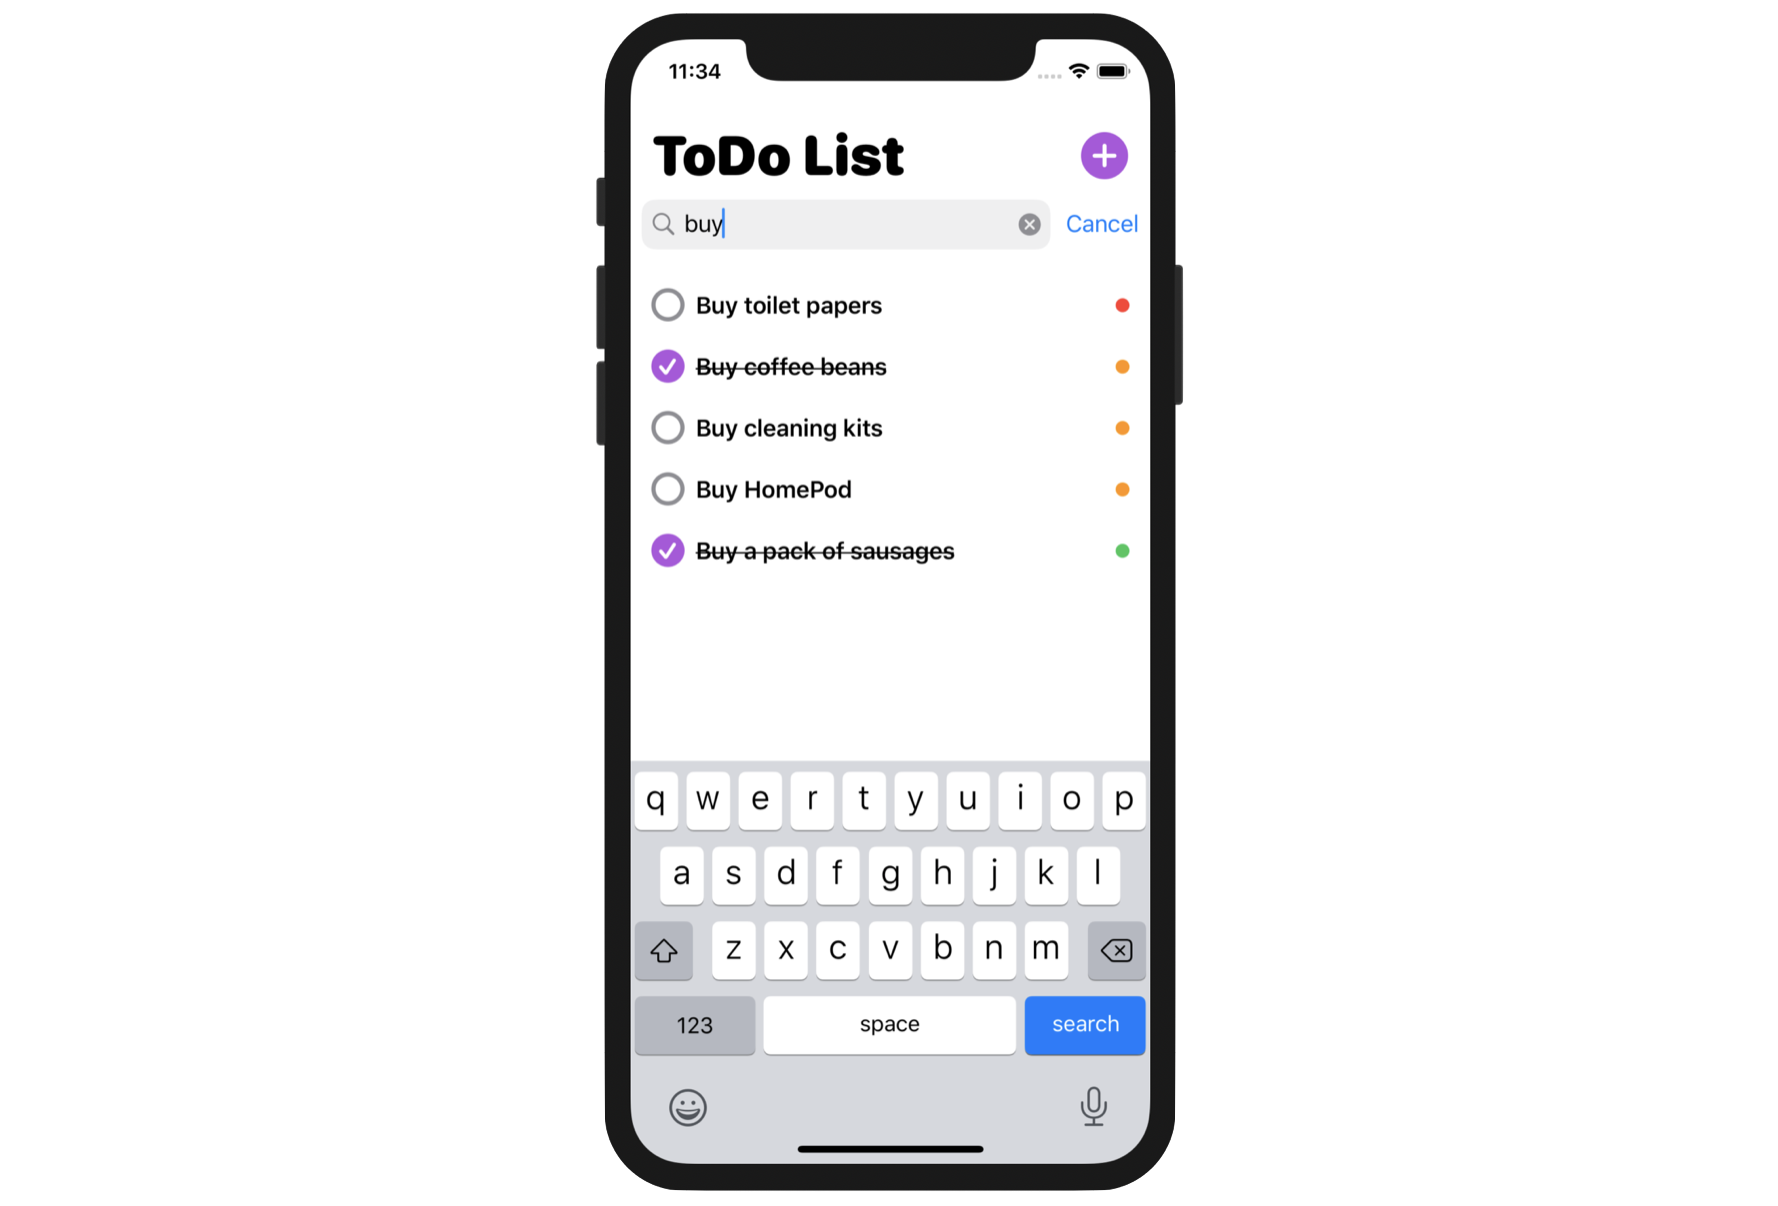
If you are new to UIKit, UISearchBar is a built-in component of the framework that allows developers to present a search bar for data search. Figure 1 shows you the standard search bar in iOS. SwiftUI, however, doesn't come with this standard UI component. To implement a search bar in a SwiftUI project (say, our ToDo app), one approach is to make use of the UISearchBar component in UIKit.
So, how do we interface with UIKit views or controllers in SwiftUI?
For the purpose of backward compatibility, Apple introduced a couple of new protocols, namely UIViewRepresentable and UIViewControllerRepresentable in the iOS SDK. With these protocols, you can wrap a UIKit view (or view controller) and make it available to your SwiftUI project.
To see how it works, we will enhance our Todo app with a search function. We will add a search bar right below the app title and let users filter the to-do items by entering a search term.
To get started, download the ToDo project at https://www.appcoda.com/resources/swiftui4/SwiftUIToDoList.zip. We will build on top of the ToDoList project. In case you haven't read chapter 22, I recommend you read it first. This will help you better understand the topics we are going to discuss below, especially if you have no experience with Core Data.
Understanding UIViewRepresentable
To use a UIKit view in SwiftUI, you wrap the view with the UIViewRepresentable protocol. Basically, you just need to create a struct in SwiftUI that adopts the protocol to create and manage a UIView object. Here is the skeleton of the custom wrapper for a UIKit view:
struct CustomView: UIViewRepresentable {

    func makeUIView(context: Context) -> some UIView {
        // Return the UIView object
    }

    func updateUIView(_ uiView: some UIView, context: Context) {
        // Update the view
    }
}
In the actual implementation, you replace some UIView with the UIKit view you want to wrap. Let's say, we want to use UISearchBar in UIKit. The code can be written like this:
struct SearchBar: UIViewRepresentable {

    func makeUIView(context: Context) -> UISearchBar {

        return UISearchBar()
    }

    func updateUIView(_ uiView: UISearchBar, context: Context) {

        // Update the view
    }
}
In the makeUIView method, we return an instance of UISearchBar. This is how you wrap a UIKit view and make it available to SwiftUI. To use the SearchBar, you can treat it like any SwiftUI view and create it like this:
struct ContentView: View {
    var body: some View {
        SearchBar()
    }
}
Adding a Search Bar
Now back to the ToDoList project to add the search bar to the app. First, we will create a new file for the search bar. In the project navigator, right click the View folder and choose New File.... Select the SwiftUI View template and name the file SearchBar.swift.
Replace the content with the following code:
import SwiftUI

struct SearchBar: UIViewRepresentable {

    @Binding var text: String

    func makeUIView(context: Context) -> UISearchBar {

        let searchBar = UISearchBar()

        searchBar.searchBarStyle = .minimal
        searchBar.autocapitalizationType = .none
        searchBar.placeholder = "Search..."

        return searchBar
    }

    func updateUIView(_ uiView: UISearchBar, context: Context) {

        uiView.text = text
    }
}

struct SearchBar_Previews: PreviewProvider {
    static var previews: some View {
        SearchBar(text: .constant(""))
    }
}
The code is similar to the code shown in the previous section but with the following differences:
- Instead of creating a
UISearchBarwith the default appearance, we initialize it with a minimal style, disable auto capitalization, and update its placeholder value. - We have added a binding to hold the search term. While the
makeUIViewmethod is responsible for creating and initializing the view object, theupdateUIViewmethod is responsible for updating the state of the UIKit view. Whenever there is a state change in SwiftUI, the framework automatically calls theupdateUIViewmethod to update the configuration of the view. In this case, whenever you update the search term in SwiftUI, the method will be called and we will update thetextofUISearchBar.
Now switch over to ContentView.swift. Declare a state variable to hold the search text:
@State private var searchText = ""
To present the search bar, insert the following code before the List:
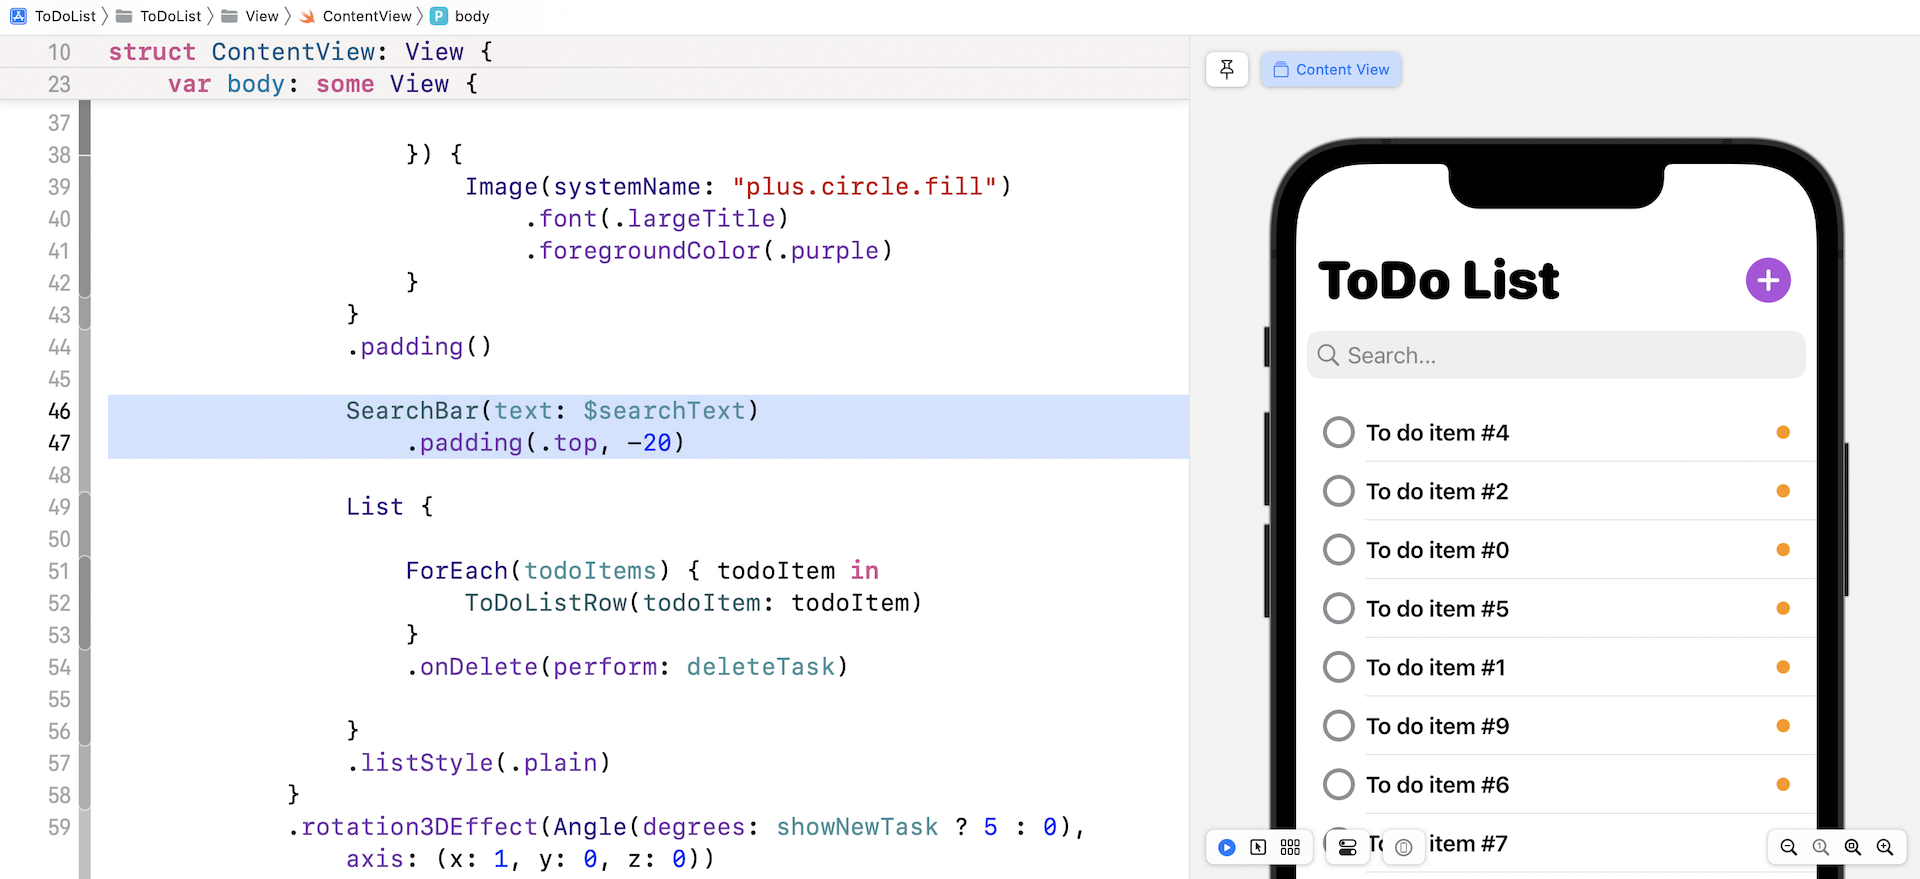
SearchBar(text: $searchText)
    .padding(.top, -20)
The SearchBar is just like any other SwiftUI views. You can apply modifiers like padding to adjust the layout. If you run the app in a simulator or simply test it in the preview, you should see a search bar, though it doesn't function yet.
Capturing the Search Text
It's pretty easy to present a UIKit view in a SwiftUI app. That said, making the search bar work is another story. For now, you can type in the search field but the app doesn't perform the query yet. What we expect is that the app should search the to-do items on the fly as the user keys in the search term.
So, how do we detect the user is entering a search term?
The search bar has a companion protocol named UISearchBarDelegate. This protocol provides several methods for managing the search text. In particular, the following method is called whenever the user changes the search text:
optional func searchBar(_ searchBar: UISearchBar, textDidChange searchText: String)
To make the search bar functional, we have to adopt the UISearchBarDelegate protocol. This is where things become more complex.
So far, we have only discussed a couple of the methods in the UIViewRepresentable protocol. If you need to work with a delegate in UIKit and communicate back to SwiftUI, you have to implement the makeCoordinator method and provide a Coordinator instance. This Coordinator acts as a bridge between UIView's delegate and SwiftUI. Let's have a look at the code, so you will understand what it means.
In the SearchBar struct (SearchBar.swift file), create a Coordinator class and implement the makeCoordinator method like this:
func makeCoordinator() -> Coordinator {
    Coordinator($text)
}

class Coordinator: NSObject, UISearchBarDelegate {
    @Binding var text: String

    init(_ text: Binding<String>) {
        self._text = text
    }

    func searchBar(_ searchBar: UISearchBar, textDidChange searchText: String) {

        searchBar.showsCancelButton = true
        text = searchText

        print("textDidChange: \(text)")
    }
}
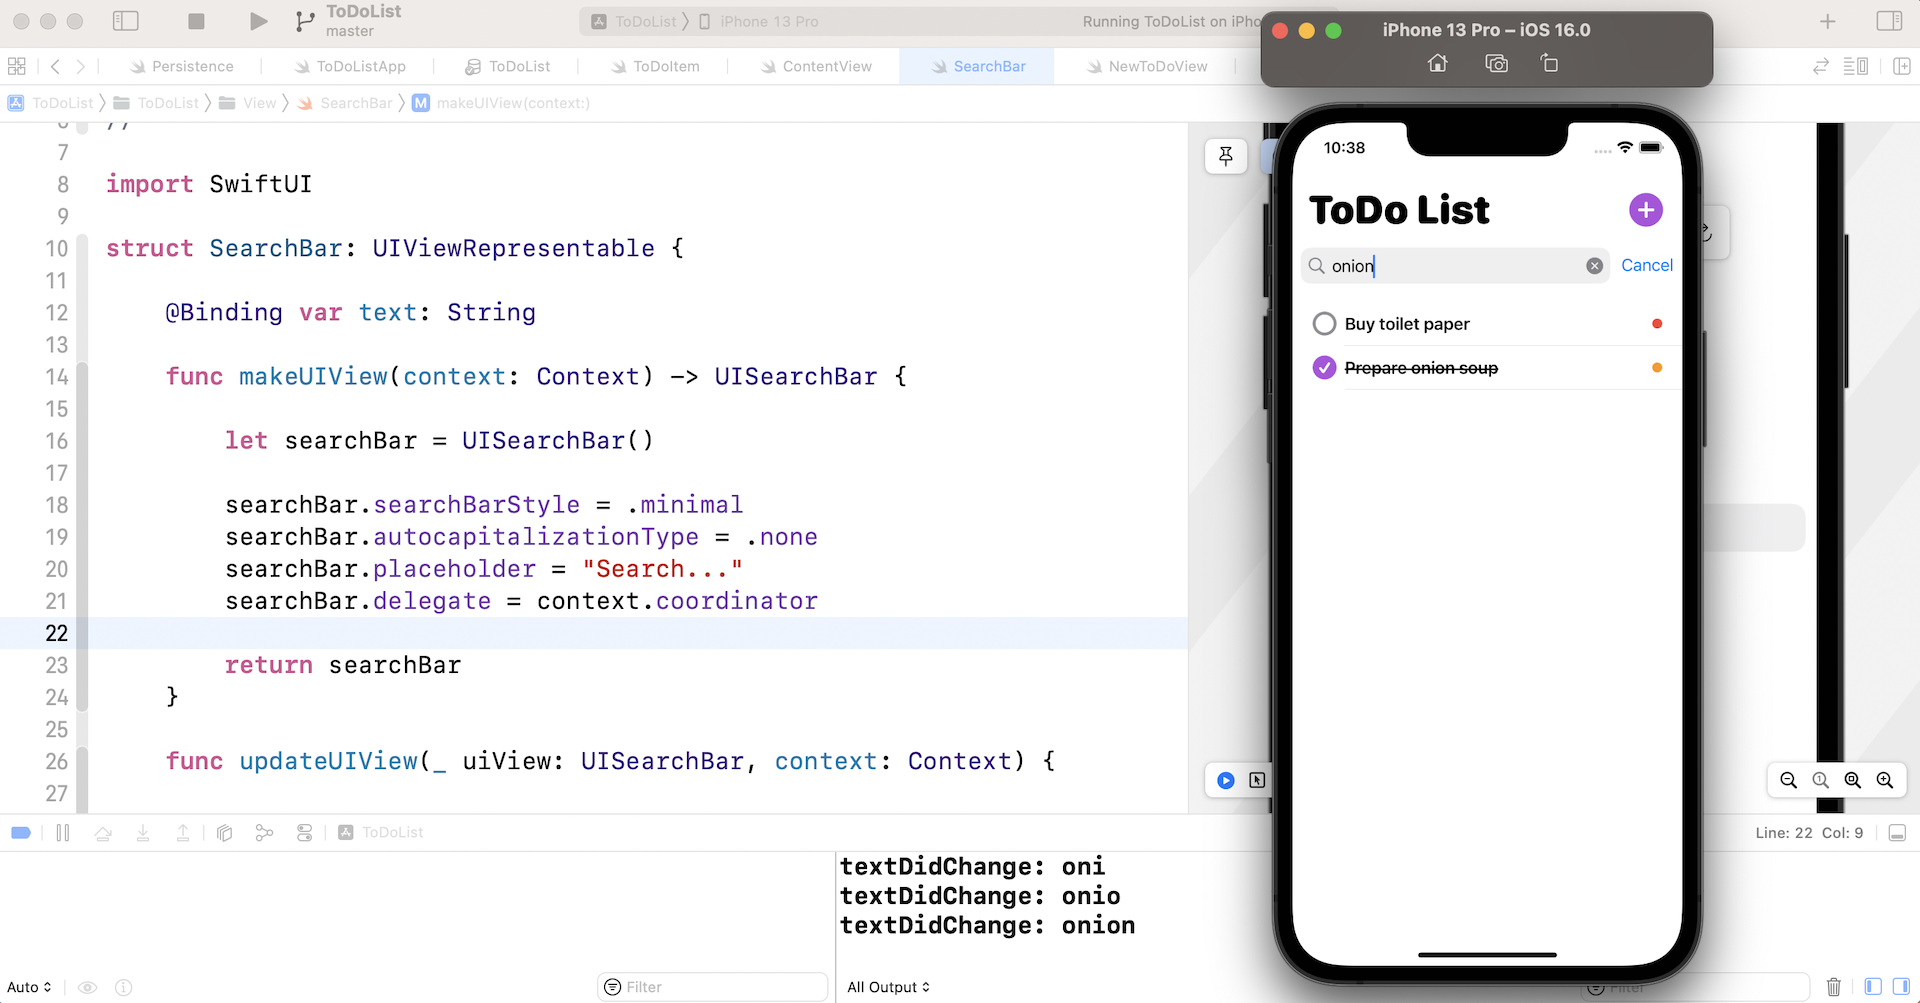
The makeCoordinator method simply returns an instance of Coordinator. The Coordinator, adopts the UISearchBarDelegate protocol and implements the searchBar(_:textDidChange:) method. As mentioned, this method is called every time a user changes the search text. Therefore, we capture the updated search text and pass it back to SwiftUI by updating the text binding. I intentionally added a print statement in the method, so that you can see the changes when we test the app later.
Now that we have a Coordinator that adopts the UISearchBarDelegate protocol, we need to make one more change. In the makeUIView method, insert the following line of code to assign the coordinator to the search bar:
searchBar.delegate = context.coordinator
That's it! Test the app again on a simulator and type in the search field. You should see the "textDidChange:" message in the console. If you can't see the message, go up to Xcode menu and choose View > Debug Area > Activate Console to enable the console.
Handling the Cancel Button
Did you tap the Cancel button? If you've tried that, you know it is not functional. To make it work, we have to implement the following methods in the Coordinator:
func searchBarCancelButtonClicked(_ searchBar: UISearchBar) {
    text = ""
    searchBar.resignFirstResponder()
    searchBar.showsCancelButton = false
    searchBar.endEditing(true)
}

func searchBarShouldBeginEditing(_ searchBar: UISearchBar) -> Bool {
    searchBar.showsCancelButton = true

    return true
}
The first method is triggered when the cancel button is clicked. In the code, we call resignFirstResponder() to dismiss the keyboard and tell the search bar to end the editing. The second method ensures that the Cancel button appears when the user taps the search field.
You can perform a quick test by running the app in a simulator. Tapping the Cancel button while editing should dismiss the software keyboard.
Performing the Search
We can now retrieve the search text and handle the cancel button. Unfortunately, the search bar is still not working yet. This is what we are going to implement in this section. For this app, there are a couple of ways to perform the search:
- Perform the search on the
todoItemsusing thefilterfunction - Perform the search on the
FetchRequestby providing a predicate
Basically the first approach is good enough for this app because the todoItems is in sync with the to-do item stored in the database. I also want to show you how to perform the search using FetchRequest. So, we will look into both approaches.
Using the filter function
In Swift, you can use the filter function to loop over a collection and get an array of items that matches the filter criteria. Here is an example:
todoItems.filter({ $0.name.contains("Buy") })
The filter function takes a closure as an argument that specifies the filter criteria. For example, the code above will return those items that contain the keyword "Buy" in its name field.
To implement the search, we can replace the ForEach loop of the List like this:
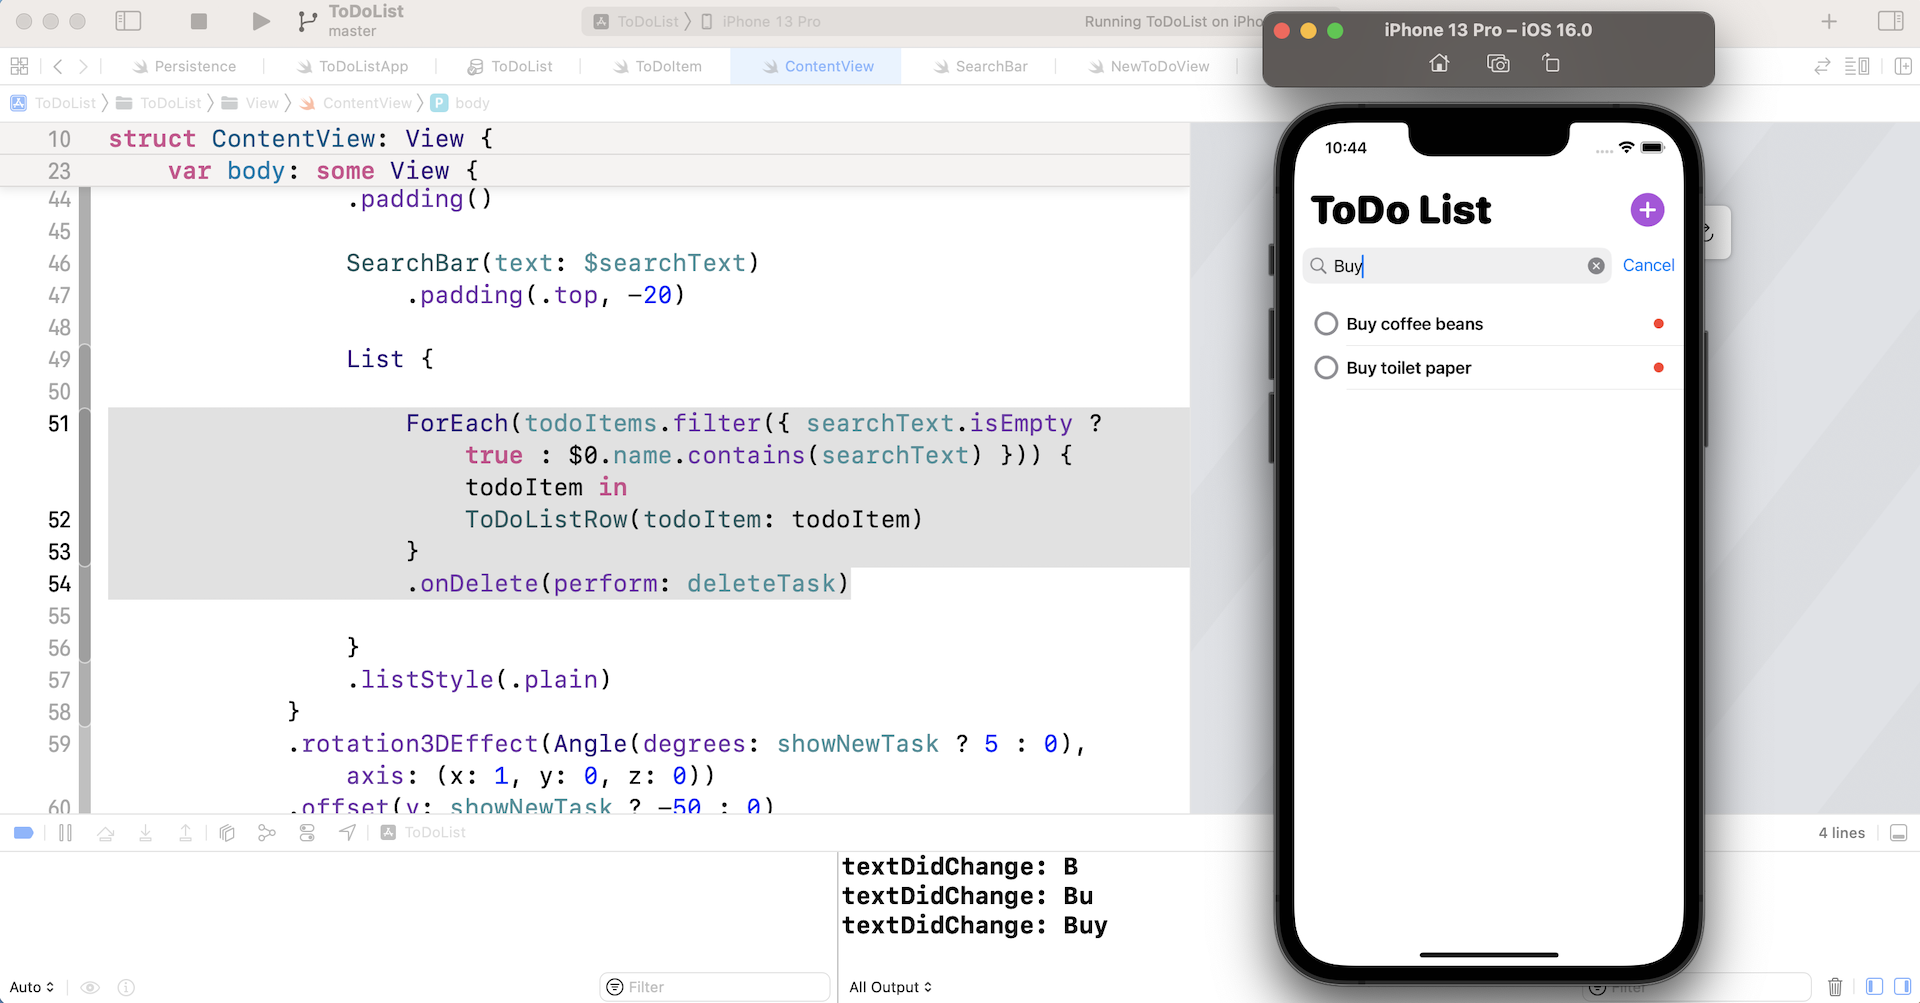
ForEach(todoItems.filter({ searchText.isEmpty ? true : $0.name.contains(searchText) })) { todoItem in
    ToDoListRow(todoItem: todoItem)
}
.onDelete(perform: deleteTask)
In the closure of the filter function, we first check if the search text has a value. If not, we simply return true, which means that it returns all the items. Otherwise, we check if the name field contains the search term.
That's it. You can now run the app to test it out. Type in the search field and the app will filter those records that match the search term.
Using FetchRequest
The filter approach performs the search on the existing fetch results. The other approach is to perform the search directly using Core Data. When we fetch the data from database, we specify clearly the todo items to retrieve.
The @FetchRequest property wrapper allows you to pass a predicate, which we haven’t discussed before, to specify the filter criteria.
Here is an example:
@FetchRequest(
    entity: ToDoItem.entity(),
    sortDescriptors: [ NSSortDescriptor(keyPath: \ToDoItem.priorityNum, ascending: false) ],
    predicate: NSPredicate(format: "name CONTAINS[c] %@", "Buy")
)
By providing the predicate property, the fetch request will only fetch the to-do items who's name field contains the search term "buy". The [c] following CONTAINS means that the search is case insensitive. If you want to test it, please make sure you revert the ForEach to the original code (without the filter function). And then replace the @FetchRequest with the code above.
Assuming you’ve added some todo items with "Buy" in the item name, you should only see the to-do items with the search term "buy" after the code change.
It looks simple, right? But when you need to create a fetch request with a dynamic predicate, then it is not that simple. Once the fetch request is initialized with a specific predicate, you can't change it. The same goes for the sort descriptor.
So, how do we build a fetch request that supports different predicates?
The trick is not to use the @FetchRequest property wrapper. Instead, we create the fetch request manually. In order to do that, we will create a separate view called FilteredList which accepts the search text as an argument. This FilteredList is responsible to create the fetch request, search for the related to-do items, and present them in a list view.
In ContentView.swift, insert the following code to create the FilteredList:
struct FilteredList: View {

    @Environment(\.managedObjectContext) var context

    @Binding var searchText: String

    var fetchRequest: FetchRequest<ToDoItem>
    var todoItems: FetchedResults<ToDoItem> {
        fetchRequest.wrappedValue
    }

    init(_ searchText: Binding<String>) {
        self._searchText = searchText

        let predicate = searchText.wrappedValue.isEmpty ? NSPredicate(value: true) : NSPredicate(format: "name CONTAINS[c] %@", searchText.wrappedValue)

        self.fetchRequest = FetchRequest(entity: ToDoItem.entity(),
                                         sortDescriptors: [ NSSortDescriptor(keyPath: \ToDoItem.priorityNum, ascending: false) ],
                                         predicate: predicate,
                                         animation: .default)
    }

    var body: some View {

        ZStack {
            List {

                ForEach(todoItems) { todoItem in
                    ToDoListRow(todoItem: todoItem)
                }
                .onDelete(perform: deleteTask)

            }
            .listStyle(.plain)

            if todoItems.count == 0 {
                NoDataView()
            }
        }


    }

    private func deleteTask(indexSet: IndexSet) {
        for index in indexSet {
            let itemToDelete = todoItems[index]
            context.delete(itemToDelete)
        }

        do {
            try context.save()
        } catch {
            print(error)
        }
    }
}
Take a look at the body and deleteTask. Both are exactly the same as before. We just extract the code and put them in the FilteredList. The core changes are in the init method and the fetch request.
We declare a variable named fetchRequest to hold the fetch request and another variable named todoItems to store the fetched results. The fetched results can actually be retrieved from the wrappedValue property of the fetch request.
Now let's dive into the init method. This custom init method accepts the search text as an argument. To be clear, it's the binding for the search text. The reason why we need to create a custom init is that we are creating a dynamic fetch request based on the given search text.
The first line of the init method is to store the binding of the search text. To assign a binding, you use the underscore like this:
self._searchText = searchText
Next, we check if the search text is empty (or not) and build the predicate accordingly:
let predicate = searchText.wrappedValue.isEmpty ? NSPredicate(value: true) : NSPredicate(format: "name CONTAINS[c] %@", searchText.wrappedValue)
Once the predicate is ready, we create the fetch request like this:
self.fetchRequest = FetchRequest(entity: ToDoItem.entity(),
                                 sortDescriptors: [ NSSortDescriptor(keyPath: \ToDoItem.priorityNum, ascending: false) ],
                                 predicate: predicate,
                                 animation: .default)
As you can see, the usage is very similar to that of the @FetchRequest property wrapper.
This is it! We now have a FilteredList that can handle a fetch request with different predicates. Now let's modify the ContentView struct to make use of this new FilteredList.
Since we've moved the fetch request to FilteredList, we can delete the following variables:
@Environment(\.managedObjectContext) var context

@FetchRequest(
    entity: ToDoItem.entity(),
    sortDescriptors: [ NSSortDescriptor(keyPath: \ToDoItem.priorityNum, ascending: false) ],
    predicate: NSPredicate(format: "name CONTAINS[c] %@", "buy")
)
var todoItems: FetchedResults<ToDoItem>
Next, replace the following code:
List {

    ForEach(todoItems.filter({ searchText.isEmpty ? true : $0.name.contains(searchText) })) { todoItem in
        ToDoListRow(todoItem: todoItem)
    }
    .onDelete(perform: deleteTask)

}
With:
FilteredList($searchText)
Here we use the FilteredList to render the list view. We pass the binding of searchText for performing the search. Since searchText is a state variable, any change on the search text will trigger the update of the FilteredList. In reality, the app creates a different predicate and fetches a new set of to-do items as the user types in the search field.
Next, remove the following code because it's in the FilteredList also:
// If there is no data, show an empty view
if todoItems.count == 0 {
    NoDataView()
}
Finally, delete the deleteTask method in ContentView because it's migrated to FilteredList:
private func deleteTask(indexSet: IndexSet) {
    for index in indexSet {
        let itemToDelete = todoItems[index]
        context.delete(itemToDelete)
    }

    DispatchQueue.main.async {
        do {
            try context.save()
        } catch {
            print(error)
        }
    }
}
Now you're ready to test! If you've made all the code changes correctly, the app should filter the to-do items as you type in the search term.
Summary
In this chapter, you've learned how to use the UIViewRepresentable protocol to integrate UIKit views with SwiftUI. While SwiftUI is still very new and doesn't come with all the standard UI components, this backward compatibility allows you to tap into the old framework and utilize any views you need.
We also explored a couple of approaches for performing data search. You should now know how to use the filter function and understand how to create a dynamic fetch request.
For reference, you can download the complete project here: