- Made by AppCoda
- Contact us / Support
- Tweet this book
- Preface
- 1. Introduction to SwiftUI
- 2. Getting Started with SwiftUI and Working with Text
- 3. Working with Images
- 4. Layout User Interfaces with Stacks
- 5. Understanding ScrollView and Building a Carousel UI
- 6. Working with SwiftUI Buttons and Gradient
- 7. Understanding State and Binding
- 8. Implementing Path and Shape for Line Drawing and Pie Charts
- 9. Basic Animations and Transitions
- 10. Understanding Dynamic List, ForEach and Identifiable
- 11. Working with Navigation UI and Navigation Bar Customization
- 12. Playing with Modal Views, Floating Buttons and Alerts
- 13. Building a Form with Picker, Toggle and Stepper
- 14. Data Sharing with Combine and Environment Objects
- 15. Building a Registration Form with Combine and View Model
- 16. Working with Swipe-to-Delete, Context Menu and Action Sheets
- 17. Using Gestures
- 18. Displaying an Expandable Bottom Sheet Using Presentation Detents
- 19. Creating a Tinder-like UI with Gestures and Animations
- 20. Creating an Apple Wallet like Animation and View Transition
- 21. Working with JSON, Slider and Data Filtering
- 22. Building a ToDo app with Core Data
- 23. Integrating UIKit with SwiftUI Using UIViewRepresentable
- 24. Creating a Search Bar View and Working with Custom Binding
- 25. Putting Everything Together to Build a Real World App
- 26. Creating an App Store like Animated View Transition
- 27. Building an Image Carousel
- 28. Building an Expandable List View Using OutlineGroup
- 29. Building Grid Layout Using LazyVGrid and LazyHGrid
- 30. Creating an Animated Activity Ring with Shape and Animatable
- 31. Working with AnimatableModifier and LibraryContentProvider
- 32. Working with TextEditor to Create Multiline Text Fields
- 33. Using matchedGeometryEffect to Create View Animations
- 34. ScrollViewReader and Grid Animation
- 35. Working with Tab View and Tab Bar Customization
- 36. Using AsyncImage in SwiftUI for Loading Images Asynchronously
- 37. Implementing Search Bar Using Searchable
- 38. Creating Bar Charts and Line Charts with the Charts Framework
- 39. Capturing Text within Image Using Live Text APIs
- 40. How to Use ShareLink for Sharing Data Like Text and Photos
- 41. Using ImageRenderer to Convert SwiftUI Views into Images
- 42. Creating PDF Documents Using ImageRenderer
- 43. Using Gauge to Display Progress and Create a Speedometer
- 44. Creating Grid Layout Using Grid APIs
- 45. Switching Layout with AnyLayout
- Published with GitBook
Chapter 16
Working with Swipe-to-Delete, Context Menu and Action Sheets
Previously, you learned how to present rows of data using list. In this chapter, we will dive a little bit deeper and see how to let users interact with the list view including:
- Use swipe to delete a row
- Tap a row to invoke an action sheet
- Touch and hold a row to bring up a context menu
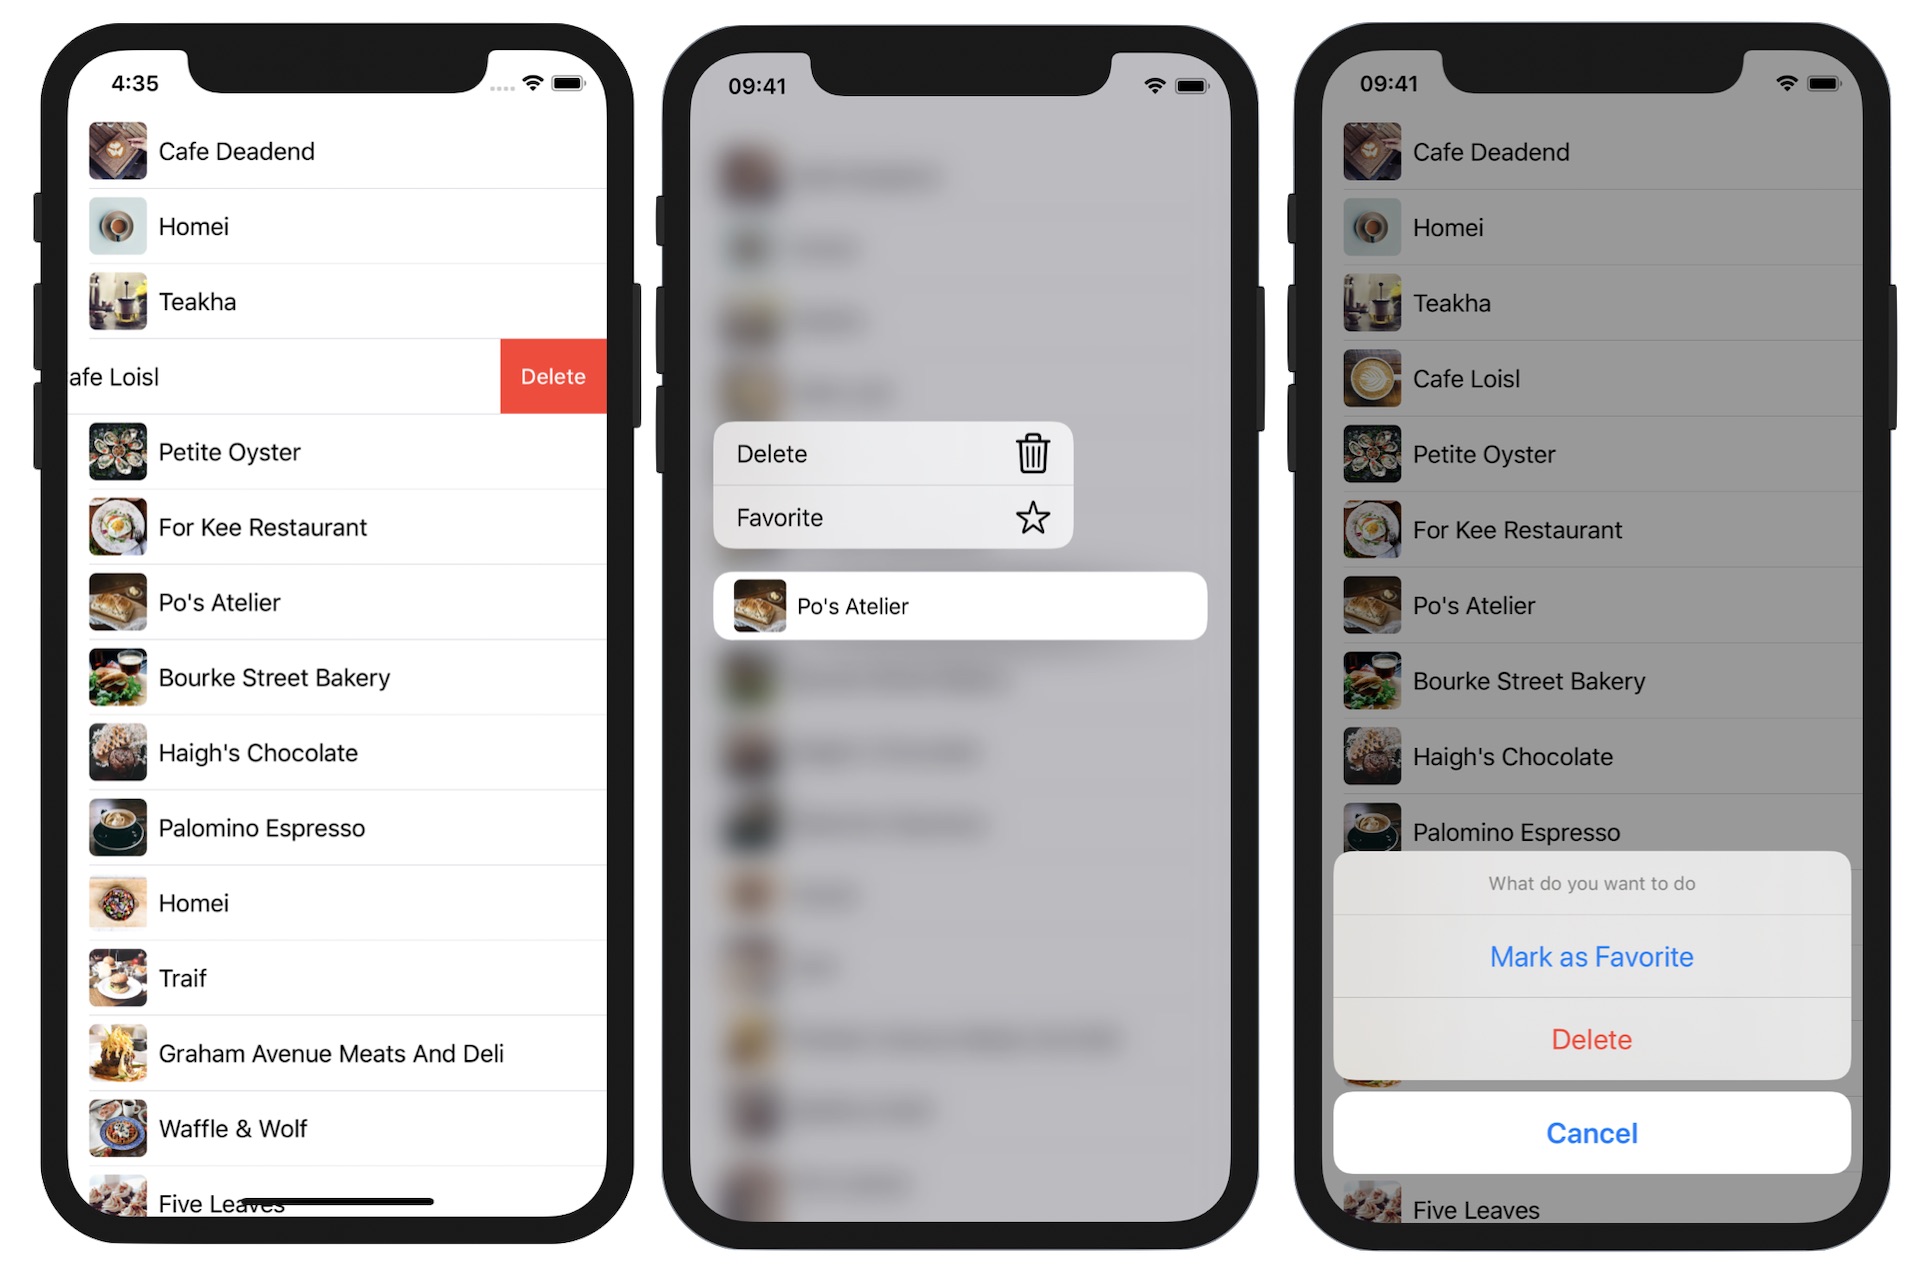
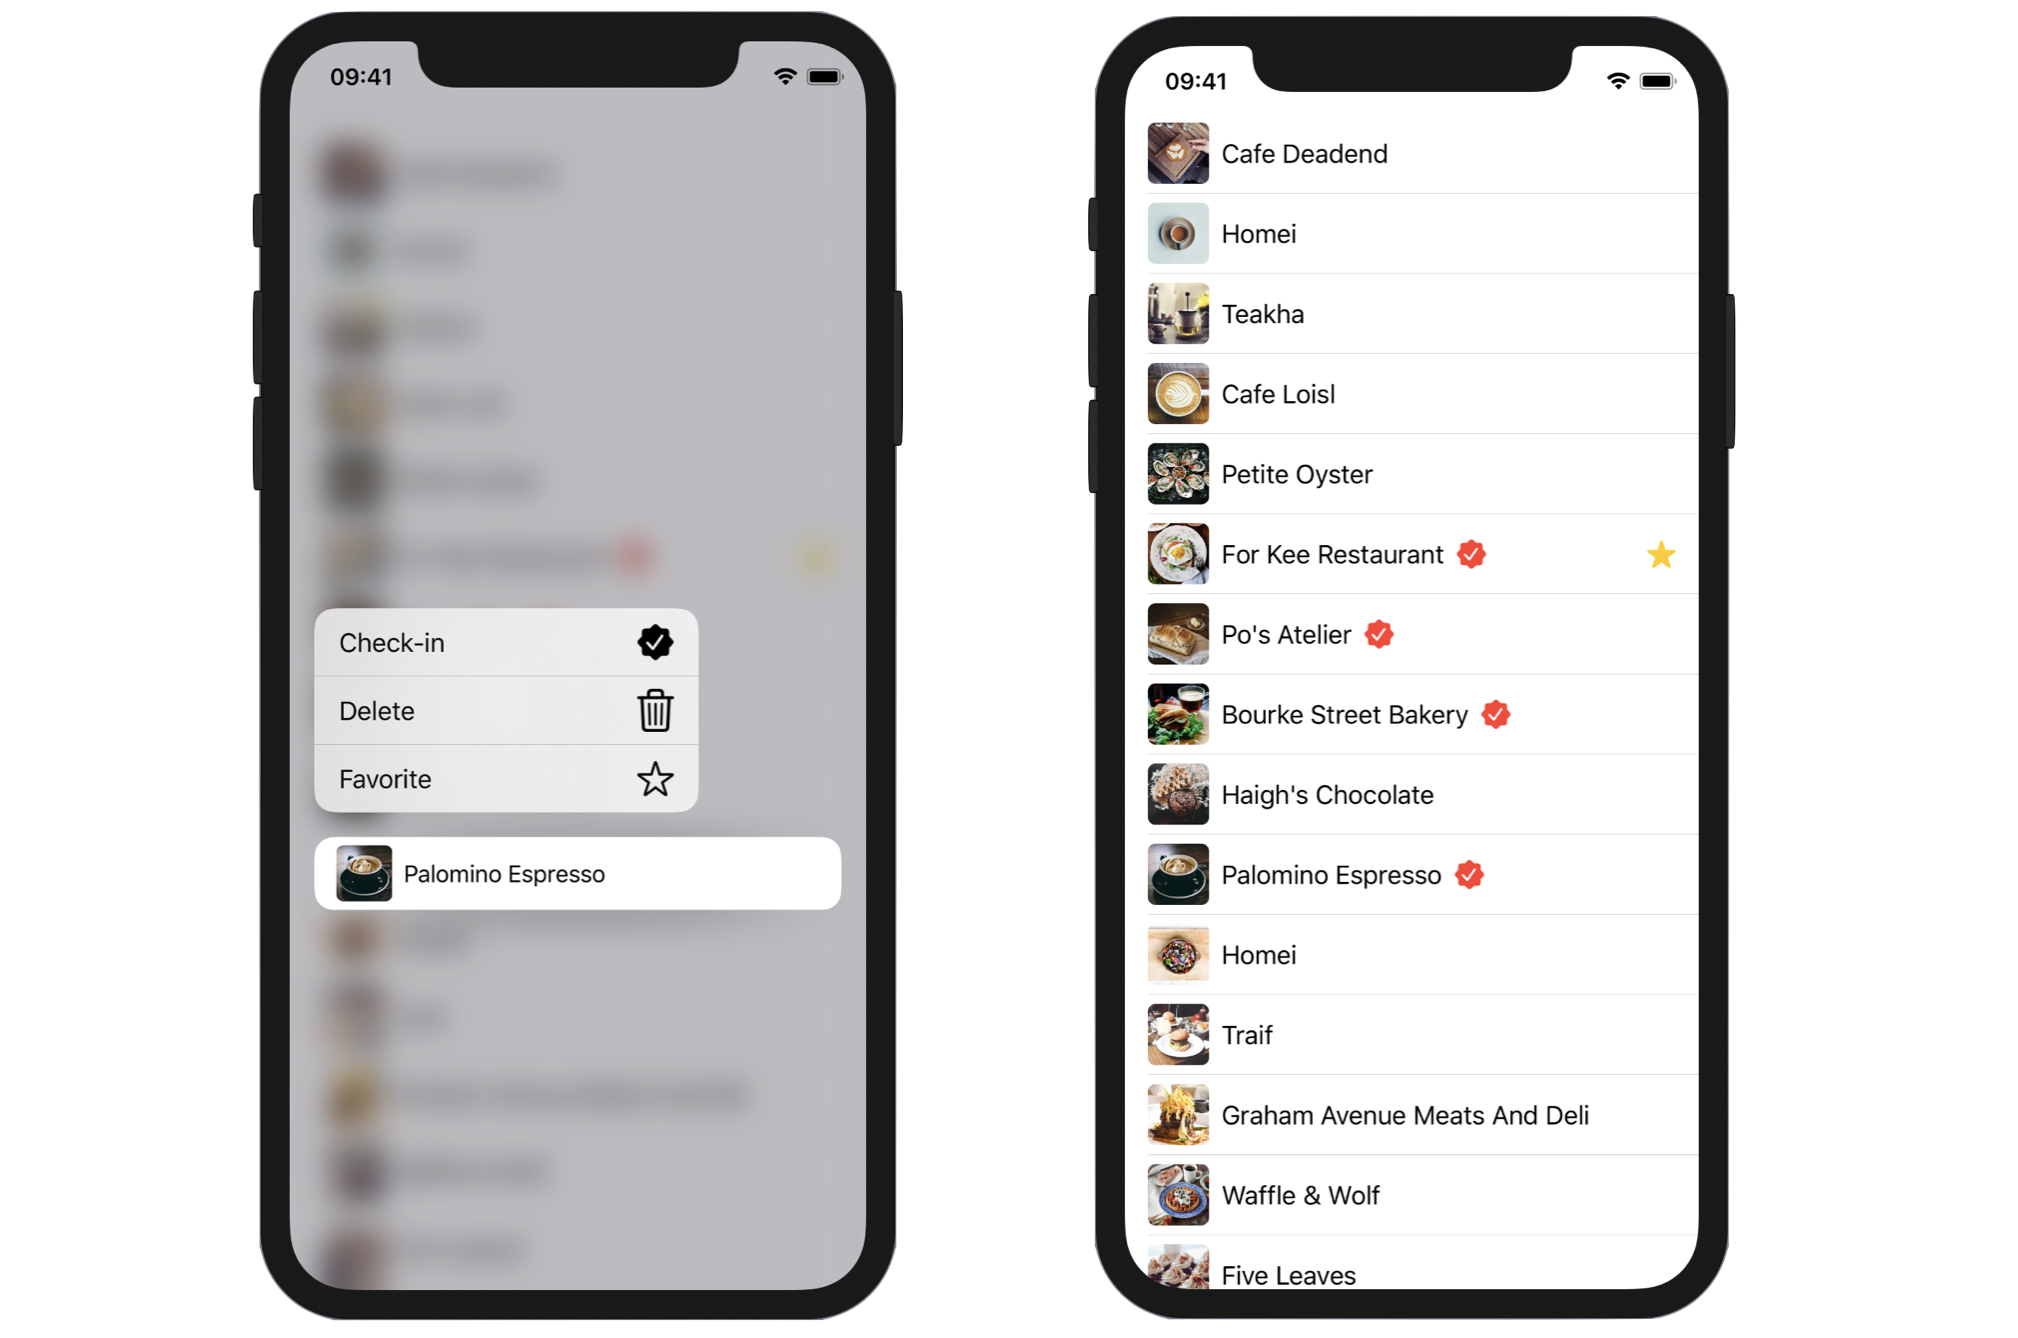
Referring to figure 1, I believe you should be very familiar with swipe-to-delete and action sheet. These two UI elements have existed in iOS for several years. Context menus were introduced in iOS 13, though they look similar to peek and pop of 3D Touch. For any views (e.g. button) implemented with the context menu, iOS will bring up a popover menu whenever a user force touches on the view. For developers, it's your responsibility to configure the action items displayed in the menu.
While this chapter focuses on the interaction of a list, the techniques that I'm going to show you can also be applied to other UI controls such as buttons.
Preparing the Starter Project
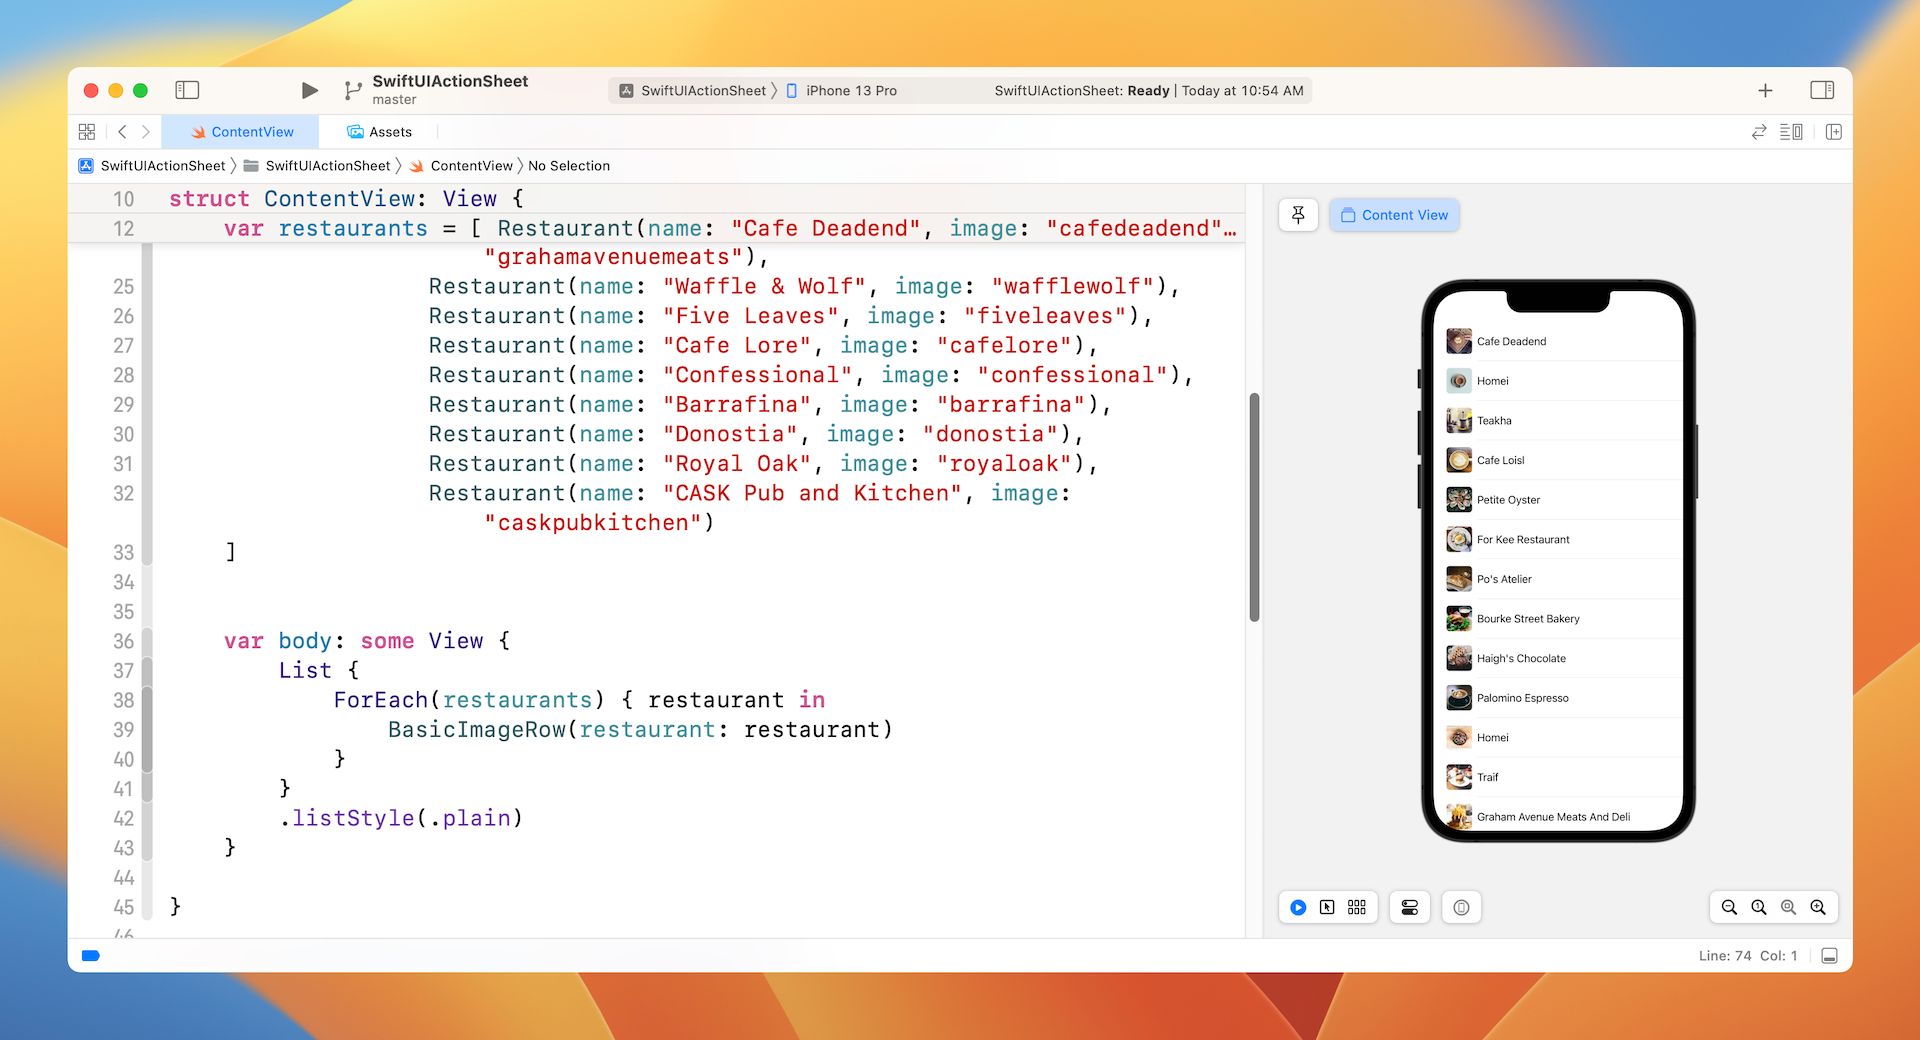
Let's get started and create the demo. We will build an interactive list based on the restaurant list app. You can download the starter project from https://www.appcoda.com/resources/swiftui4/SwiftUIActionSheetStarter.zip. Once downloaded, open the project and check out the preview. It should display a simple list with text and images. Later, we will add the swipe-to-delete feature, an action sheet, and a context menu to this demo app.
If you have a sharp eye, you may spot that the starter project used ForEach to implement the list. Why did I use ForEach instead of passing the collection of data to List? The main reason is that the onDelete handler that I'm going to walk you through only works with ForEach.
Implementing Swipe-to-delete
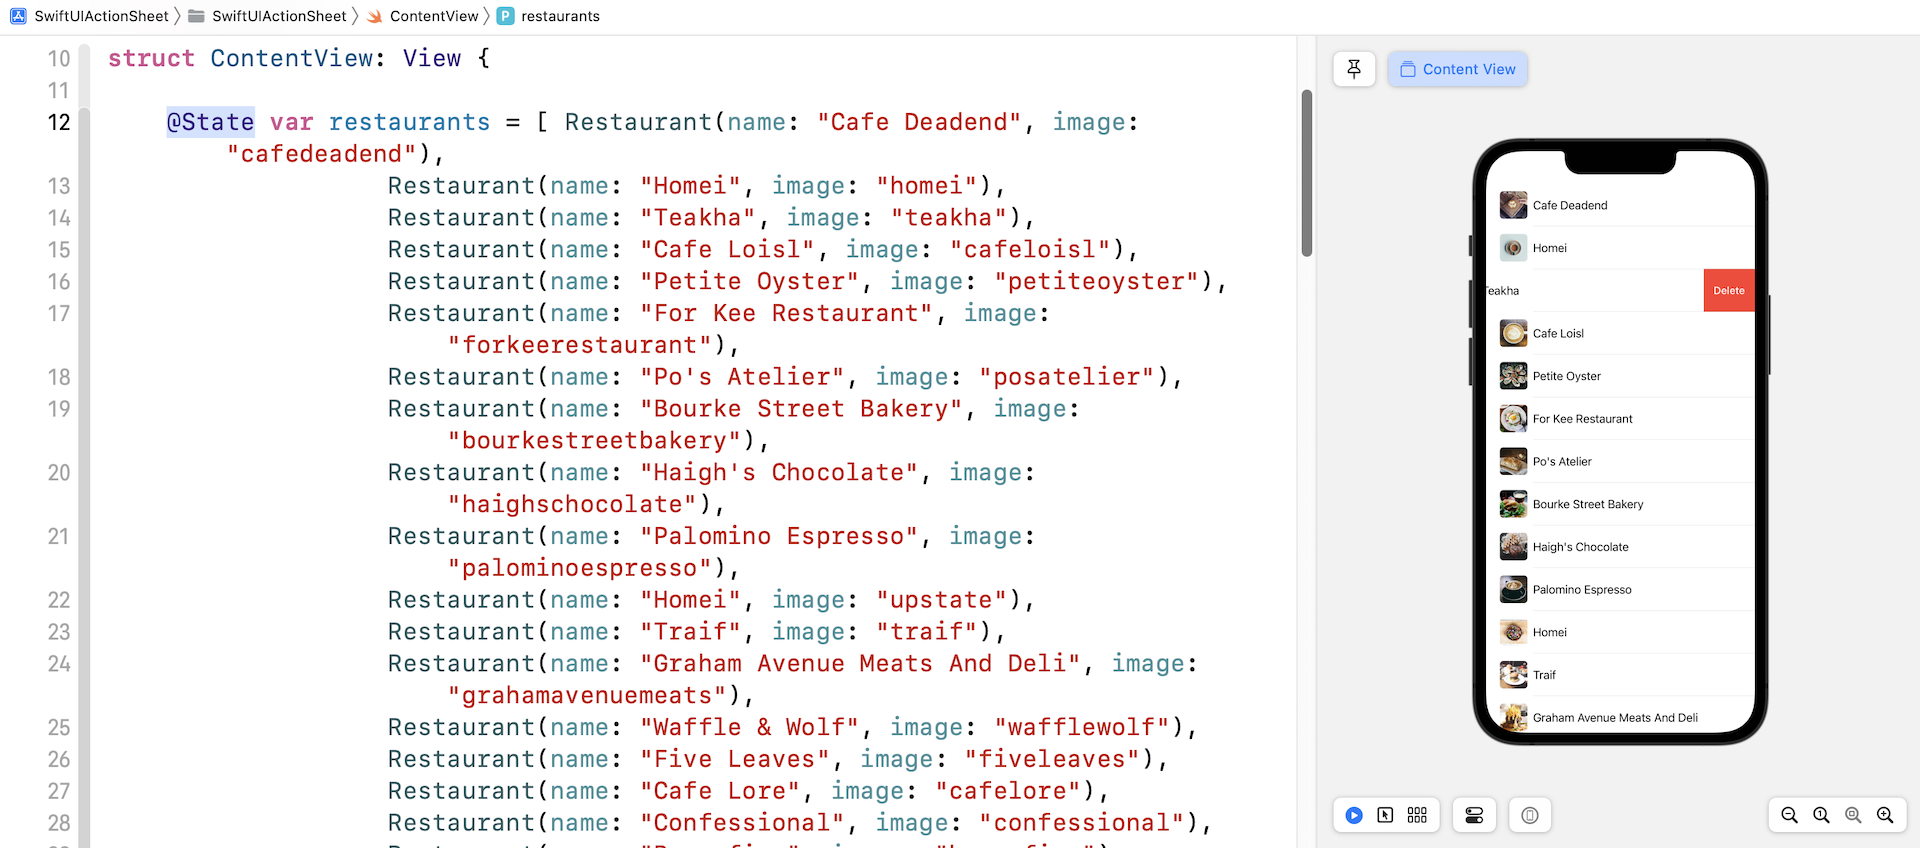
Assuming you have the starter project ready, let's begin implementing the swipe-to-delete feature. I've briefly mentioned the onDelete handler. To activate swipe-to-delete for all rows in a list, you just need to attach this handler to all the row data. So, update the List like this:
List {
    ForEach(restaurants) { restaurant in
        BasicImageRow(restaurant: restaurant)
    }
    .onDelete { (indexSet) in
        self.restaurants.remove(atOffsets: indexSet)
    }
}
.listStyle(.plain)
In the closure of onDelete, we pass an indexSet storing the index of the rows to be deleted. We then call the remove method with the indexSet to delete the specific items in the restaurants array.
There is still one thing left before the swipe-to-delete feature works. Whenever a user removes a row from the list, the UI should be updated accordingly. As discussed in earlier chapters, SwiftUI has come with a very powerful feature to manage the application's state. In our code, the value of the restaurants array will be changed when a user chooses to delete a record. We have to ask SwiftUI to monitor the property and update the UI whenever the value of the property changes.
To do that, insert the @State keyword to the restaurants variable:
@State var restaurants = [ ... ]
Once you have made the change, you're ready to test the delete feature in the preview canvas. Swipe any of the rows to the left to reveal the Delete button. Tap it and that row will be removed from the list. By the way, do you notice the nice animation while the row is being removed? You don't need to write any extra code. This animation is automatically generated by SwiftUI. Cool, right?
If you've written the same feature using UIKit, I'm sure you are amazed by SwiftUI. With just a few lines of code and a keyword, you implemented the swipe-to-delete feature.
Creating a Context Menu
Next, let's talk about context menus. As said, a context menu is similar to peek and pop in 3D Touch. One noticeable difference is that this feature works on all devices running iOS 13 and later, even if the device doesn't support 3D Touch. To bring up a context menu, you use the touch and hold gesture or force touch if the device is powered with 3D Touch.
SwiftUI has made it very simple to implement a context menu. All you need to do is attach the contextMenu container to the view and configure its menu items.
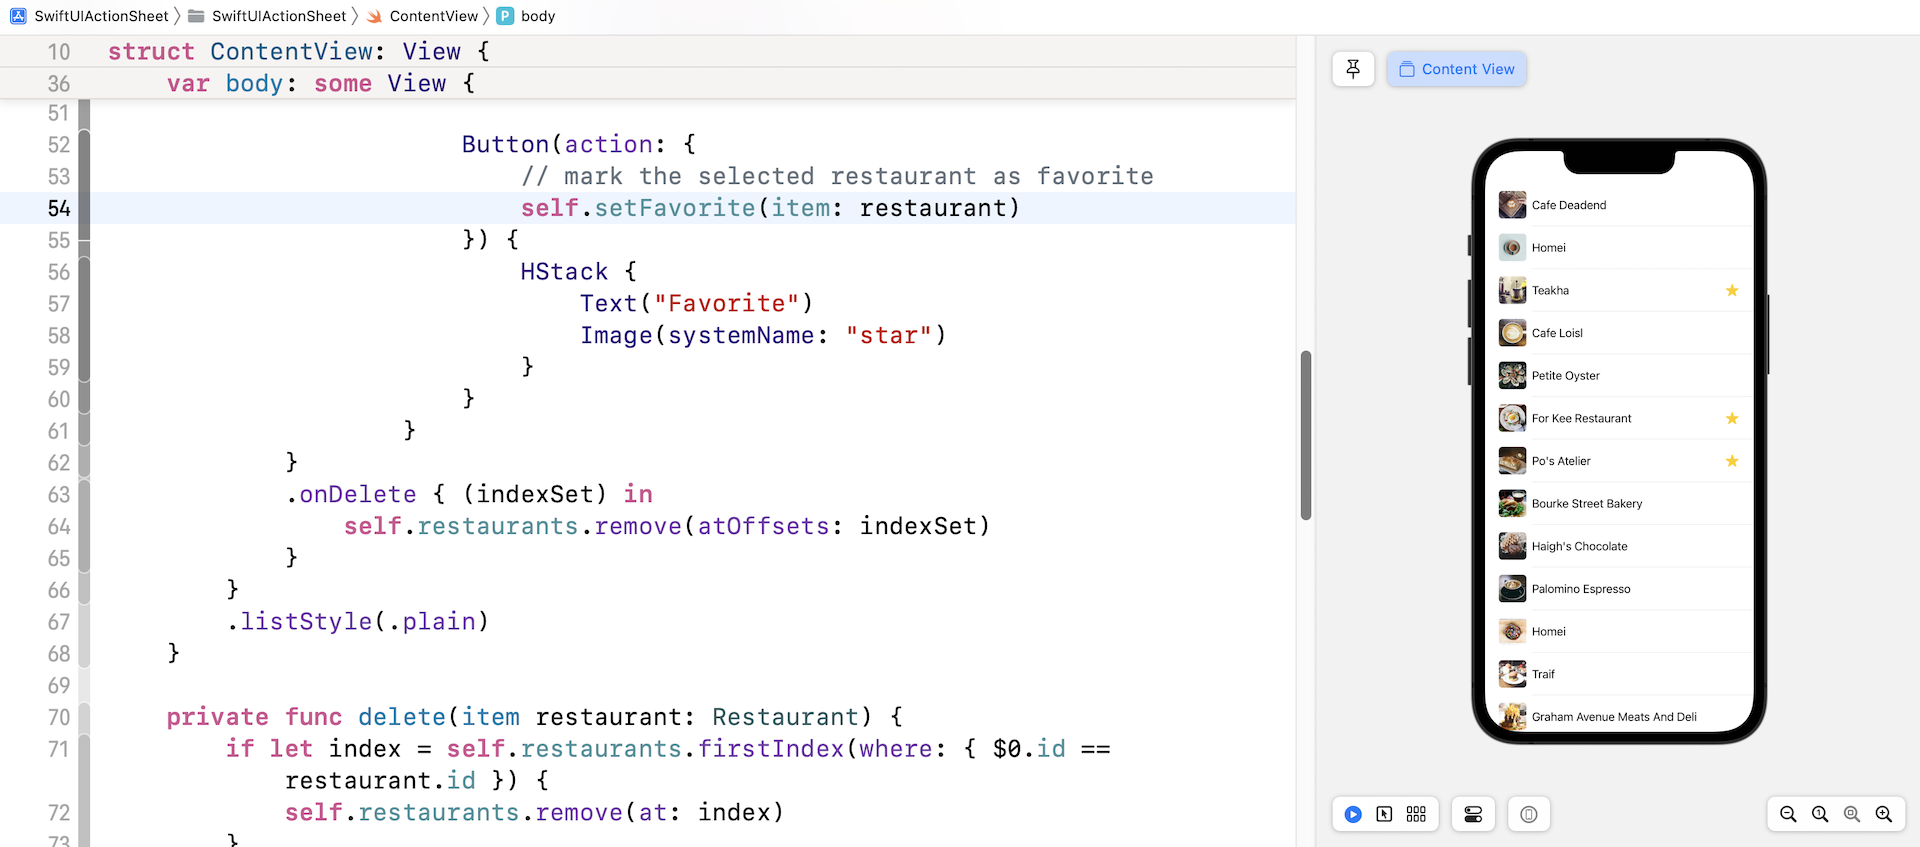
For our demo app, we want to trigger the context menu when people touch and hold any of the rows. The menu provides two action buttons for users to choose: Delete and Favorite. When selected, the Delete button will remove the row from the list. The Favorite button will mark the selected row with a star indicator.
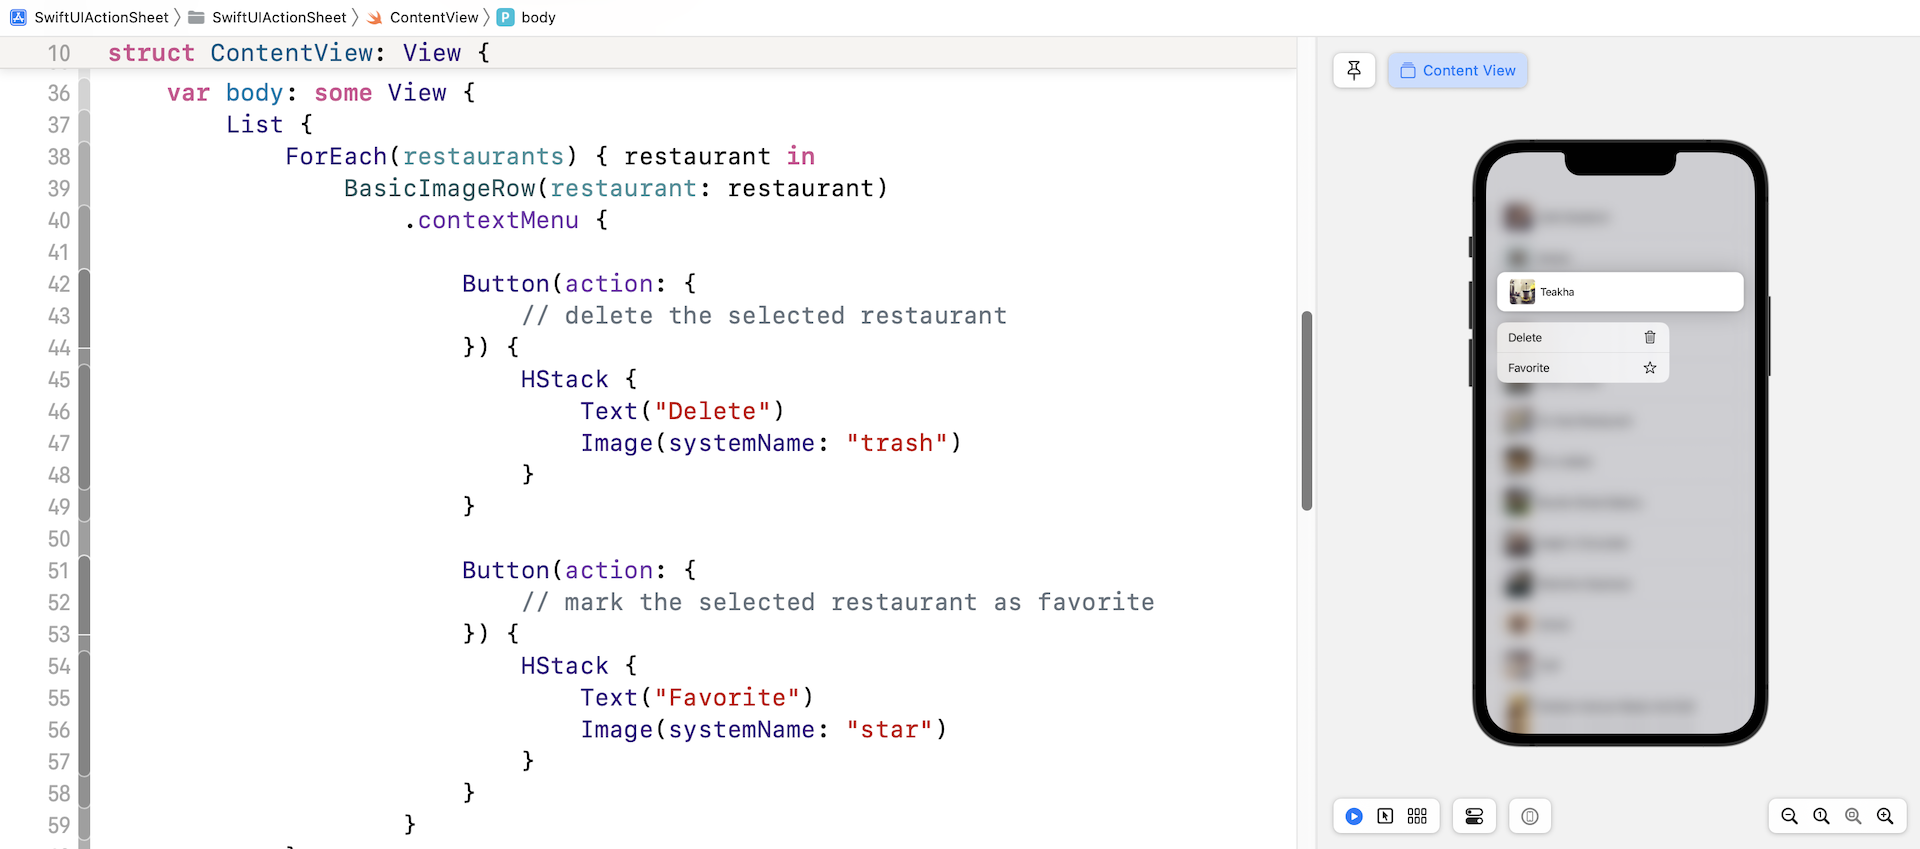
To present these two items in the context menu, we attach the contextMenu to each of the rows in the list like this:
List {
    ForEach(restaurants) { restaurant in
        BasicImageRow(restaurant: restaurant)
            .contextMenu {

                Button(action: {
                    // delete the selected restaurant
                }) {
                    HStack {
                        Text("Delete")
                        Image(systemName: "trash")
                    }
                }

                Button(action: {
                    // mark the selected restaurant as favorite
                }) {
                    HStack {
                        Text("Favorite")
                        Image(systemName: "star")
                    }
                }
            }
    }
    .onDelete { (indexSet) in
        self.restaurants.remove(atOffsets: indexSet)
    }
}
.listStyle(.plain)
We haven't implemented any of the button actions yet. However, if you test the app, the app will bring up the context menu when you touch and hold one of the rows.
Let's continue by implementing the delete action. Unlike the onDelete handler, the contextMenu doesn't give us the index of the selected restaurant. To figure it out, it would require a little bit of work. Create a new function in ContentView:
private func delete(item restaurant: Restaurant) {
    if let index = self.restaurants.firstIndex(where: { $0.id == restaurant.id }) {
        self.restaurants.remove(at: index)
    }
}
This delete function takes in a restaurant object and searches for its index in the restaurants array. To find the index, we call the firstIndex function and specify the search criteria. The function loops through the array and compares the id of the given restaurant with those in the array. If there is a match, the firstIndex function returns the index of the given restaurant. Once we have the index, we can remove the restaurant from the restaurants array by calling remove(at:).
Next, insert the following line of code under // delete the selected restaurant:
self.delete(item: restaurant)
We simply call the delete function when the user selects the Delete button. Now you're ready to test the app. Click the Play button in the canvas to run the app. Press and hold one of the rows to bring up the context menu. Choose Delete and you should see your selected restaurant removed from the list.
Let's move onto the implementation of the Favorite button. When this button is selected, the app will place a star in the selected restaurant's row. To implement this feature, we first need to modify the Restaurant struct and add a new property named isFavorite like this:
struct Restaurant: Identifiable {
    var id = UUID()
    var name: String
    var image: String
    var isFavorite: Bool = false
}
This isFavorite property indicates whether the restaurant is marked as a favorite. By default, it's set to false.
Similar to the Delete feature, we'll create a separate function in ContentView for setting a favorite restaurant. Insert the following code to create the new function:
private func setFavorite(item restaurant: Restaurant) {
    if let index = self.restaurants.firstIndex(where: { $0.id == restaurant.id }) {
        self.restaurants[index].isFavorite.toggle()
    }
}
The code is very similar to that of the delete function. We first find out the index of the given restaurant. Once we have the index, we change the value of its isFavorite property. Here we invoke the toggle function to toggle the value. For example, if the original value of isFavorite is set to false, the value will change to true after calling toggle().
Next, we have to handle the UI for the row. Whenever the restaurant's isFavorite property is set to true, the row should present a star indicator. Update the BasicImageRow struct like this:
struct BasicImageRow: View {
    var restaurant: Restaurant

    var body: some View {
        HStack {
            Image(restaurant.image)
                .resizable()
                .frame(width: 40, height: 40)
                .cornerRadius(5)
            Text(restaurant.name)

            if restaurant.isFavorite {
                Spacer()

                Image(systemName: "star.fill")
                    .foregroundColor(.yellow)
            }
        }
    }
}
In the code above, we just add a code snippet in the HStack. If the isFavorite property of the given restaurant is set to true, we add a spacer and a system image to the row.
That's how we implement the Favorite feature. Lastly, insert the following line of code under // mark the selected restaurant as favorite to invoke the setFavorite function:
self.setFavorite(item: restaurant)
Now it's time to test. Execute the app in the canvas. Press and hold one of the rows (e.g. Petite Oyster), and then choose Favorite. You should see a star app appeared at the end of the row.
Working with Action Sheets
That is how you implement context menus. Lastly, let's see how to create an action sheet in SwiftUI. The action sheet, that we are going to build, provides the same options as the context menu. If you forgot what the action sheet looks like, please refer to figure 1 again.
The SwiftUI framework comes with an ActionSheet view for you to create an action sheet. Basically, you can create an action sheet like this:
ActionSheet(title: Text("What do you want to do"), message: nil, buttons: [.default(Text("Delete"))]
You initialize an action sheet with a title and an option message. The buttons parameter accepts an array of buttons. In the sample code above, it provides a default button titled Delete.
To activate an action sheet, you attach the actionSheet modifier to a button or any view. If you look into SwiftUI's documentation, you have two ways to bring up an action sheet.
You can control the appearance of an action sheet by using the isPresented parameter:
func actionSheet(isPresented: Binding<Bool>, content: () -> ActionSheet) -> some View
Or through an optional binding:
func actionSheet<T>(item: Binding<T?>, content: (T) -> ActionSheet) -> some View where T : Identifiable
We will use both approaches to present the action sheet, so you'll understand when to use which approach.
For the first approach, we need a Boolean variable to represent the status of the action and also a variable of the type Restaurant to store the selected restaurant. So, declare these two variables in ContentView:
@State private var showActionSheet = false

@State private var selectedRestaurant: Restaurant?
By default, the showActionSheet variable is set to false, meaning that the action sheet is not shown. We will toggle this variable to true when a user selects a row. The selectedRestaurant variable, as its name suggests, is designed to hold the chosen restaurant. Both variables have the @State keyword because we want SwiftUI to monitor their changes and update the UI accordingly.
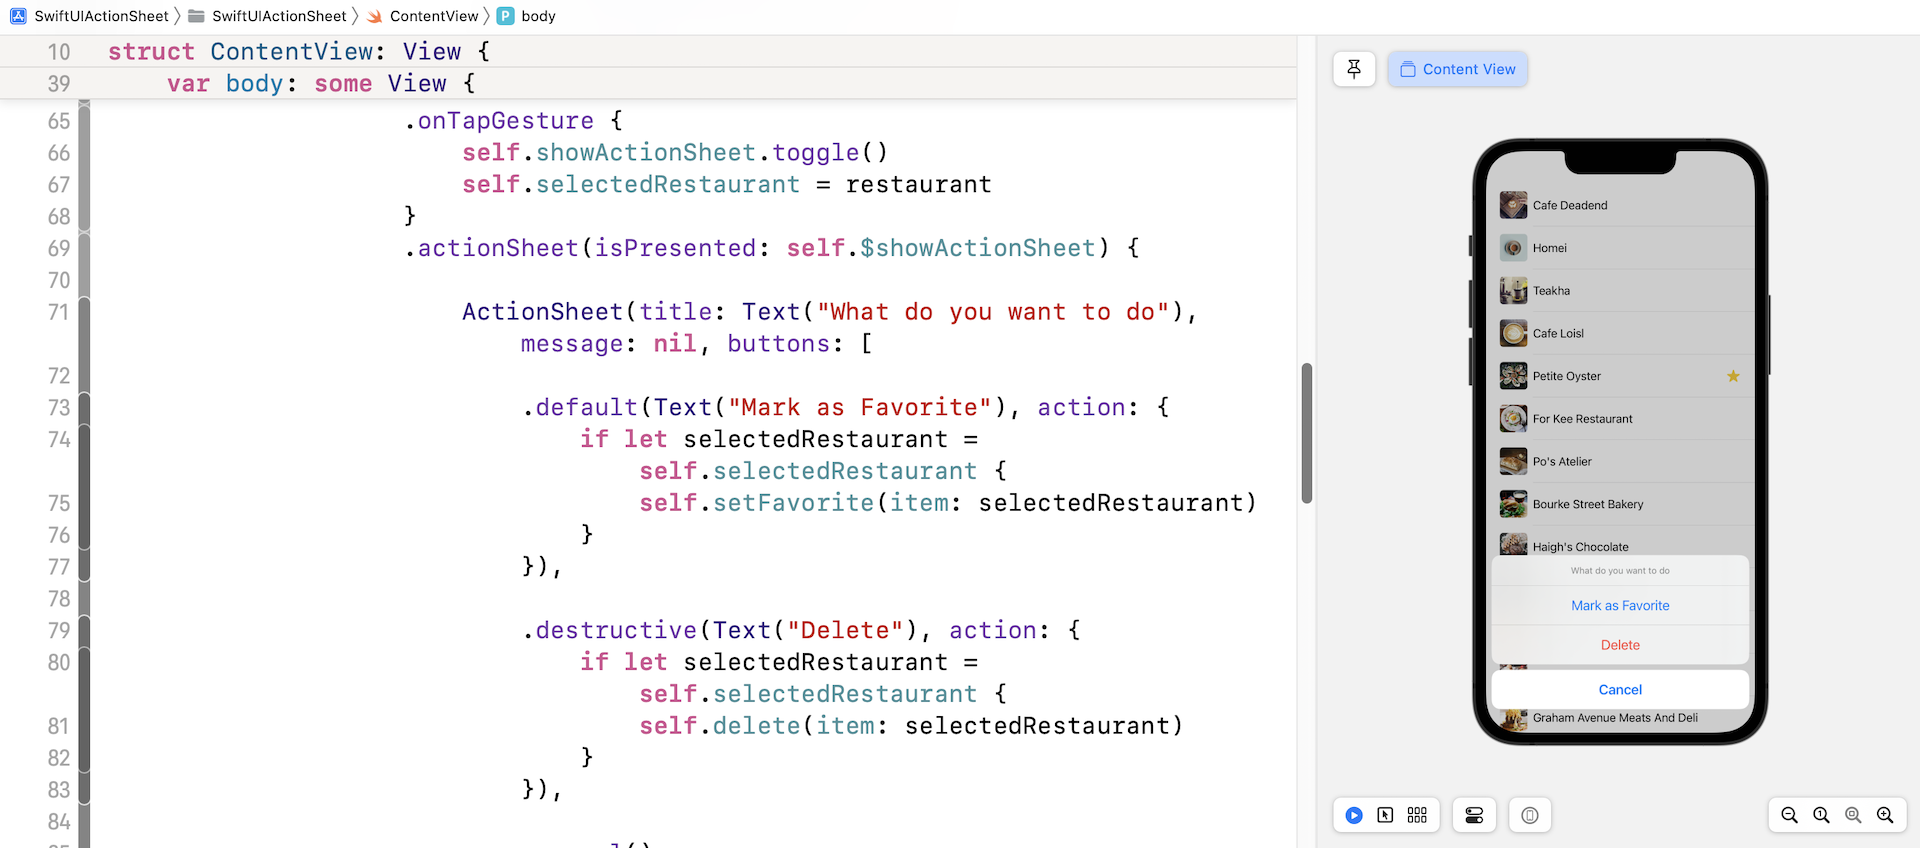
Next, attach the onTapGesture and actionSheet modifiers to the List view like this:
List {
    ForEach(restaurants) { restaurant in
        BasicImageRow(restaurant: restaurant)
            .contextMenu {

                ...
            }
            .onTapGesture {
                self.showActionSheet.toggle()
                self.selectedRestaurant = restaurant
            }
            .actionSheet(isPresented: self.$showActionSheet) {

                ActionSheet(title: Text("What do you want to do"), message: nil, buttons: [

                    .default(Text("Mark as Favorite"), action: {
                        if let selectedRestaurant = self.selectedRestaurant {
                            self.setFavorite(item: selectedRestaurant)
                        }
                    }),

                    .destructive(Text("Delete"), action: {
                        if let selectedRestaurant = self.selectedRestaurant {
                            self.delete(item: selectedRestaurant)
                        }
                    }),

                    .cancel()
                ])
            }
    }
    .onDelete { (indexSet) in
        self.restaurants.remove(atOffsets: indexSet)
    }
}
The onTapGesture modifier, attached to each row, is used to detect users' touch. When a row is tapped, the block of code in onTapGesture will be run. Here, we toggle the showActionSheet variable and set the selectedRestaurant variable to the selected restaurant.
Earlier, I explained the usage of the actionSheet modifier. In the code above, we pass the isPresented parameter with the binding of showActionSheet. When showActionSheet is set to true, the block of code will be executed. We initiate an ActionSheet with three buttons: Mark as Favorite, Delete, and Cancel. Action sheet comes with three types of buttons including default, destructive, and cancel. You usually use the default button type for ordinary actions. A destructive button is very similar to a default button but the font color is set to red to indicate destructive actions such as delete. The cancel button is a special type for dismissing the action sheet.
The Mark as Favorite button, is our default button. In the action closure, we call the setFavorite function to add the star. For the destructive button we used Delete. Similar to the Delete button of the context menu, we call the delete function to remove the selected restaurant.
If you've made the changes correctly, you should be able to bring up the action sheet when you tap one of the rows in the list view. Selecting the Delete button will remove the row. If you choose the Mark as Favorite option, you will mark the row with a yellow star.
Everything works great, but I promised you to walk you through the second approach of using the actionSheet modifier. The first approach, which we have covered, relies on a Boolean value (i.e. showActionSheet) to indicate whether the action sheet should be displayed.
The second approach triggers the action sheet through an optional Identifiable binding:
func actionSheet<T>(item: Binding<T?>, content: (T) -> ActionSheet) -> some View where T : Identifiable
In plain English, this means the action sheet will be shown when the item you pass has a value. For our case, the selectedRestaurant variable is an optional that conforms to the Identifiable protocol. To use the second approach, you just need to pass the selectedRestaurant binding to the actionSheet modifier like this:
.actionSheet(item: self.$selectedRestaurant) { restaurant in

    ActionSheet(title: Text("What do you want to do"), message: nil, buttons: [

        .default(Text("Mark as Favorite"), action: {
            self.setFavorite(item: restaurant)
        }),

        .destructive(Text("Delete"), action: {
            self.delete(item: restaurant)
        }),

        .cancel()
    ])
}
If the selectedRestaurant has a value, the app will bring up the action sheet. From the closure's parameter, you can retrieve the selected restaurant and perform the operations accordingly.
When you use this approach, you no longer need the boolean variable shownActionSheet. You can remove it from the code:
@State private var showActionSheet = false
Also, in the tapGesture modifier, remove the line of the code that toggles the showActionSheet variable:
self.showActionSheet.toggle()
Test the app again. The action sheet looks still the same, but you implemented the action sheet with a different approach.
Exercise
Now that you have some idea how to build a context menu, let's have an exercise to test your knowledge. Your task is to add a Check-in item in the context menu. When a user selects the option, the app will add a check-in indicator in the selected restaurant. You can refer to figure 7 for the sample UI. For the sample, I used the system image named checkmark.seal.fill for the check-in indicator. However, you are free to choose your own image.
Please take some time to work on the exercise before checking out the solution. Have fun!
For reference, you can download the complete project here:
- Demo project and solution to exercise (https://www.appcoda.com/resources/swiftui4/SwiftUIActionSheet.zip)