- Made by AppCoda
- Contact us / Support
- Tweet this book
- Preface
- 1. Introduction to SwiftUI
- 2. Getting Started with SwiftUI and Working with Text
- 3. Working with Images
- 4. Layout User Interfaces with Stacks
- 5. Understanding ScrollView and Building a Carousel UI
- 6. Working with SwiftUI Buttons and Gradient
- 7. Understanding State and Binding
- 8. Implementing Path and Shape for Line Drawing and Pie Charts
- 9. Basic Animations and Transitions
- 10. Understanding Dynamic List, ForEach and Identifiable
- 11. Working with Navigation UI and Navigation Bar Customization
- 12. Playing with Modal Views, Floating Buttons and Alerts
- 13. Building a Form with Picker, Toggle and Stepper
- 14. Data Sharing with Combine and Environment Objects
- 15. Building a Registration Form with Combine and View Model
- 16. Working with Swipe-to-Delete, Context Menu and Action Sheets
- 17. Using Gestures
- 18. Displaying an Expandable Bottom Sheet Using Presentation Detents
- 19. Creating a Tinder-like UI with Gestures and Animations
- 20. Creating an Apple Wallet like Animation and View Transition
- 21. Working with JSON, Slider and Data Filtering
- 22. Building a ToDo app with Core Data
- 23. Integrating UIKit with SwiftUI Using UIViewRepresentable
- 24. Creating a Search Bar View and Working with Custom Binding
- 25. Putting Everything Together to Build a Real World App
- 26. Creating an App Store like Animated View Transition
- 27. Building an Image Carousel
- 28. Building an Expandable List View Using OutlineGroup
- 29. Building Grid Layout Using LazyVGrid and LazyHGrid
- 30. Creating an Animated Activity Ring with Shape and Animatable
- 31. Working with AnimatableModifier and LibraryContentProvider
- 32. Working with TextEditor to Create Multiline Text Fields
- 33. Using matchedGeometryEffect to Create View Animations
- 34. ScrollViewReader and Grid Animation
- 35. Working with Tab View and Tab Bar Customization
- 36. Using AsyncImage in SwiftUI for Loading Images Asynchronously
- 37. Implementing Search Bar Using Searchable
- 38. Creating Bar Charts and Line Charts with the Charts Framework
- 39. Capturing Text within Image Using Live Text APIs
- 40. How to Use ShareLink for Sharing Data Like Text and Photos
- 41. Using ImageRenderer to Convert SwiftUI Views into Images
- 42. Creating PDF Documents Using ImageRenderer
- 43. Using Gauge to Display Progress and Create a Speedometer
- 44. Creating Grid Layout Using Grid APIs
- 45. Switching Layout with AnyLayout
- Published with GitBook
Chapter 21
Working with JSON, Slider and Data Filtering
JSON, short for JavaScript Object Notation, is a common data format for data interchange in client-server applications. Even though we are mobile app developers, it's inevitable to work with JSON since nearly all web APIs or backend web services use JSON as the data exchange format.
In this chapter, we will discuss how you can work with JSON while building an app using the SwiftUI framework. If you have never worked with JSON, I would recommend you read this free chapter from our Intermediate programming book. It will explain to you, in detail, the two different approaches in handling JSON in Swift.
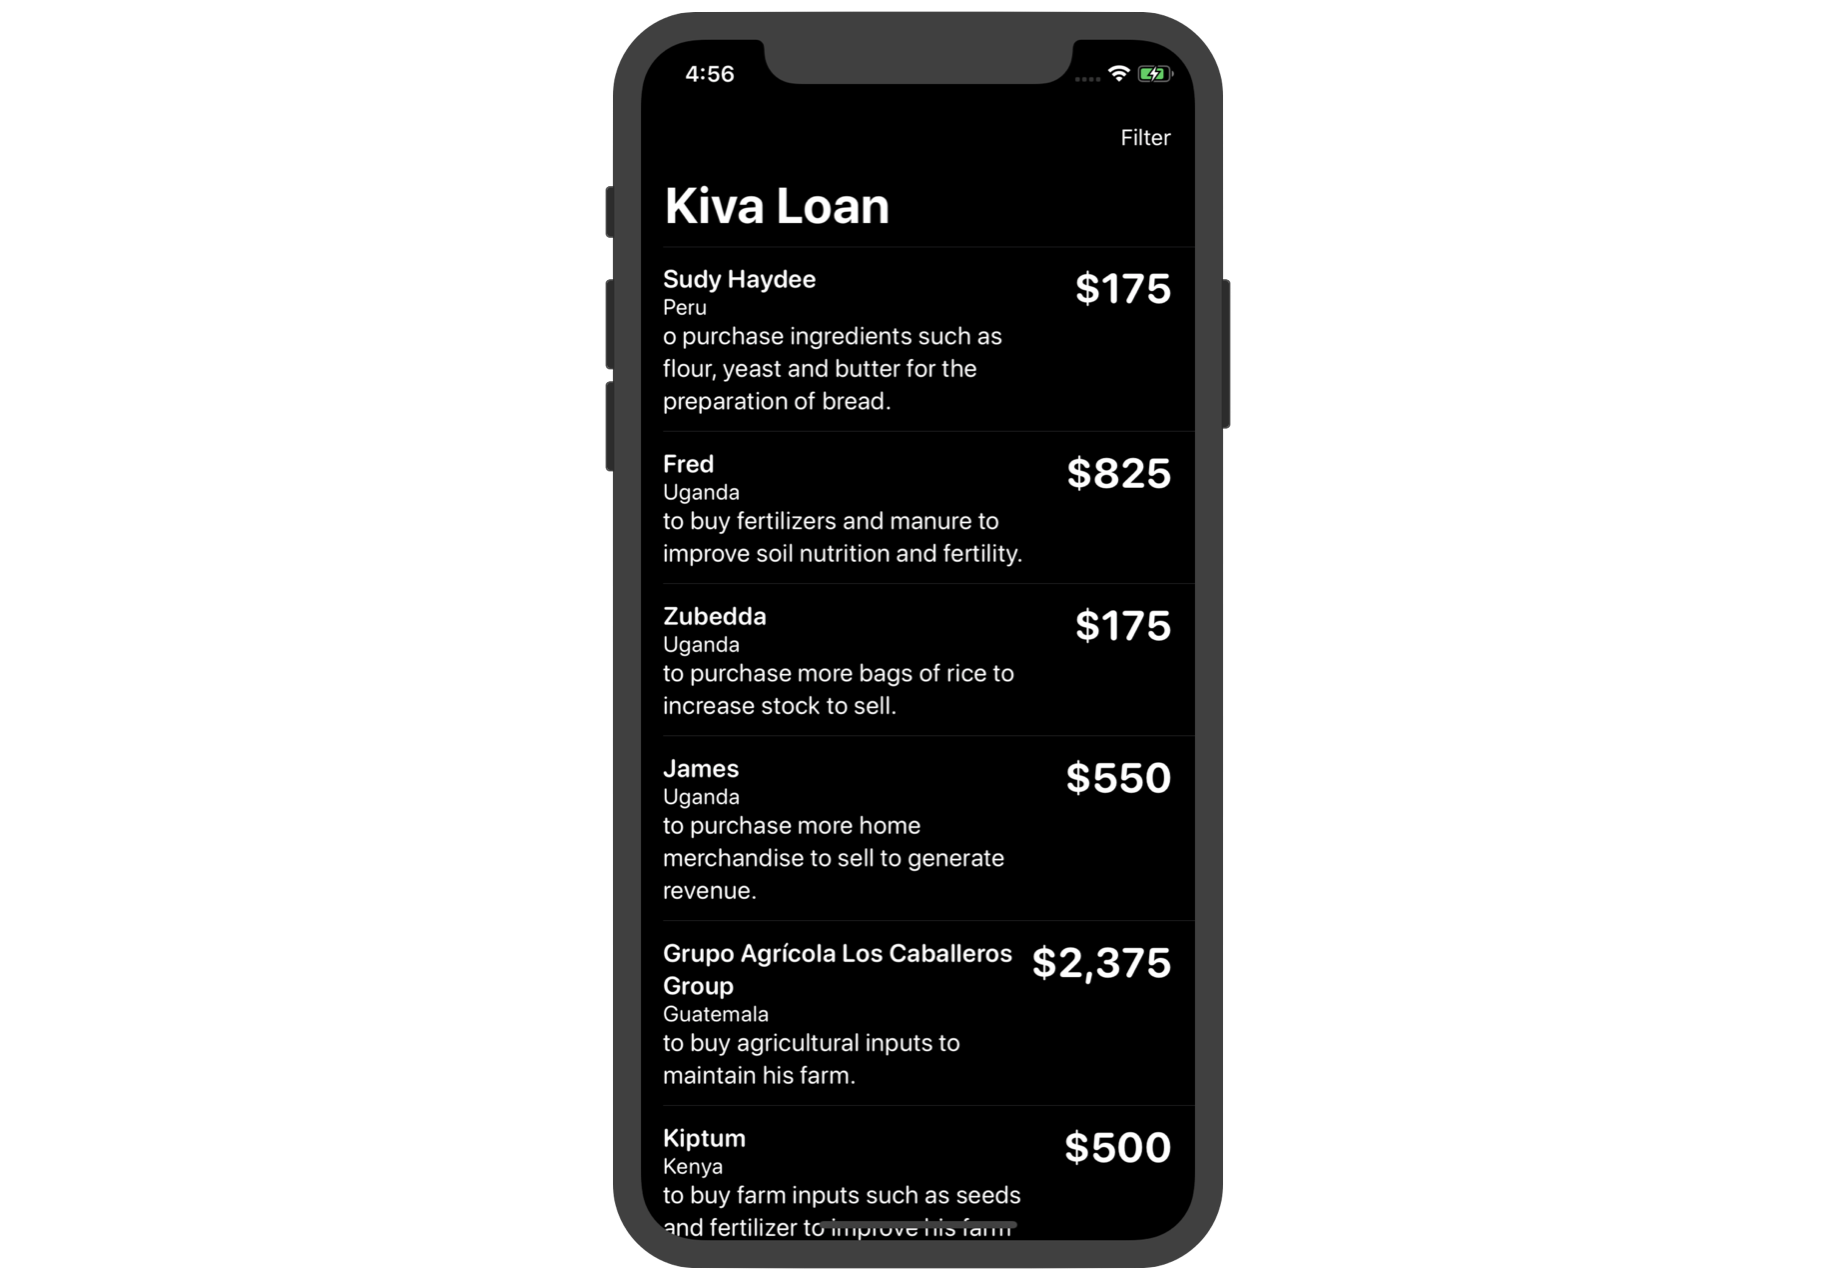
As usual, in order to learn about JSON and its related APIs, you will build a simple JSON app that utilizes a JSON-based API provided by Kiva.org. If you haven't heard of Kiva, it is a non-profit organization with a mission to connect people through lending to alleviate poverty. It lets individuals lend as little as $25 to help create opportunities around the world. Kiva provides free web-based APIs for developers to access their data. For our demo app, we'll call up a free Kiva API to retrieve the most recent fundraising loans and display them in a list view as shown in figure 1.
Additionally, we will demonstrate the usage of a Slider, which is one of the many built-in UI controls provided by SwiftUI. With the slider, you will implement a data filtering option in the app so that users can filter the loan data in the list.

Understanding JSON and Codable
First things first, What does the JSON format look like? If you have no idea what JSON looks like, open a browser and point it to the following web API, provided by Kiva:
https://api.kivaws.org/v1/loans/newest.json
You should see something like this:
{
    "loans": [
        {
            "activity": "Fruits & Vegetables",
            "basket_amount": 25,
            "bonus_credit_eligibility": false,
            "borrower_count": 1,
            "description": {
                "languages": [
                    "en"
                ]
            },
            "funded_amount": 0,
            "id": 1929744,
            "image": {
                "id": 3384817,
                "template_id": 1
            },
            "lender_count": 0,
            "loan_amount": 250,
            "location": {
                "country": "Papua New Guinea",
                "country_code": "PG",
                "geo": {
                    "level": "town",
                    "pairs": "-9.4438 147.180267",
                    "type": "point"
                },
                "town": "Port Moresby"
            },
            "name": "Mofa",
            "partner_id": 582,
            "planned_expiration_date": "2020-04-02T08:30:11Z",
            "posted_date": "2020-03-03T09:30:11Z",
            "sector": "Food",
            "status": "fundraising",
            "tags": [],
            "themes": [
                "Vulnerable Groups",
                "Rural Exclusion",
                "Underfunded Areas"
            ],
            "use": "to purchase additional vegetables to increase her currrent sales."
        },

        ...

        "paging": {
        "page": 1,
        "page_size": 20,
        "pages": 284,
        "total": 5667
    }
}
Your results may not be formatted the same but this is what a JSON response looks like. If you're using Chrome, you can download and install an extension called JSON Formatter (http://link.appcoda.com/json-formatter) to beautify the JSON response.
Alternatively, you can format the JSON data on Mac by using the following command:
curl https://api.kivaws.org/v1/loans/newest.json | python -m json.tool > kiva-loans-data.txt
This will format the response and save it to a text file.
Now that you have seen JSON, Let's learn how to parse JSON data in Swift. Starting with Swift 4, Apple introduced a new way to encode and decode JSON data by adopting a protocol called Codable.
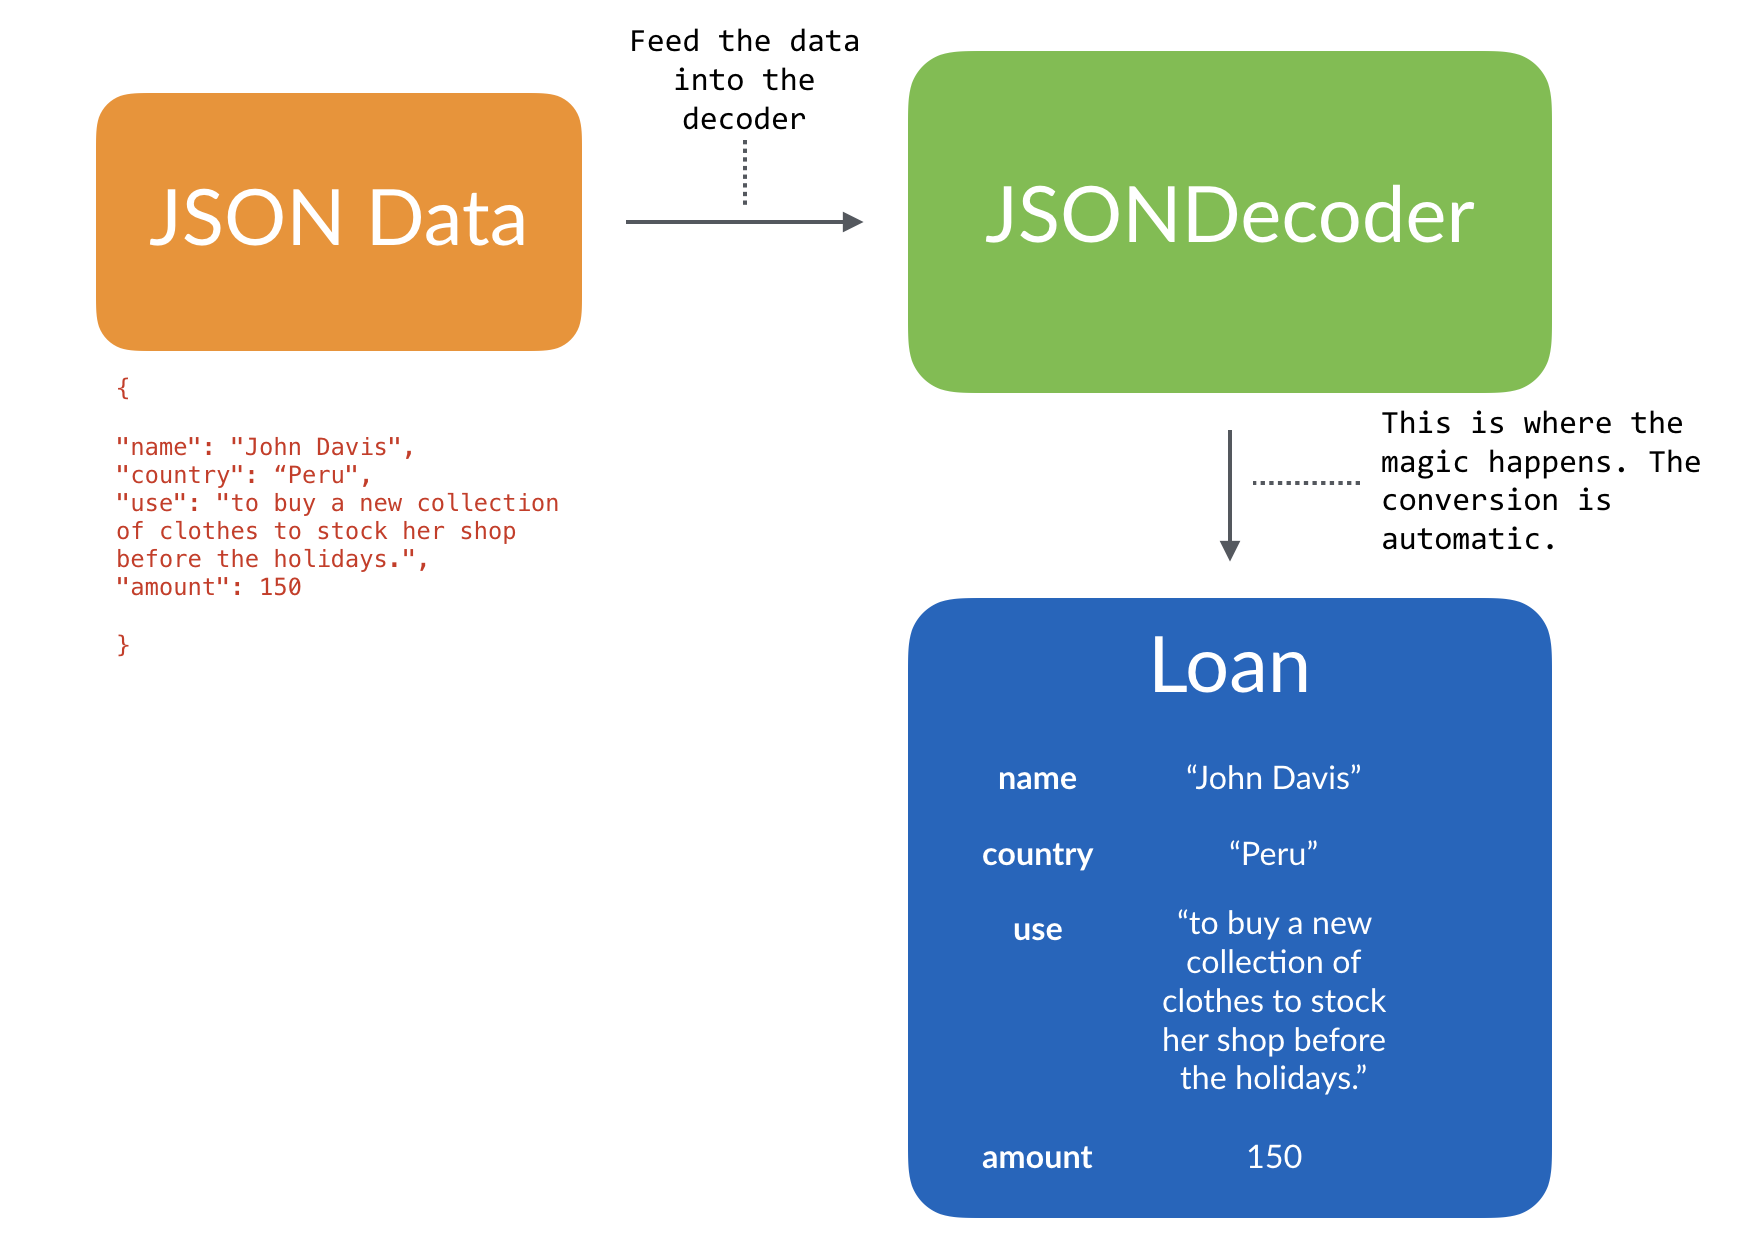
Codable simplifies the whole process by offering developers a different way to decode (or encode) JSON. As long as your type conforms to the Codable protocol, together with the new JSONDecoder, you will be able to decode the JSON data into your specified instances.
Figure 3 illustrates the decoding of sample loan data into an instance of Loan using JSONDecoder.
Using JSONDecoder and Codable
Before building the demo app, let's try out JSON decoding on Playgrounds. Fire up Xcode and open a new Playground project (Go up to Xcode menu and choose File > New > Playground...). Once you have created your Playground project, declare the following json variable:
let json = """
{

"name": "John Davis",
"country": "Peru",
"use": "to buy a new collection of clothes to stock her shop before the holidays.",
"amount": 150

}
"""
Assuming you're new to JSON parsing, let's make things simple. The above is a simplified JSON response, similar to that shown in the previous section.
To parse the data, declare the Loan structure like this:
struct Loan: Codable {
    var name: String
    var country: String
    var use: String
    var amount: Int
}
As you can see, the structure adopts the Codable protocol. The variables defined in the structure match the keys of the JSON response. This is how you let the decoder know how to decode the data.
Now let's see the magic!
Continue to insert the following code in your Playground file:
let decoder = JSONDecoder()

if let jsonData = json.data(using: .utf8) {

    do {
        let loan = try decoder.decode(Loan.self, from: jsonData)
        print(loan)

    } catch {
        print(error)
    }
}
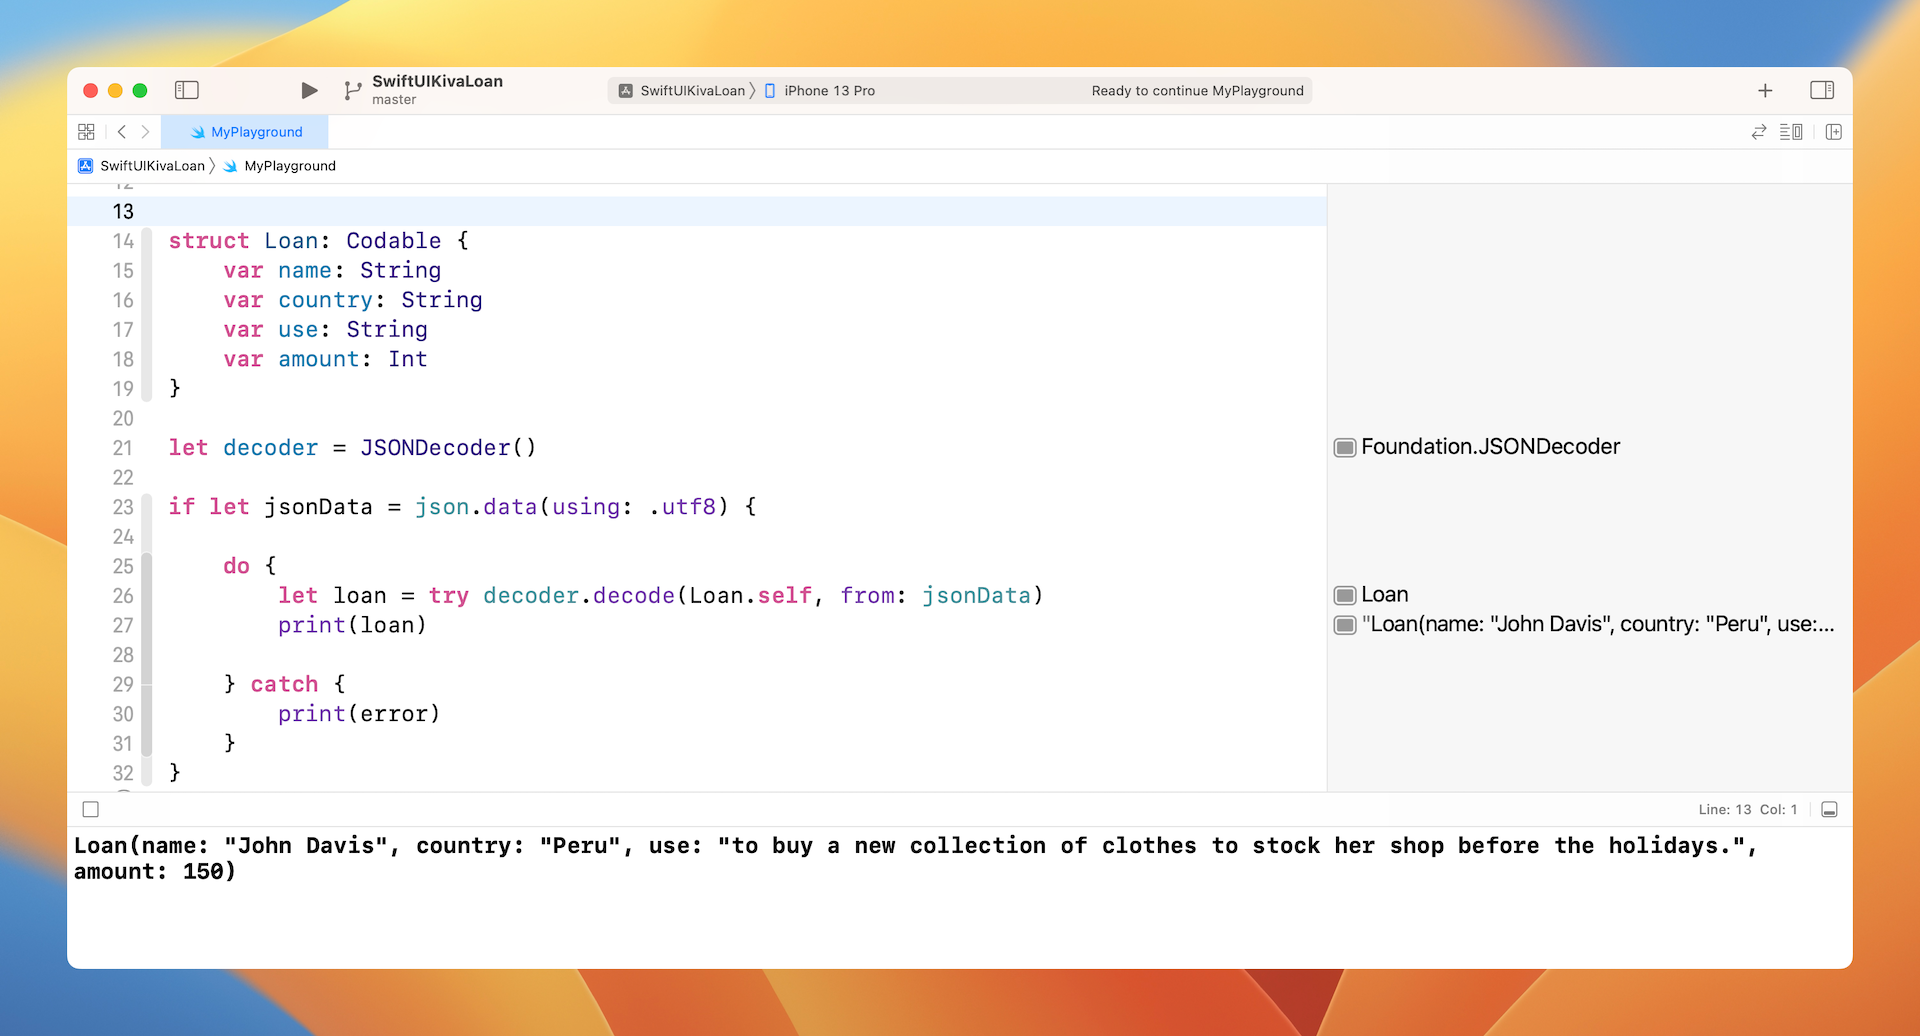
If you run the project, you should see a message displayed in the console. That's a Loan instance, populated with the decoded values.
Let's look into the code snippet again. We instantiate an instance of JSONDecoder and then convert the JSON string into Loan. The magic happened in this line of code:
let loan = try decoder.decode(Loan.self, from: jsonData)
You just need to call the decode method of the decoder with the JSON data and specify the type of value to decode (i.e. Loan.self). The decoder will automatically parse the JSON data and convert them into a Loan object.
Cool, right?
Working with Custom Property Names
Now, let's jump into something more complicated. What if the name of the property and the key of the JSON are different? How can you define the mapping?
For example, we modify the json variable like this:
let json = """
{

"name": "John Davis",
"country": "Peru",
"use": "to buy a new collection of clothes to stock her shop before the holidays.",
"loan_amount": 150

}
"""
As you can see, the key amount is now loan_amount. In order to decode the JSON data, you can modify the property name from amount to loan_amount. However, we really want to keep the name amount. In this case, how can we define the mapping?
To define the mapping between the key and the property name, you are required to declare an enum called CodingKeys that has a rawValue of type String and conforms to the CodingKey protocol.
Now update the Loan structure like this:
struct Loan: Codable {
    var name: String
    var country: String
    var use: String
    var amount: Int

    enum CodingKeys: String, CodingKey {
        case name
        case country
        case use
        case amount = "loan_amount"
    }
}
In the enum, you define all the property names of your model and their corresponding keys in the JSON data. For example, the case amount is defined to map to the key loan_amount. If both the property name and the key of the JSON data are the same, you can omit the assignment.
Working with Nested JSON Objects
Now that you understand the basics, let's dive even deeper and decode a more realistic JSON response. First, update the json variable like this:
let json = """
{

"name": "John Davis",
"location": {
"country": "Peru",
},
"use": "to buy a new collection of clothes to stock her shop before the holidays.",
"loan_amount": 150

}
"""
We've added the location key that has a nested JSON object with the nested key country. So, how do we decode the value of country from the nested object?
Let's modify the Loan structure like this:
struct Loan: Codable {
    var name: String
    var country: String
    var use: String
    var amount: Int

    enum CodingKeys: String, CodingKey {
        case name
        case country = "location"
        case use
        case amount = "loan_amount"
    }

    enum LocationKeys: String, CodingKey {
        case country
    }

    init(from decoder: Decoder) throws {
        let values = try decoder.container(keyedBy: CodingKeys.self)

        name = try values.decode(String.self, forKey: .name)

        let location = try values.nestedContainer(keyedBy: LocationKeys.self, forKey: .country)
        country = try location.decode(String.self, forKey: .country)

        use = try values.decode(String.self, forKey: .use)
        amount = try values.decode(Int.self, forKey: .amount)

    }
}
Similar to what we have done earlier, we have to define an enum CodingKeys. For the case country, we specify to map to the key location. To handle the nested JSON object, we need to define an additional enumeration. In the code above, we name it LocationKeysand declare the case country that matches the key country of the nested object.
Since it is not a direct mapping, we need to implement the initializer of the Decodable protocol to handle the decoding of all properties. In the init method, we first invoke the container method of the decoder with CodingKeys.self to retrieve the data related to the specified coding keys, which are name, location, use and amount.
To decode a specific value, we call the decode method with the specific key (e.g. .name) and the associated type (e.g. String.self). The decoding of the name, use and amount is pretty straightforward. For the country property, the decoding is a little bit tricky. We have to call the nestedContainer method with LocationKeys.self to retrieve the nested JSON object. From the values returned, we further decode the value of country.
That is how you decode JSON data with nested objects.
Working with Arrays
The JSON data returned from Kiva API comes with more than one loan. Multiple loans are structured in the form of an array. Let's see how to decode an array of JSON objects using Codable.
First, modify the json variable like this:
let json = """
{
"loans":
[{
"name": "John Davis",
"location": {
"country": "Paraguay",
},
"use": "to buy a new collection of clothes to stock her shop before the holidays.",
"loan_amount": 150
},
{
"name": "Las Margaritas Group",
"location": {
"country": "Colombia",
},
"use": "to purchase coal in large quantities for resale.",
"loan_amount": 200
}]
}
"""
In the example above, there are two loans in the json variable. How do you decode it into an array of Loan?
To do that, declare another struct named LoanStore that also adopts Codable:
struct LoanStore: Codable {
    var loans: [Loan]
}
This LoanStore only has a loans property that matches the key loans of the JSON data. And, its type is defined as an array of Loan.
To decode the loans, modify this line of code from:
let loan = try decoder.decode(Loan.self, from: jsonData)
to:
let loanStore = try decoder.decode(LoanStore.self, from: jsonData)
The decoder will automatically decode the loans JSON objects and store them into the loans array of LoanStore. To print out the loans replace the line print(loan) with
for loan in loanStore.loans {
    print(loan)
}
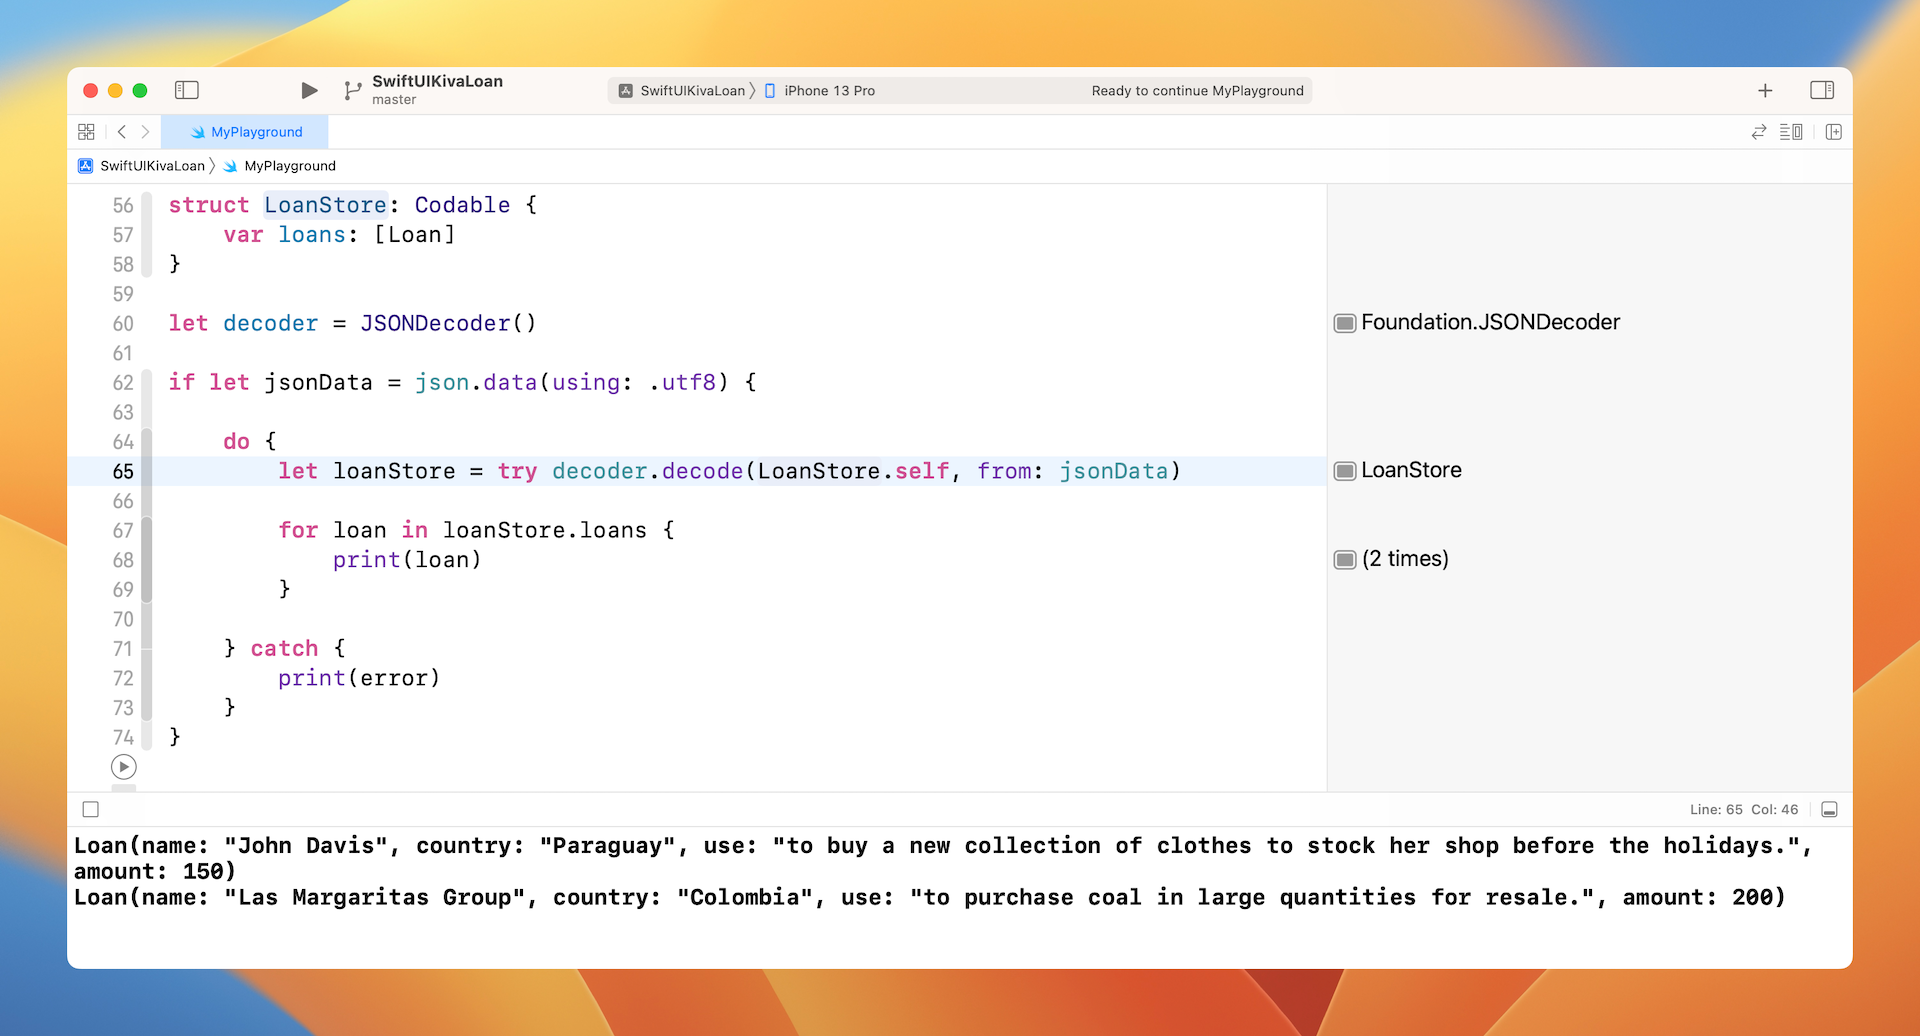
You should see a similar message as shown in figure 5.
That's how you decode JSON using Swift.
Note: For reference, the Playgrounds project is included in the final deliverable. You can find the download link at the end of this chapter.
Building the Kiva Loan App
Okay, you should now understand how to handle JSON decoding. Let's begin to build the demo app and see how you apply the skills you just learned.
Assuming you have launched Xcode, go up to the menu and select File > New > Projects to create a new project. As usual, use the App template. Name the project SwiftUIKivaLoan or whatever name you prefer.
We will start by building the model class that stores all the latest loans retrieved from Kiva. We will handle the implementation of user interface later.
Retrieving the Latest Loans from Kiva
First, create a new file using the Swift File template and name it Loan.swift. This file stores the Loan structure that adopts the Codable protocol for JSON decoding.
Insert the following code in the file:
struct Loan: Identifiable {
    var id = UUID()
    var name: String
    var country: String
    var use: String
    var amount: Int

    init(name: String, country: String, use: String, amount: Int) {
        self.name = name
        self.country = country
        self.use = use
        self.amount = amount
    }

}

extension Loan: Codable {
    enum CodingKeys: String, CodingKey {
        case name
        case country = "location"
        case use
        case amount = "loan_amount"
    }

    enum LocationKeys: String, CodingKey {
        case country
    }

    init(from decoder: Decoder) throws {
        let values = try decoder.container(keyedBy: CodingKeys.self)

        name = try values.decode(String.self, forKey: .name)

        let location = try values.nestedContainer(keyedBy: LocationKeys.self, forKey: .country)
        country = try location.decode(String.self, forKey: .country)

        use = try values.decode(String.self, forKey: .use)
        amount = try values.decode(Int.self, forKey: .amount)

    }
}
The code is almost the same as we discussed in the previous section. We just use an extension to adopt the Codable protocol. Other than Codable, this structure also adopts the Identifiable protocol and has an id property default to UUID(). Later, we will use SwiftUI's List control to present the loans. This is why we make this structure adopt the Identifiable protocol.
Next, create another file using the Swift File template and name it LoanStore.swift. This class is to connect to the Kiva's web API, decode the JSON data, and store them locally.
Let's write the LoanStore class step by step, so you can better understand how I came up with the implementation. Insert the following code in LoanStore.swift:
class LoanStore: Decodable {
    var loans: [Loan] = []
}
Later, the decoder will decode the loans JSON objects and store them into the loans array of LoanStore. This is why we create the LoanStore like above. The code looks very similar to the LoanStore structure we created before. However, it adopts the Decodable protocol instead of Codable.
If you look into the documentation of Codable, it is just a type alias of a protocol composition:
typealias Codable = Decodable & Encodable
Decodable and Encodable are the two actual protocols you need to work with. Since LoanStore is only responsible for handling the JSON decoding, we adopt the Decodable protocol.
As mentioned earlier, we will display the loans using a List view. So, other than Decodable, we have to adopt the ObservableObject protocol and mark the loans variable with the @Published property wrapper like this:
class LoanStore: Decodable, ObservableObject {
    @Published var loans: [Loan] = []
}
By doing so, SwiftUI will manage the UI update automatically whenever there is any change to the loans variable. If you have forgotten what ObservableObject is, please read chapter 14 again.
Once you add the @Published property wrapper, Xcode shows you an error. The Decodable (or Codable) protocol doesn't play well with @Published.

To fix the error, requires some extra work. When the @Published property wrapper is used, we need to implement the required method of Decodable manually. If you look into the documentation (https://developer.apple.com/documentation/swift/decodable), here is the method to adopt:
init(from decoder: Decoder) throws
Actually, we've implemented the method before when decoding the nested JSON objects. Now, update the class like this:
class LoanStore: Decodable, ObservableObject {
    @Published var loans: [Loan] = []

    enum CodingKeys: CodingKey {
        case loans
    }

    required init(from decoder: Decoder) throws {
        let values = try decoder.container(keyedBy: CodingKeys.self)
        loans = try values.decode([Loan].self, forKey: .loans)
    }

    init() {

    }
}
We added the CodingKeys enum that explicitly specifies the key to decode. And then, we implemented the custom initializer to handle the decoding.
Okay, the error is now fixed. What's next?
Calling the Web API
So far, we just set up everything for JSON decoding but we haven't consumed the web API. Declare a new variable in the LoanStore class to store the URL of the Kiva's API:
private static var kivaLoanURL = "https://api.kivaws.org/v1/loans/newest.json"
Next, insert the following methods in the class:
func fetchLatestLoans() {
    guard let loanUrl = URL(string: Self.kivaLoanURL) else {
        return
    }

    let request = URLRequest(url: loanUrl)
    let task = URLSession.shared.dataTask(with: request, completionHandler: { (data, response, error) -> Void in

        if let error = error {
            print(error)
            return
        }

        // Parse JSON data
        if let data = data {
            DispatchQueue.main.async {
                self.loans = self.parseJsonData(data: data)
            }

        }
    })

    task.resume()
}

func parseJsonData(data: Data) -> [Loan] {

    let decoder = JSONDecoder()

    do {

        let loanStore = try decoder.decode(LoanStore.self, from: data)
        self.loans = loanStore.loans

    } catch {
        print(error)
    }

    return loans
}
The fetchLatestLoans() method connects to the web API by using URLSession. Once it receives the data returned by the API, it passes the data to the parseJsonData method to decode the JSON and convert the loan data into an array of Loan.
You may wonder why we need to wrap the following line of code with DispatchQueue.main.async:
DispatchQueue.main.async {
    self.loans = self.parseJsonData(data: data)
}
When calling the web API, the operation is performed in a background queue. Here, the loans variable is marked as @Published. That means, for any modification of the variable, SwiftUI will trigger an update of the user interface. UI updates are required to run in the main queue. This is the reason why we wrap it using DispatchQueue.main.async.
Implementing the User Interface
Now that we have created the classes ready for retrieving the loan data, let's move onto the implementation of the user interface. To help you remember what the UI looks like, look at the following figure. This is the UI we are going to build.
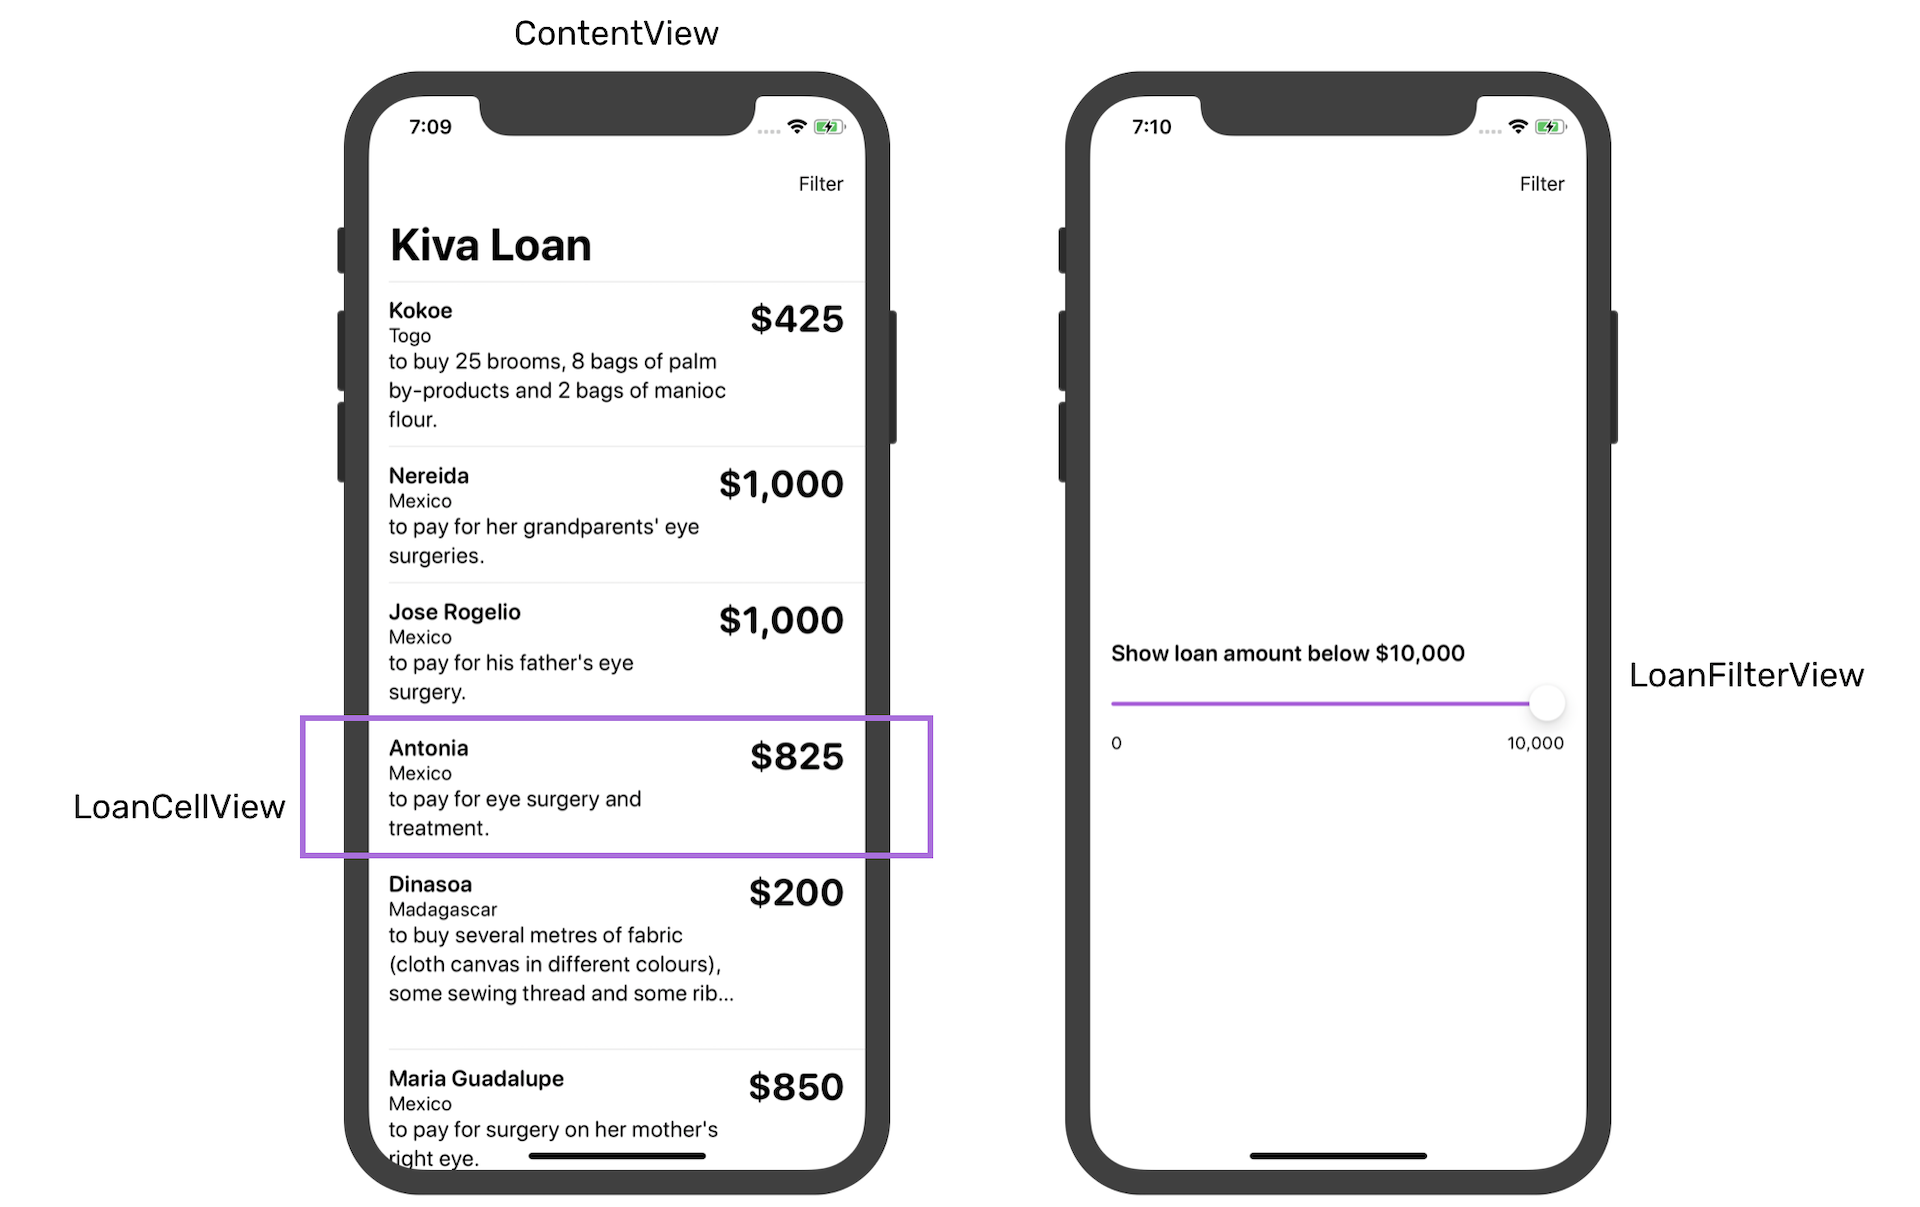
And, instead of coding the UI in one file, we will break it down into three views:
- ContentView.swift - this is the main view presenting the list of loans
- LoanCellView.swift - this is the cell view
- LoanFilterView.swift - this is the view showing the filtering option
Let's begin with the cell view. In the project navigator, right click SwiftUIKivaLoan and choose New file.... Select the SwiftUI View template and name the file LoanCellView.swift.
Update the LoanCellView like this:
struct LoanCellView: View {

    var loan: Loan

    var body: some View {
        HStack(alignment: .top) {
            VStack(alignment: .leading) {
                Text(loan.name)
                    .font(.system(.headline, design: .rounded))
                    .bold()
                Text(loan.country)
                    .font(.system(.subheadline, design: .rounded))
                Text(loan.use)
                    .font(.system(.body, design: .rounded))
            }

            Spacer()

            VStack {
                Text("$\(loan.amount)")
                    .font(.system(.title, design: .rounded))
                    .bold()
            }
        }
        .frame(minWidth: 0, maxWidth: .infinity)

    }
}
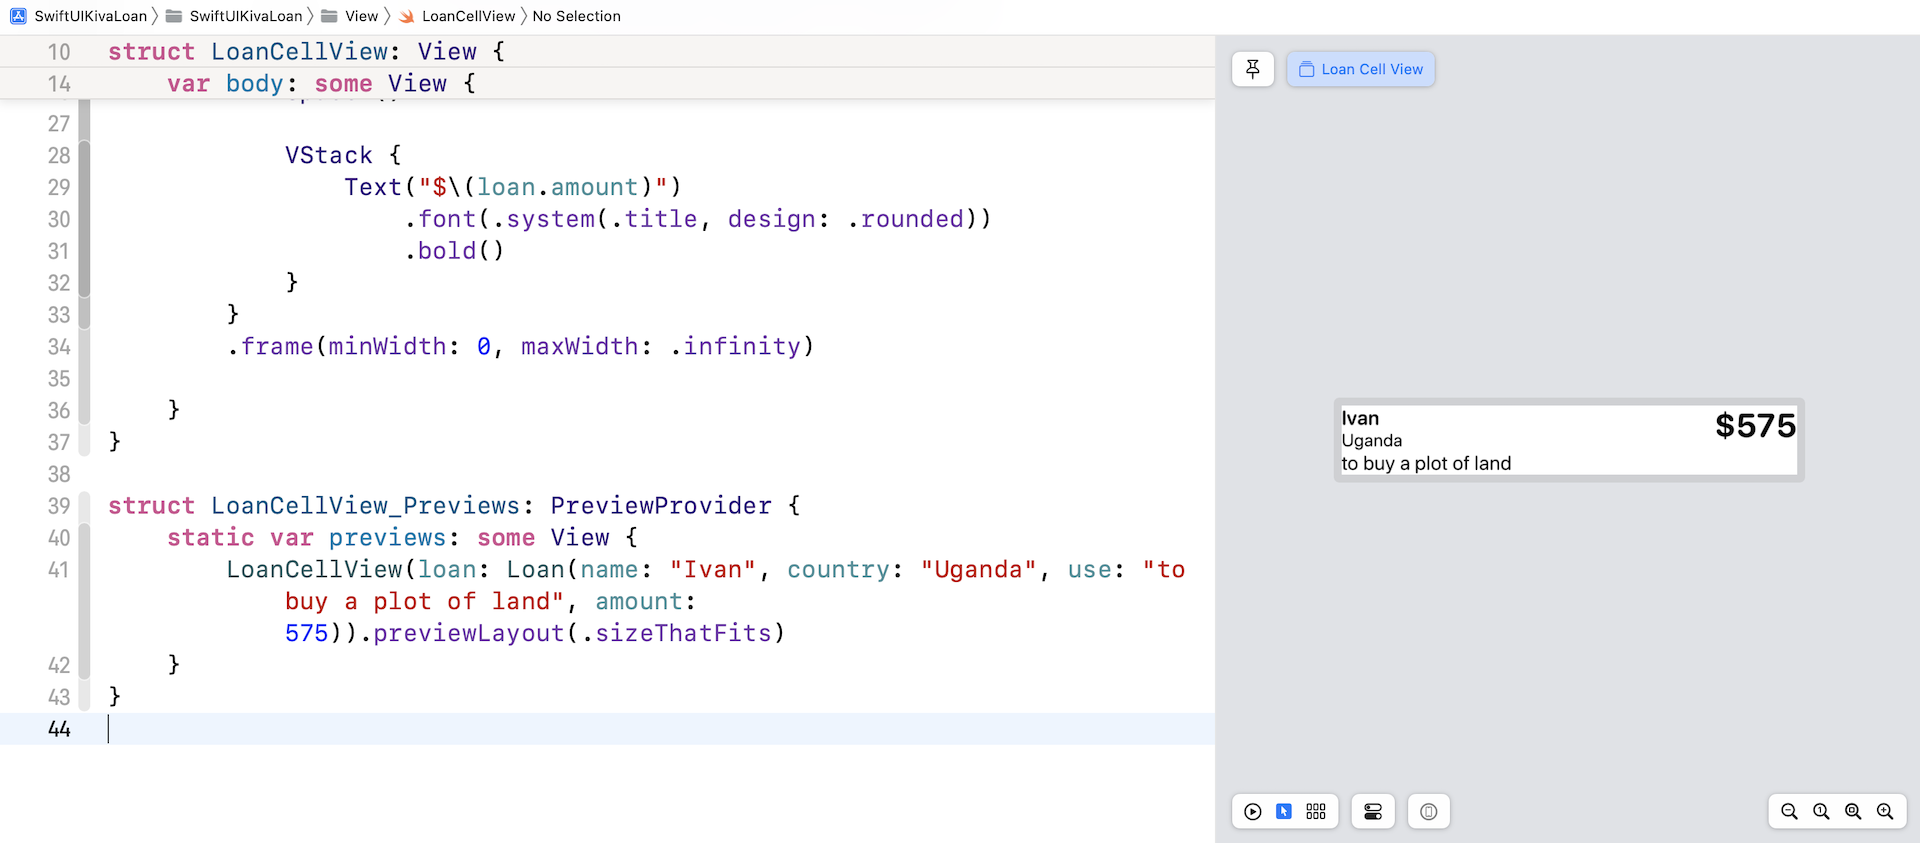
This view takes in a Loan and renders the cell view. The code is self explanatory but if you want to preview the cell view, you will need to modify LoanCellView_Previews like this:
struct LoanCellView_Previews: PreviewProvider {
    static var previews: some View {
        LoanCellView(loan: Loan(name: "Ivan", country: "Uganda", use: "to buy a plot of land", amount: 575)).previewLayout(.sizeThatFits)
    }
}
We instantiate a dummy loan and pass it to the cell view for rendering. Your preview pane should be similar to that shown in figure 8 if you change it to the Selectable mode.
Now go back to ContentView.swift to implement the list view. First, declare a variable named loanStore:
@ObservedObject var loanStore = LoanStore()
Since we want to observe the change of loan store and update the UI, the loanStore is marked with the @ObservedObject property wrapper.
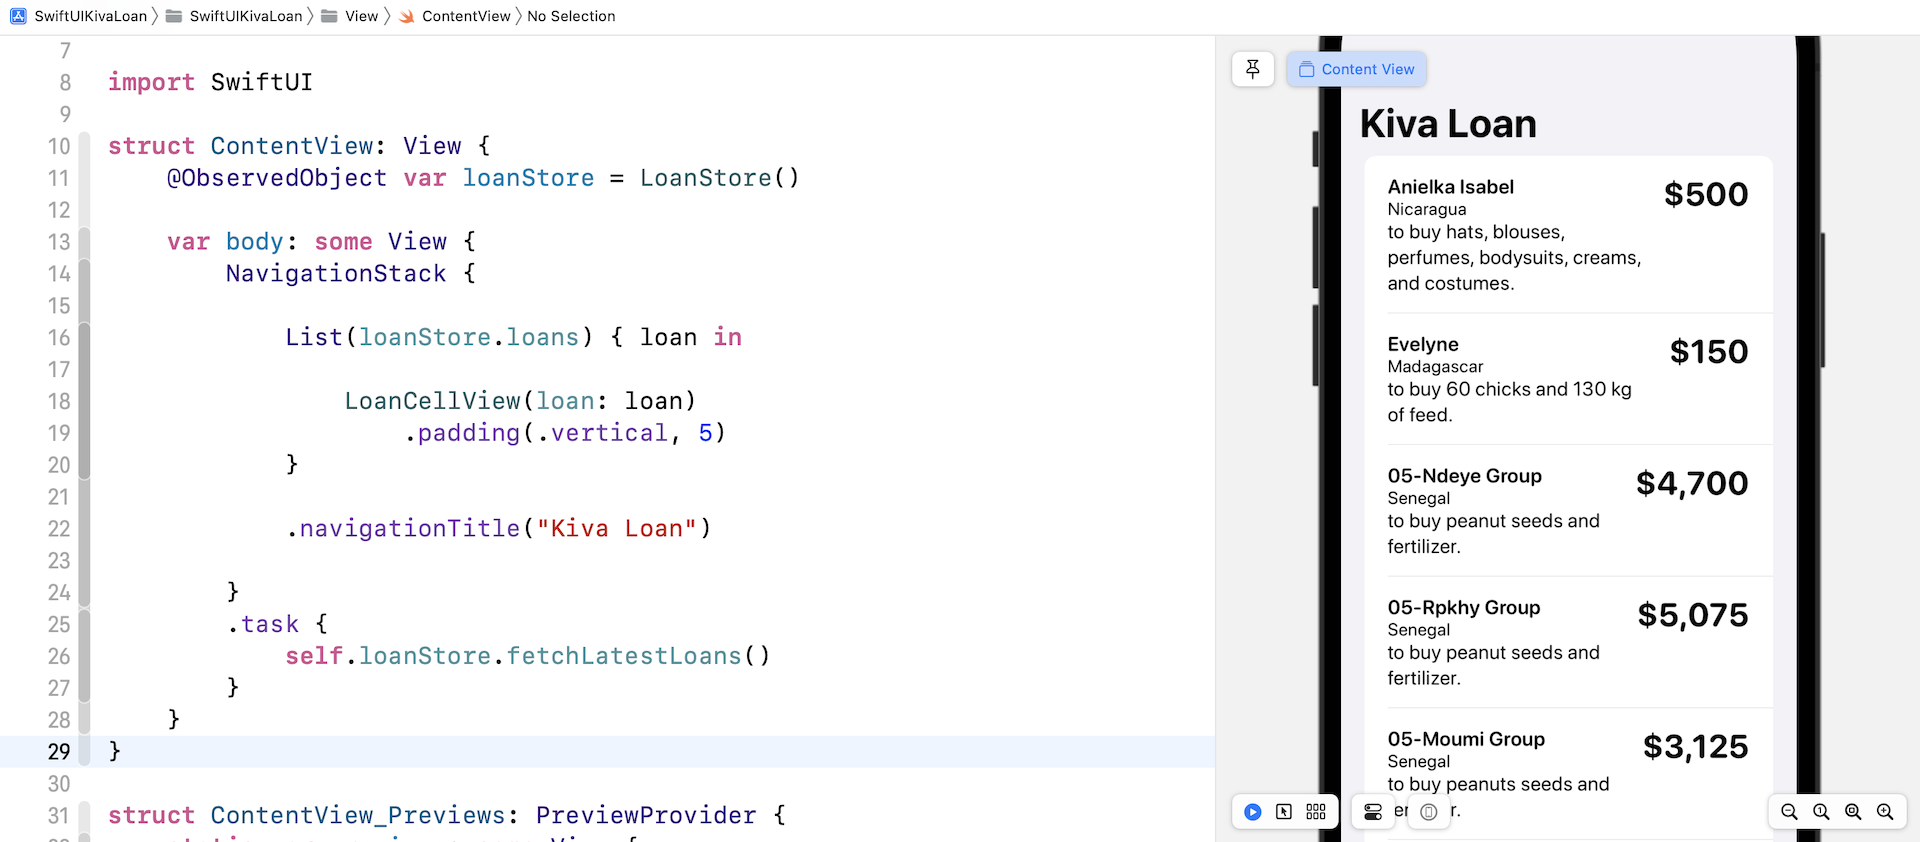
Next, update the body variable like this:
var body: some View {
    NavigationStack {

        List(loanStore.loans) { loan in

            LoanCellView(loan: loan)
                .padding(.vertical, 5)
        }

        .navigationTitle("Kiva Loan")

    }
    .task {
        self.loanStore.fetchLatestLoans()
    }
}
If you've read chapter 10 and 11, you should understand how to present a list view and embed it in a navigation view. That's what the code above does. The code in the task closure will be invoked when the view appears. We call up the fetchLatestLoans() method to retrieve the latest loans from Kiva.
If this is the first time you use .task, it's very similar to .onAppear. Both allow you to run asynchronous tasks when the view appears. The main difference is that .task will automatically cancel the task when the view is destroyed. It's more appropriate in this case.
Now test the app in the preview or on a simulator. You should be able to see the loan records.
Creating the Filter View with a Slider
Before we finish this chapter, I want to show you how to implement a filter feature. This filter function allows users to define a maximum loan amount and only display the records below that value. Figure 7 shows a sample filter view. Users can use a slider to configure the maximum amount.
Again, we want our code to be better organized. So, create a new file for the filter view and name it LoanFilterView.swift.
Next update the LoanFilterView struct like this:
struct LoanFilterView: View {

    @Binding var amount: Double

    var minAmount = 0.0
    var maxAmount = 10000.0

    var body: some View {
        VStack(alignment: .leading) {

            Text("Show loan amount below $\(Int(amount))")
                .font(.system(.headline, design: .rounded))

            HStack {

                Slider(value: $amount, in: minAmount...maxAmount, step: 100)
                    .accentColor(.purple)

            }

            HStack {
                Text("\(Int(minAmount))")
                    .font(.system(.footnote, design: .rounded))

                Spacer()

                Text("\(Int(maxAmount))")
                .font(.system(.footnote, design: .rounded))
            }

        }
        .padding(.horizontal)
        .padding(.bottom, 10)
    }
}
I assume you fully understand stack views. Therefore, I'm not going to discuss how they are used to create the layout. But let's talk a bit more about the Slider control. It's a standard component provided by SwiftUI. You can instantiate the slider by passing it the binding, range, and step of the slider. The binding holds the current value of the slider. Here is sample code for creating a slider:
Slider(value: $amount, in: minAmount...maxAmount, step: 100)
The step controls the amount of change when the user drags the slider. If you let the user have finer control, set the step to a smaller number. For the code above, we set it to 100.
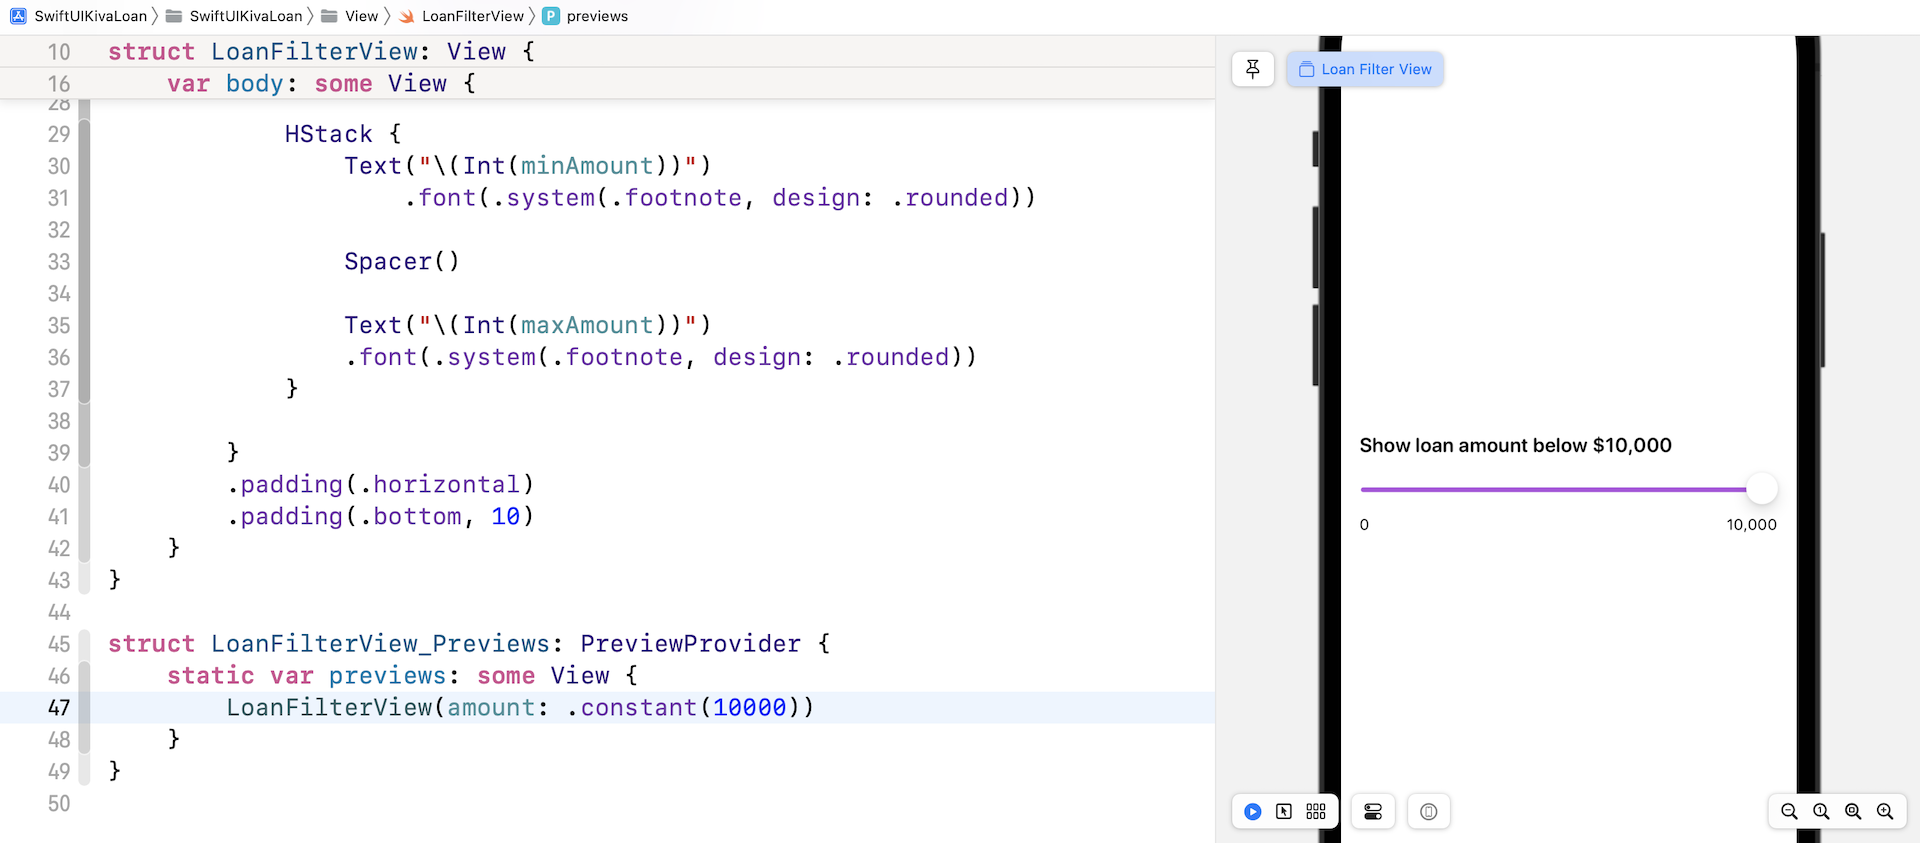
In order to preview the filter view, update the FilterView_Previews like this:
struct LoanFilterView_Previews: PreviewProvider {
    static var previews: some View {
        LoanFilterView(amount: .constant(10000))
    }
}
Now your preview should look like figure 10.
Okay, we've implemented the filter view. However, we haven't implemented the actual logic for filtering the records. Let's enhance the LoanStore.swift to power it with the filter function.
First, declare the following variable which is used to store a copy of the loan records for the filter operation:
private var cachedLoans: [Loan] = []
To save the copy, insert the following line of code after self.loans = self.parseJsonData(data: data):
self.cachedLoans = self.loans
Lastly, create a new function for the filtering:
func filterLoans(maxAmount: Int) {
    self.loans = self.cachedLoans.filter { $0.amount < maxAmount }
}
This function takes in the value of maximum amount and filter those loan items that are below this limit.
Cool! We are almost done.
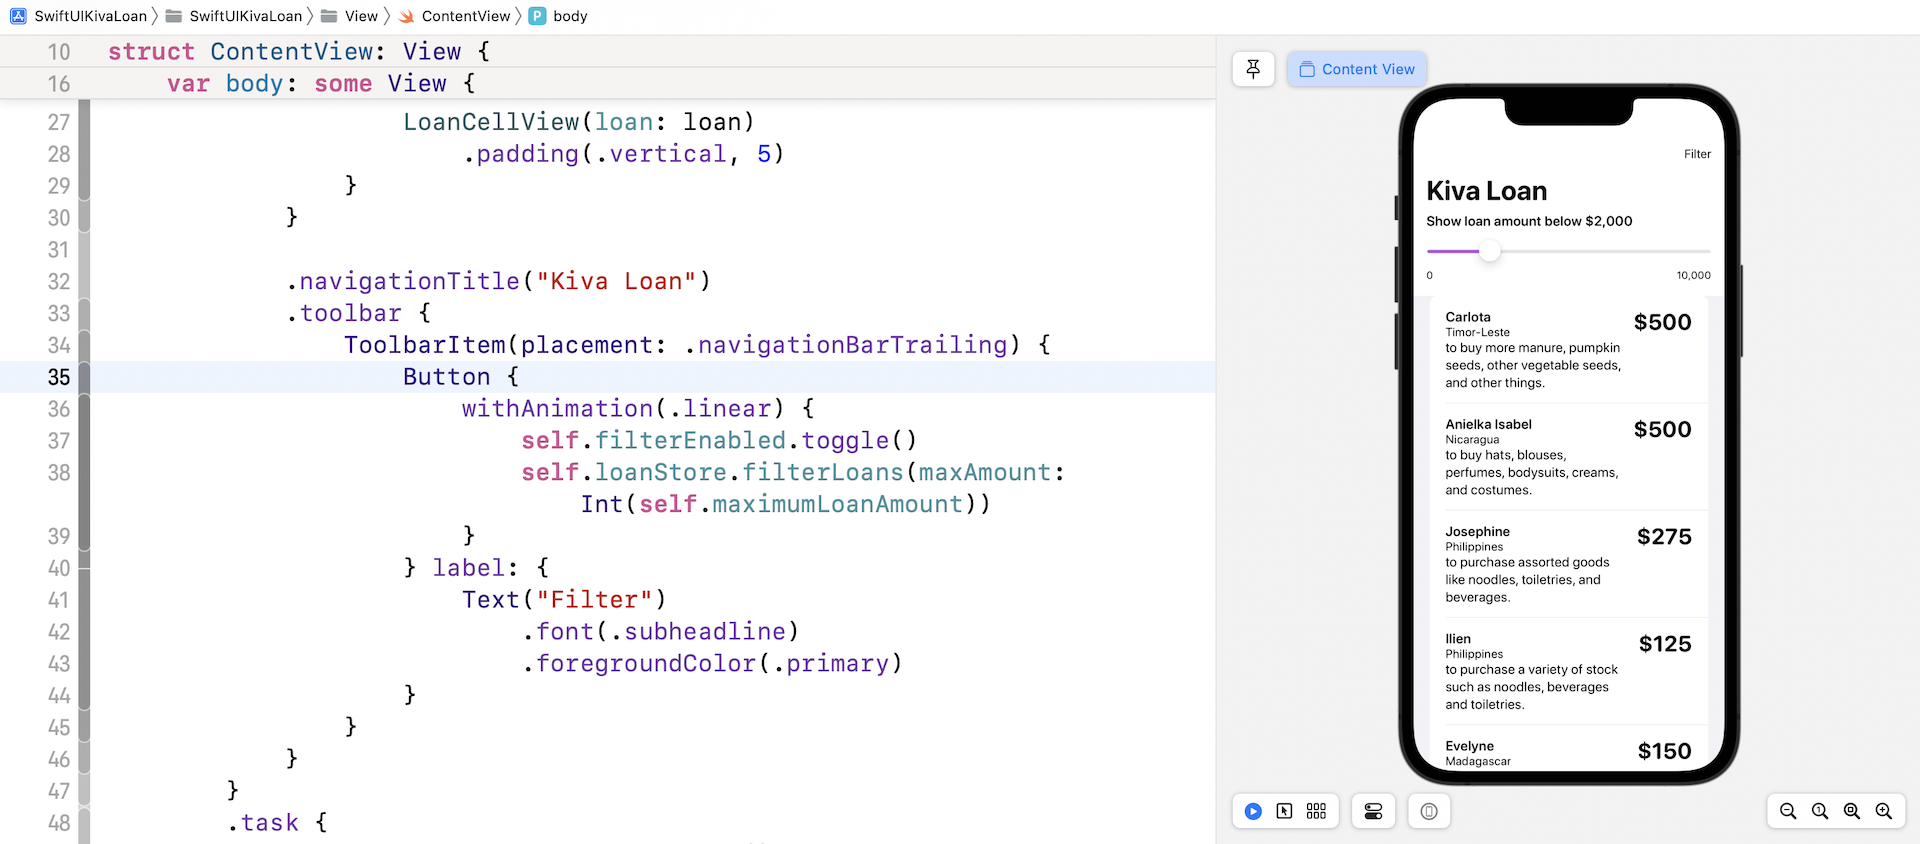
Let's go back to ContentView.swift to present the filter view. What we are going to do is add a navigation bar button at the top-right corner. When a user taps this button, the app presents the filter view.
Let's first declare two state variables:
@State private var filterEnabled = false
@State private var maximumLoanAmount = 10000.0
The filterEnabled variable stores the current state of the filter view. It's set to false by default indicating that the filter view is not shown. The maximumLoanAmount stores the maximum loan amount for display. Any loan records with an amount larger than this limit will be hidden.
Next, update the code of NavigationView like this:
NavigationStack {
    VStack {
        if filterEnabled {
            LoanFilterView(amount: self.$maximumLoanAmount)
                .transition(.opacity)
        }

        List(loanStore.loans) { loan in

            LoanCellView(loan: loan)
                .padding(.vertical, 5)
        }
    }

    .navigationTitle("Kiva Loan")
}
We added the LoanFilterView and embed it in a VStack. The appearance of LoanFilterView is controlled by the filterEnabled variable. When filterEnabled is set to true, the app will insert the loan filter view on top of the list view. What's left is the navigation bar button. Insert the following code and place it after .navigationTitle("Kiva Loan"):
.toolbar {
    ToolbarItem(placement: .navigationBarTrailing) {
        Button {
            withAnimation(.linear) {
                self.filterEnabled.toggle()
                self.loanStore.filterLoans(maxAmount: Int(self.maximumLoanAmount))
            }
        } label: {
            Text("Filter")
                .font(.subheadline)
                .foregroundColor(.primary)
        }
    }
}
This adds a navigation bar button at the top-right corner. When the button is tapped, we toggle the value of filterEnabled to show/hide the filter view. Additionally, we call the filterLoans function to filter the loan item.
Now test the app in the preview. You should see a filter button on the navigation bar. Tap it once to bring up the filter view. You can then set a new limit (e.g. $500). Tap the button again and the app will only show you the loan records that are below $500.
Summary
We covered quite a lot in this chapter. You should know how to consume web APIs, parse the JSON content, and present the data in a list view. We also briefly covered the usage of the Slider control.
If you've developed an app using UIKit before, you will be amazed by the simplicity of SwiftUI. Take a look at the code of ContentView again. It only takes around 40 lines of code to create the list view. Most importantly, you don't need to handle the UI update manually and pass the data around. Everything just works behind the scenes.
For reference, you can download the complete loan project here: