- Made by AppCoda
- Contact us / Support
- Tweet this book
- Preface
- 1. Introduction to SwiftUI
- 2. Getting Started with SwiftUI and Working with Text
- 3. Working with Images
- 4. Layout User Interfaces with Stacks
- 5. Understanding ScrollView and Building a Carousel UI
- 6. Working with SwiftUI Buttons and Gradient
- 7. Understanding State and Binding
- 8. Implementing Path and Shape for Line Drawing and Pie Charts
- 9. Basic Animations and Transitions
- 10. Understanding Dynamic List, ForEach and Identifiable
- 11. Working with Navigation UI and Navigation Bar Customization
- 12. Playing with Modal Views, Floating Buttons and Alerts
- 13. Building a Form with Picker, Toggle and Stepper
- 14. Data Sharing with Combine and Environment Objects
- 15. Building a Registration Form with Combine and View Model
- 16. Working with Swipe-to-Delete, Context Menu and Action Sheets
- 17. Using Gestures
- 18. Displaying an Expandable Bottom Sheet Using Presentation Detents
- 19. Creating a Tinder-like UI with Gestures and Animations
- 20. Creating an Apple Wallet like Animation and View Transition
- 21. Working with JSON, Slider and Data Filtering
- 22. Building a ToDo app with Core Data
- 23. Integrating UIKit with SwiftUI Using UIViewRepresentable
- 24. Creating a Search Bar View and Working with Custom Binding
- 25. Putting Everything Together to Build a Real World App
- 26. Creating an App Store like Animated View Transition
- 27. Building an Image Carousel
- 28. Building an Expandable List View Using OutlineGroup
- 29. Building Grid Layout Using LazyVGrid and LazyHGrid
- 30. Creating an Animated Activity Ring with Shape and Animatable
- 31. Working with AnimatableModifier and LibraryContentProvider
- 32. Working with TextEditor to Create Multiline Text Fields
- 33. Using matchedGeometryEffect to Create View Animations
- 34. ScrollViewReader and Grid Animation
- 35. Working with Tab View and Tab Bar Customization
- 36. Using AsyncImage in SwiftUI for Loading Images Asynchronously
- 37. Implementing Search Bar Using Searchable
- 38. Creating Bar Charts and Line Charts with the Charts Framework
- 39. Capturing Text within Image Using Live Text APIs
- 40. How to Use ShareLink for Sharing Data Like Text and Photos
- 41. Using ImageRenderer to Convert SwiftUI Views into Images
- 42. Creating PDF Documents Using ImageRenderer
- 43. Using Gauge to Display Progress and Create a Speedometer
- 44. Creating Grid Layout Using Grid APIs
- 45. Switching Layout with AnyLayout
- Published with GitBook
Chapter 25
Putting Everything Together to Build a Personal Finance App
By now, you should have a good understanding of SwiftUI and have built some simple apps using this new framework. In this chapter, you are going to use what you've learned so far to develop a personal finance app, allowing users to keep track of their income and expenses.
This app is not too complicated to build but you will learn quite a lot about SwiftUI and understand how to apply the techniques you learned in developing this real world app. In brief, here is some of the stuff we will go through with you:
- How to build a form and perform validation
- How to filter records and refresh the list view
- How to use bottom sheet to display record details
- How to use MVVM (Model-View-ViewModel) in SwiftUI
- How to save and manage data in a database using Core Data
- How to use DatePicker for date selection
- How to handle keyboard notification and adjust the form position
Let me stress this once again. This app is the result of what you learned so far. Therefore, I assume you have already read the book from chapter 1 to chapter 24. You should understand how a bottom sheet is built (chapter 18), how form validation with Combine works (chapter 14 & 15), and how to persist data using Core Data (chapter 22). If you haven't read these chapters, I suggest you go read them first. In this chapter, we will mostly focus on techniques that haven't been discussed before.
Downloading the Complete Project
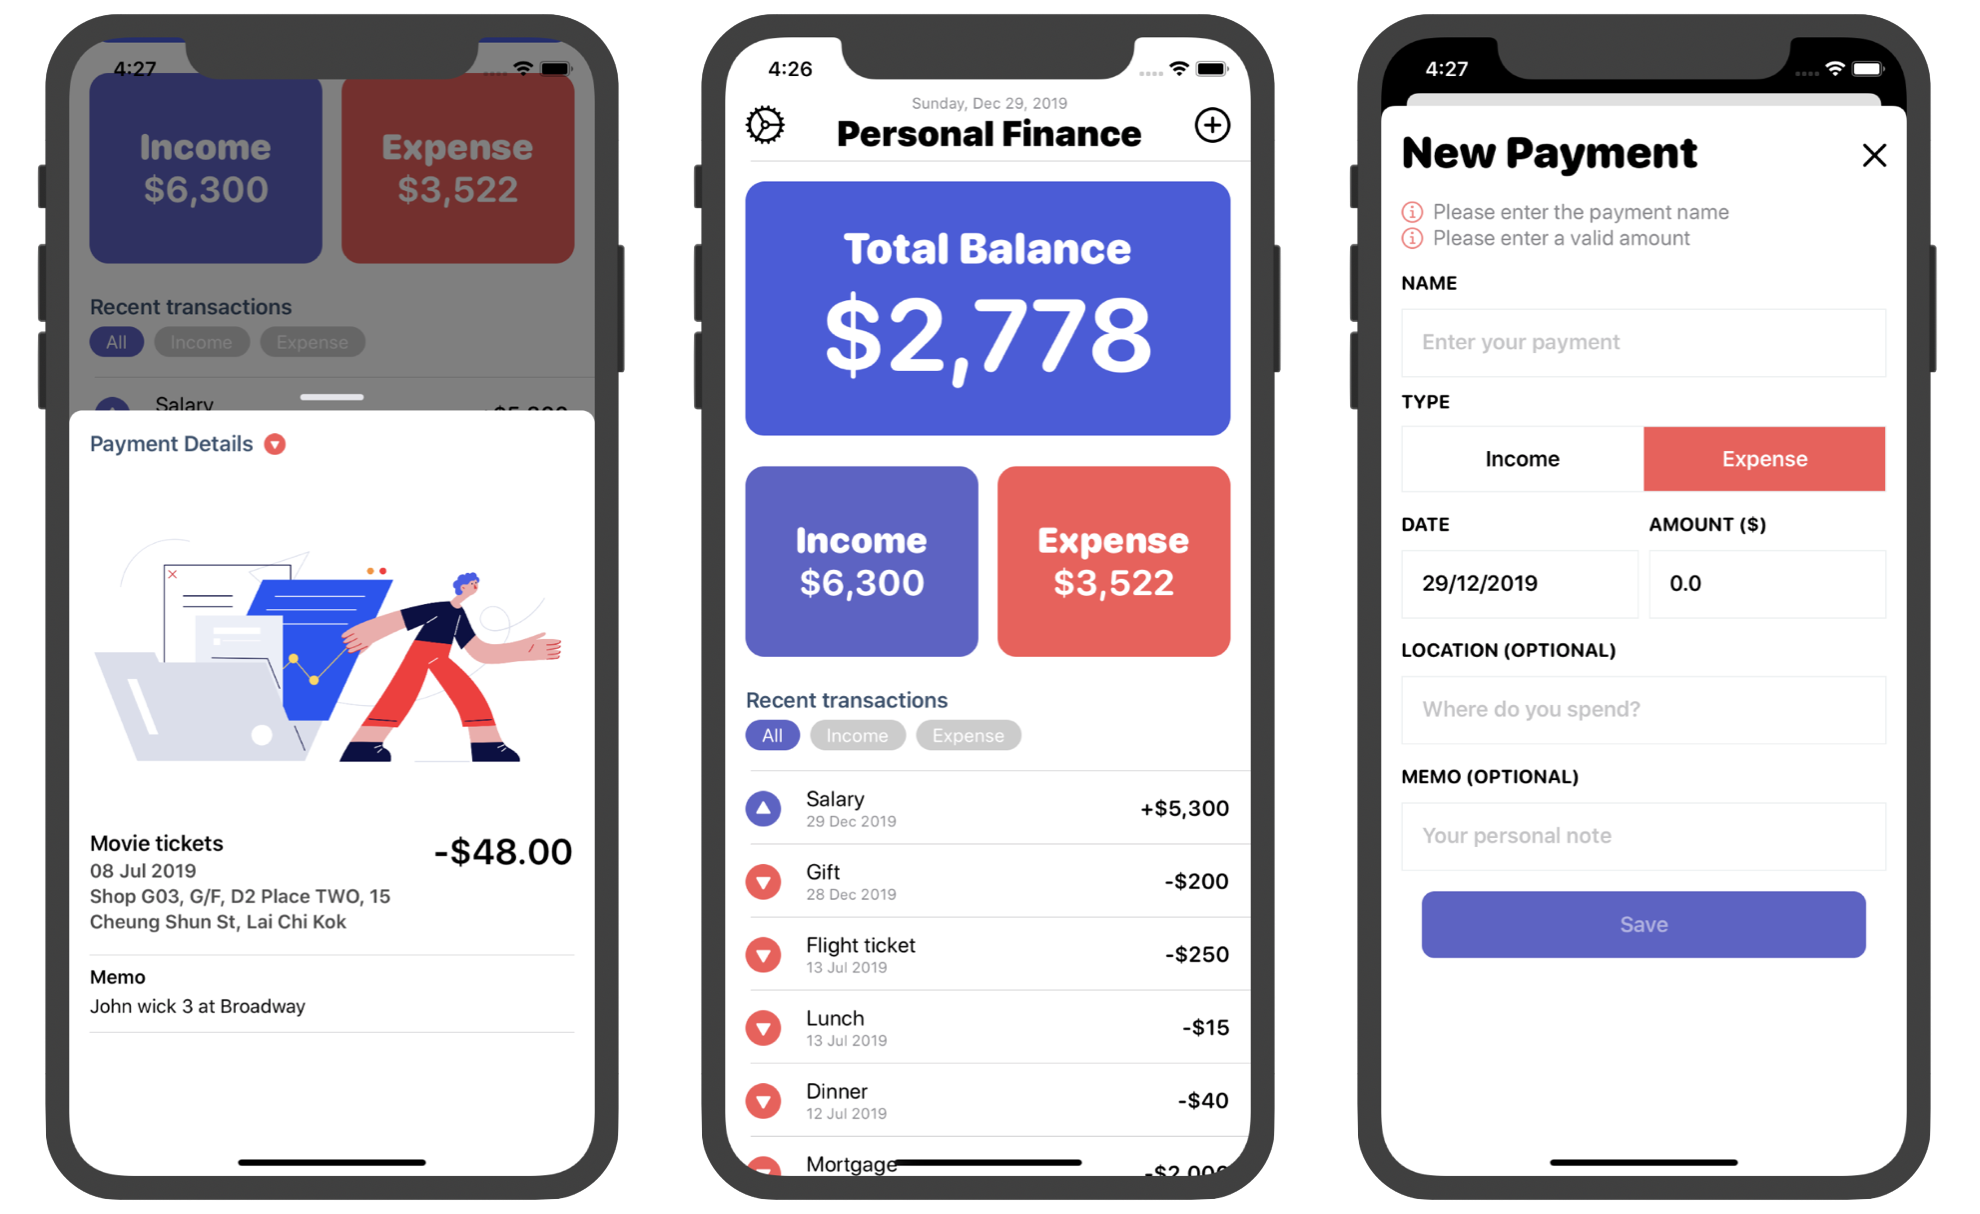
Normally, we build a demo app from scratch. This time is a bit different. I've already built the Personal Finance app for you. You can download the full source code of the project from https://www.appcoda.com/resources/swiftui4/SwiftUIPFinance.zip to take a look. Unzip the project and run the app on a simulator to try it out. When the app is first launched, it looks different from the one shown in figure 1 because there are no records. You can tap the + button to add a new record. After you go back to the main view, you will see the new record in the Recent Transactions section. And, the total balance is automatically calculated.
The app uses Core Data for data management. The records are persisted locally in the built-in database, so you should see the records even after restarting the app.
For the rest of the chapter, I will explain how the code works in detail. But I encourage you to take a look at the code first to see how much you understand.
Understanding the Model
As you can see in the project navigator, the app is broken into three main parts: model, view model and view. Let's begin with the model layer and Core Data model. Open the PaymentActivity.swift file to take a look:
enum PaymentCategory: Int {
    case income = 0
    case expense = 1
}

public class PaymentActivity: NSManagedObject {

    @NSManaged public var paymentId: UUID
    @NSManaged public var date: Date
    @NSManaged public var name: String
    @NSManaged public var address: String?
    @NSManaged public var amount: Double
    @NSManaged public var memo: String?
    @NSManaged public var typeNum: Int32
}

extension PaymentActivity: Identifiable {
    var type: PaymentCategory {
        get {
            return PaymentCategory(rawValue: Int(typeNum)) ?? .expense
        }

        set {
            self.typeNum = Int32(newValue.rawValue)
        }
    }
}
The PaymentActivity class represents a payment record which can either be an expense or income. In the code above, we use an enum to differentiate the payment types. Each payment has the following properties:
- paymentId - an unique ID for the payment record
- date - the date of the transaction
- name - the name of the transaction
- address - where you spend / where the income comes from
- amount - the amount of the transaction
- memo - additional notes for the payment
- typeNum - the payment type (income / expense)
Since we use Core Data to persist the payment activity, this PaymentActivity class inherits from NSManagedObject. Later, you will see in the Core Data model that this class is set as a custom class of the managed object. Again, if you don't understand Core Data, please refer to chapter 22.
The payment type (i.e. typeNum), is saved as an integer in the database. Therefore, we need a conversion between the integer and the actual enumeration. This is one approach to save an enum in a persistent storage.
Lastly, we adopt the Identifiable protocol. Why do we need to adopt it? We will use the List view to present all the payment activities. This is why the PaymentActivity class adopts the protocol. If you forget what the Identifiable protocol is, you can read about it in chapter 10.
Working with Core Data
Now, open PFinanceStore to have a look at the managed data model. In the model, we only have one entity, PaymentActivity.

This class, as we discussed earlier, is the custom class of this entity. You can click the Data Model inspector to reveal the settings. As mentioned before, I prefer to create the custom class manually (instead of codegen). This gives me more flexibility to customize the class.
Next, let's head over to Persistence.swift (inside the Model group) to see how this data model is loaded. In the PersistenceController struct, you should see the following code:
struct PersistenceController {
    static let shared = PersistenceController()

    let container: NSPersistentContainer

    .
    .
    .

    init(inMemory: Bool = false) {
        container = NSPersistentContainer(name: "PFinanceStore")
        if inMemory {
            container.persistentStoreDescriptions.first!.url = URL(fileURLWithPath: "/dev/null")
        }
        container.loadPersistentStores(completionHandler: { (storeDescription, error) in
            if let error = error as NSError? {
                fatalError("Unresolved error \(error), \(error.userInfo)")
            }
        })
    }
}
When the app starts, we load the PFinanceStore.xcdatamodeld using NSPersistentContainer. Now, switch over to PFinanceApp.swift and check out the code:
struct PFinanceApp: App {

    let persistenceController = PersistenceController.shared

    var body: some Scene {
        WindowGroup {
            DashboardView().environment(\.managedObjectContext, persistenceController.container.viewContext)
        }
    }
}
To use Core Data in SwiftUI, we inject the managed object context into the environment. Later, in the SwiftUI views, we can easily retrieve the context from the environment for further operations.
Implementing the New Payment View
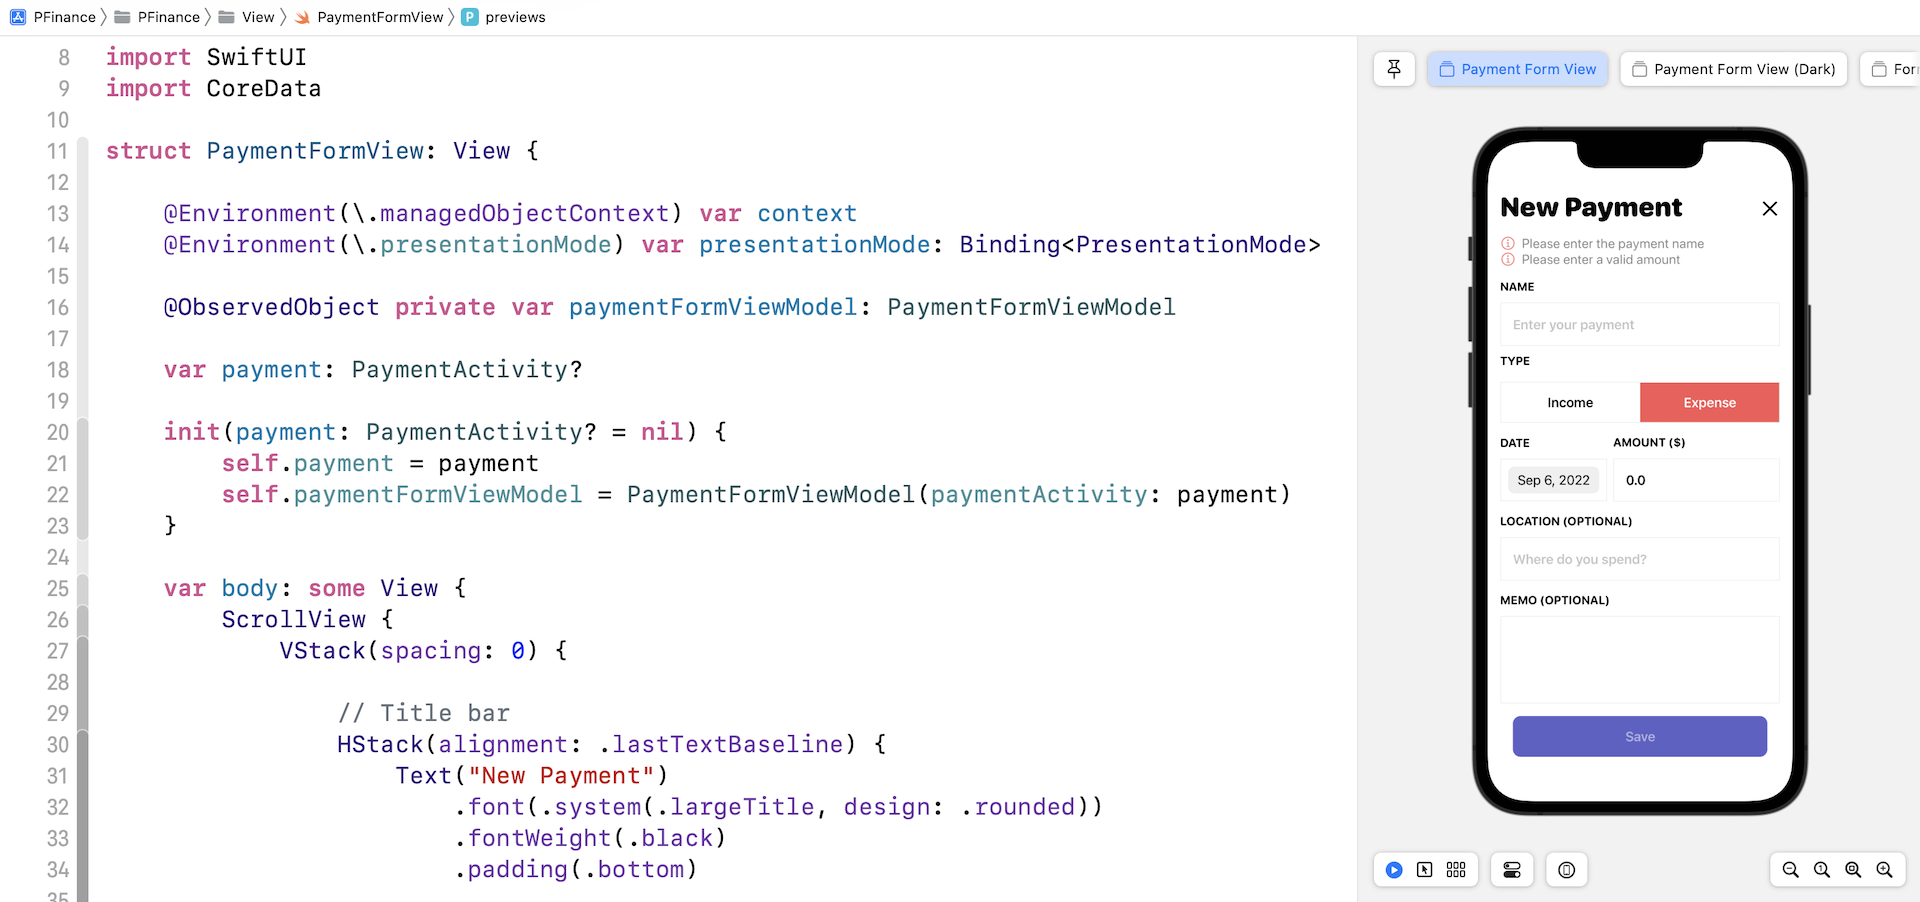
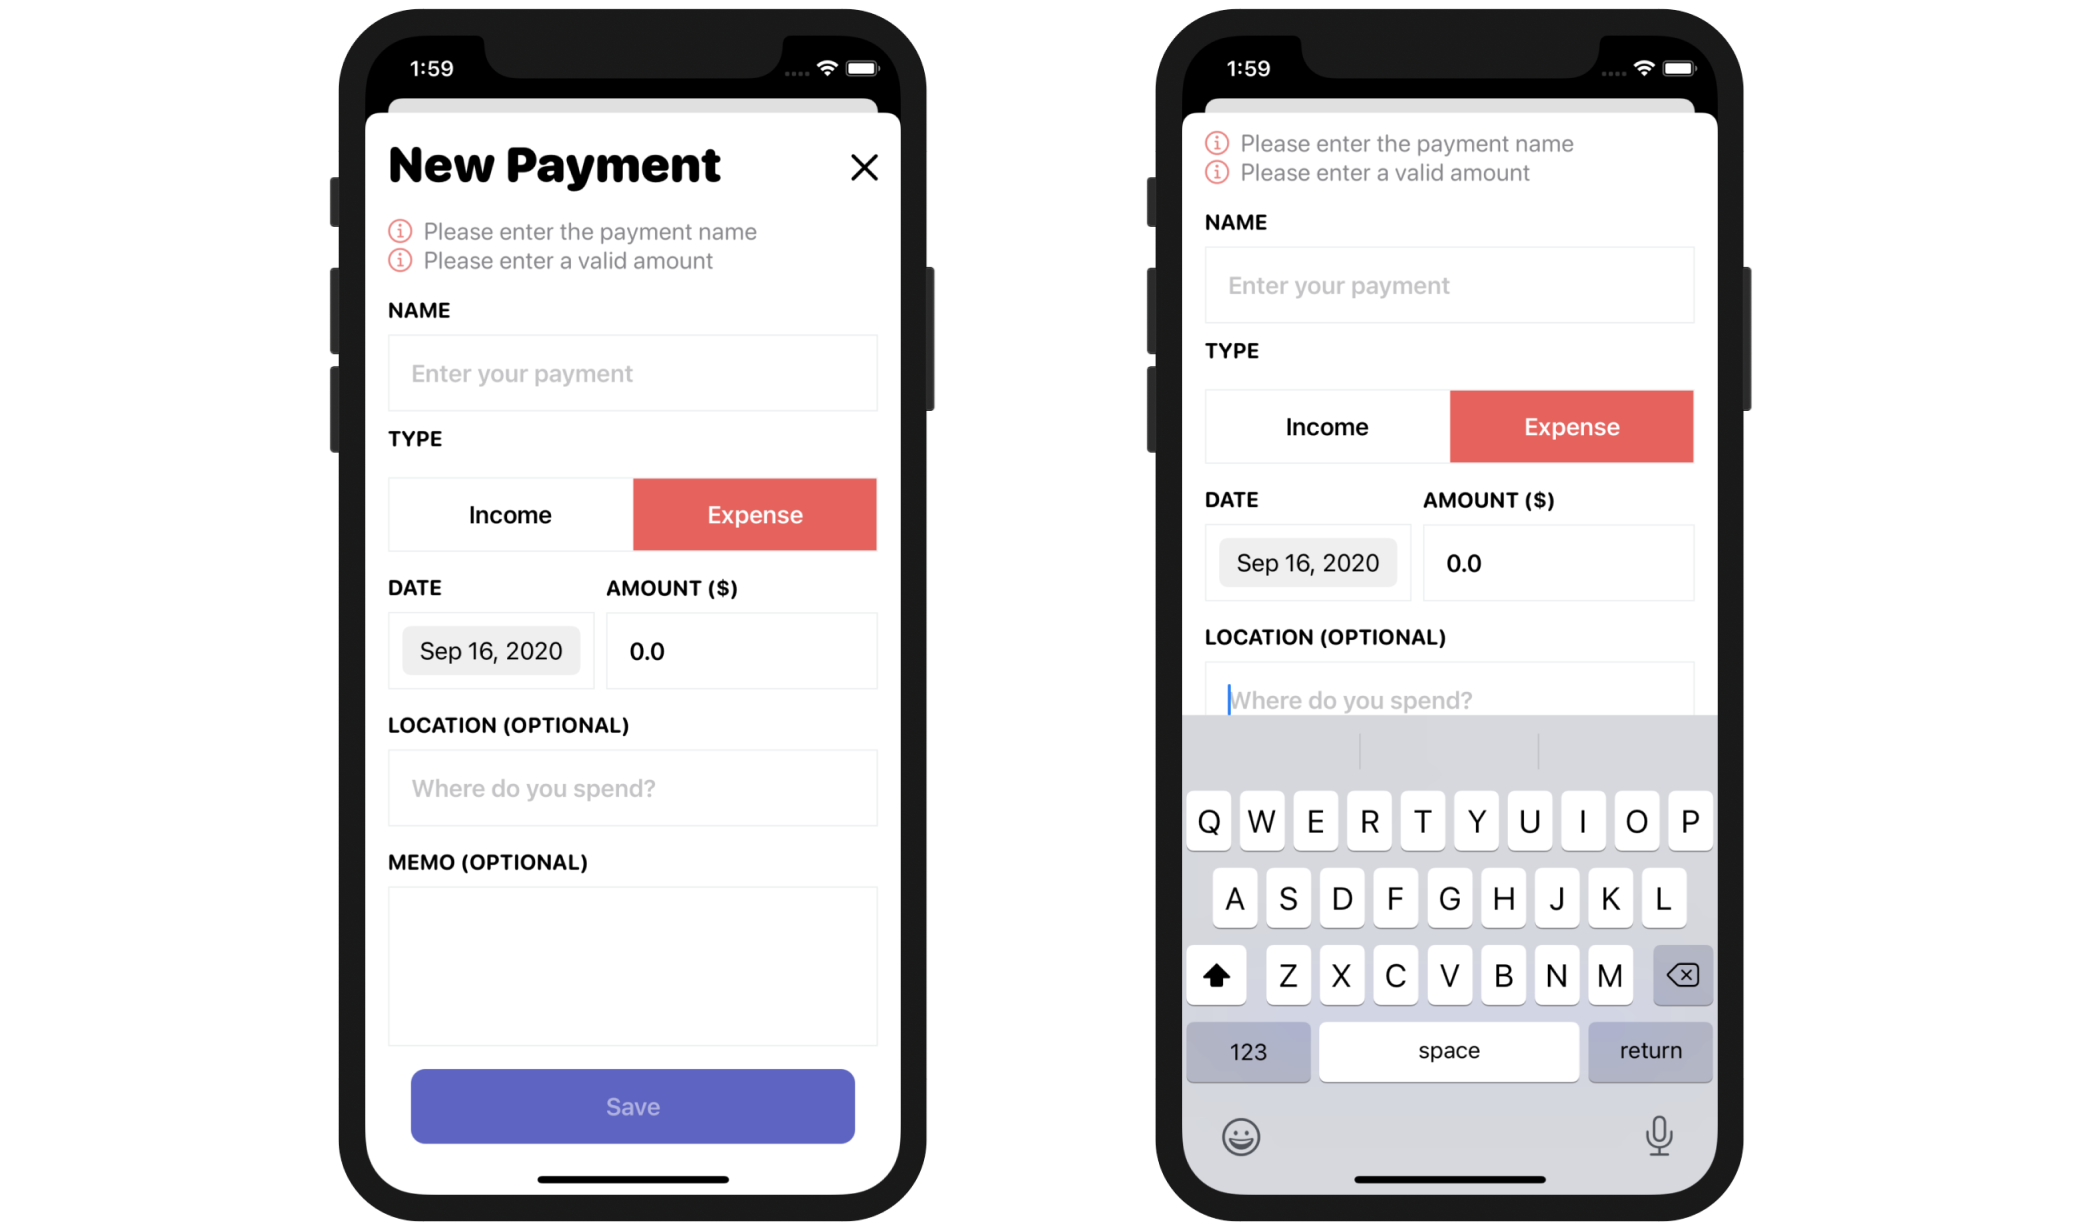
Now that we have completed the walkthrough of the model layer, let's see how we implement each of the views. The New Payment view is designed for users to create a new payment activity. Open the PaymentFormView.swift file to take a look. You should be able to preview the input form.
The Form Layout
Let me first walk you through how the form is laid out. It's always good practice to extract common views to create a more generic version. Since most of the form fields are very similar, we created a generic text field (i.e. FormTextField) to render the field name and the placeholder using a VStack:
struct FormTextField: View {
    let name: String
    var placeHolder: String

    @Binding var value: String

    var body: some View {
        VStack(alignment: .leading) {
            Text(name.uppercased())
                .font(.system(.subheadline, design: .rounded))
                .fontWeight(.bold)
                .foregroundColor(.primary)

            TextField(placeHolder, text: $value)
                .font(.headline)
                .foregroundColor(.primary)
                .padding()
                .border(Color("Border"), width: 1.0)

        }
    }
}
Do you notice the two validation errors under the form title? Since these validation messages have a similar format, we also create a generic view for this kind of message:
struct ValidationErrorText: View {

    var iconName = "info.circle"
    var iconColor = Color(red: 251/255, green: 128/255, blue: 128/255)

    var text = ""

    var body: some View {
        HStack {
            Image(systemName: iconName)
                .foregroundColor(iconColor)
            Text(text)
                .font(.system(.body, design: .rounded))
                .foregroundColor(.secondary)
            Spacer()
        }
    }
}
With these two common views created, it's very straightforward to layout the form. We use a ScrollView, together with a VStack to arrange the form fields. The validation error messages are only displayed when an error is detected:
Group {
    if !paymentFormViewModel.isNameValid {
        ValidationErrorText(text: "Please enter the payment name")
    }

    if !paymentFormViewModel.isAmountValid {
        ValidationErrorText(text: "Please enter a valid amount")
    }

    if !paymentFormViewModel.isMemoValid {
        ValidationErrorText(text: "Your memo should not exceed 300 characters")
    }
}
The type field is a bit different because it's not a text field. The user can either select income or expense. In this case, we created two buttons
VStack(alignment: .leading) {
    Text("TYPE")
        .font(.system(.subheadline, design: .rounded))
        .fontWeight(.bold)
        .foregroundColor(.primary)
        .padding(.vertical, 10)

    HStack(spacing: 0) {
        Button(action: {
            self.paymentFormViewModel.type = .income
        }) {
            Text("Income")
                .font(.headline)
                .foregroundColor(self.paymentFormViewModel.type == .income ? Color.white : Color.primary)
        }
        .frame(minWidth: 0.0, maxWidth: .infinity)
        .padding()
        .background(self.paymentFormViewModel.type == .income ? Color("IncomeCard") : Color.white)

        Button(action: {
            self.paymentFormViewModel.type = .expense
        }) {
            Text("Expense")
                .font(.headline)
                .foregroundColor(self.paymentFormViewModel.type == .expense ? Color.white : Color.primary)
        }
        .frame(minWidth: 0.0, maxWidth: .infinity)
        .padding()
        .background(self.paymentFormViewModel.type == .expense ? Color("ExpenseCard") : Color.white)
    }
    .border(Color("Border"), width: 1.0)
}
The background color of the button varies depending on the type of the payment activity.
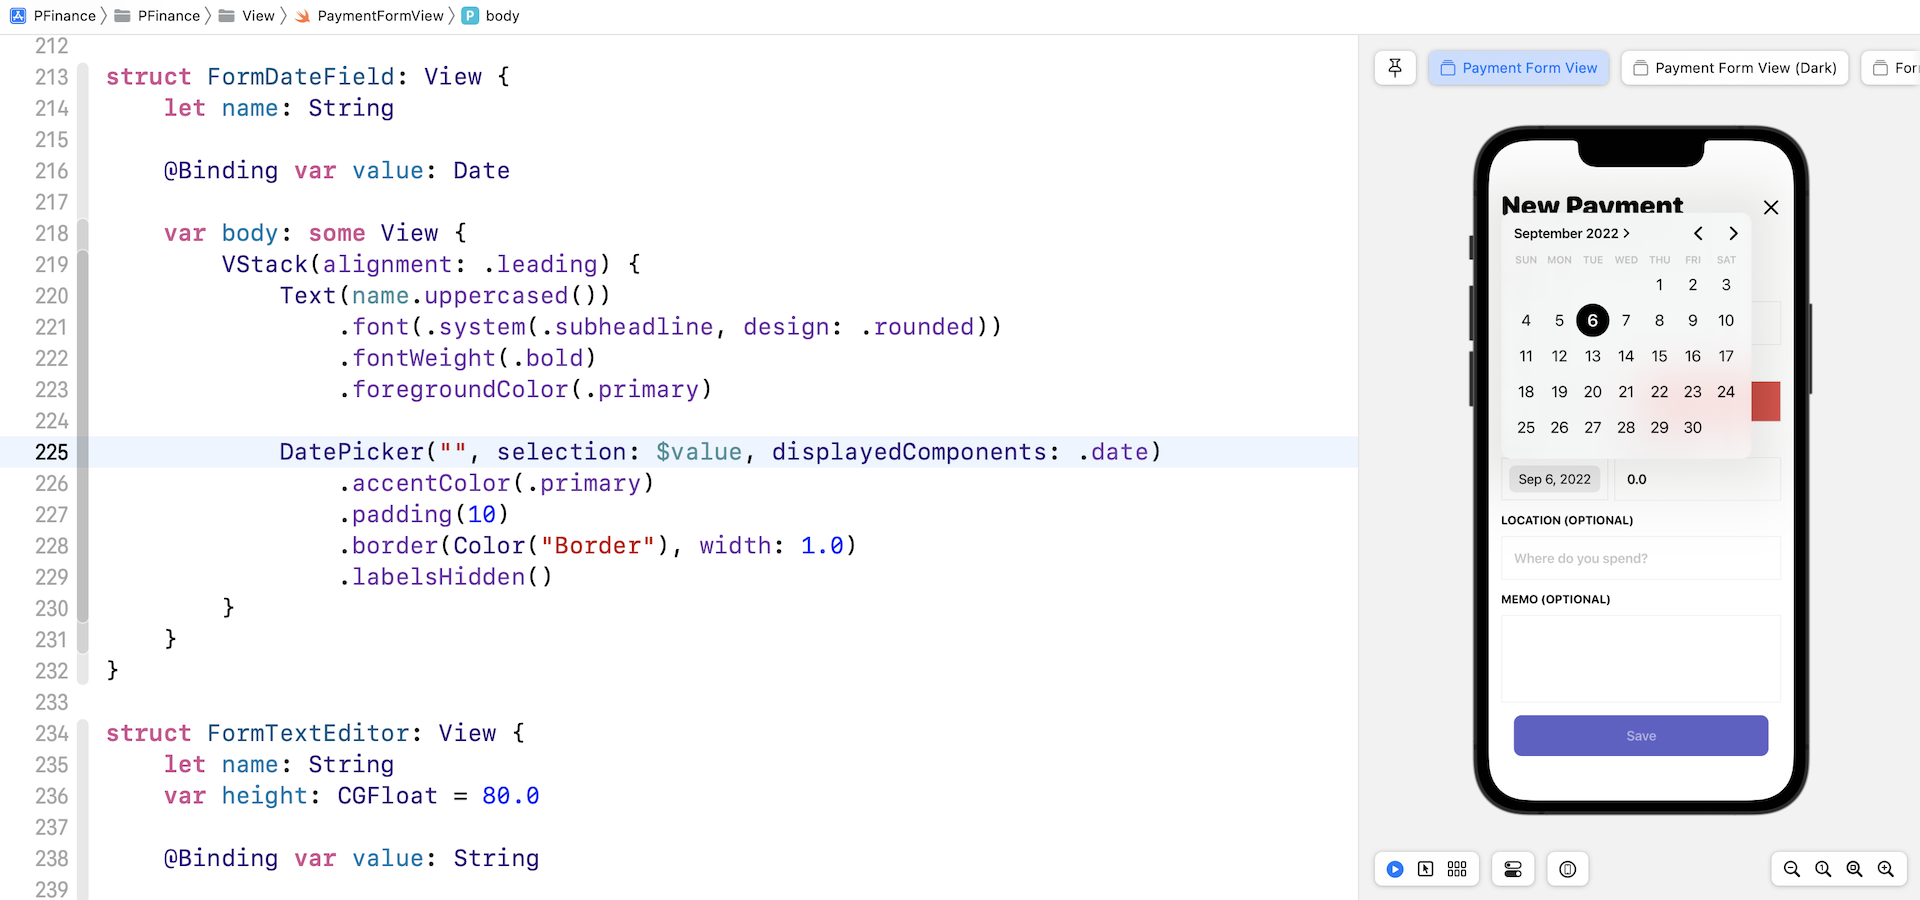
The date field is implemented using the DatePicker component. It's very easy to use the DatePicker. All you need is to provide the label, the binding to the date value, and the display components of the date.
struct FormDateField: View {
    let name: String

    @Binding var value: Date

    var body: some View {
        VStack(alignment: .leading) {
            Text(name.uppercased())
                .font(.system(.subheadline, design: .rounded))
                .fontWeight(.bold)
                .foregroundColor(.primary)

            DatePicker("", selection: $value, displayedComponents: .date)
                .accentColor(.primary)
                .padding(10)
                .border(Color("Border"), width: 1.0)
                .labelsHidden()
        }
    }
}
Since the release of iOS 14, the built-in DatePicker has been improved with better UI and more styles. If you run the view and tap the date field, the app displays a full calendar view for users to pick the date. The user interface is much much better than the old version of date picker.
The memo field is not a text field but a text editor. When SwiftUI was first released, it doesn't come with a multiline text field. To support multiline text editing, you will need to tap into the UIKit framework and wrap UITextView into a SwiftUI component. Starting from iOS 14, Swift introduced a new component called TextEditor for displaying and editing long-form text. In PaymentFormView.swift, you should find the following struct:
struct FormTextEditor: View {
    let name: String
    var height: CGFloat = 80.0

    @Binding var value: String

    var body: some View {
        VStack(alignment: .leading) {
            Text(name.uppercased())
                .font(.system(.subheadline, design: .rounded))
                .fontWeight(.bold)
                .foregroundColor(.primary)

            TextEditor(text: $value)
                .frame(minHeight: height)
                .font(.headline)
                .foregroundColor(.primary)
                .padding()
                .border(Color("Border"), width: 1.0)
        }
    }
}
The usage of TextEditor is very similar to TextField. All you need is to pass it the binding to a String variable. Just like any other SwiftUI view, you apply view modifiers to style its appearance. This is how we created the Memo field for users to type long form text.
At the end of the form, is the Save button. This button is disabled by default. It's only enabled when all the required fields are filled. The disabled modifier is used to control the button's state.
Button(action: {
    self.save()
    self.presentationMode.wrappedValue.dismiss()
}) {
    Text("Save")
        .opacity(paymentFormViewModel.isFormInputValid ? 1.0 : 0.5)
        .font(.headline)
        .foregroundColor(.white)
        .padding()
        .frame(minWidth: 0, maxWidth: .infinity)
        .background(Color("IncomeCard"))
        .cornerRadius(10)

}
.padding()
.disabled(!paymentFormViewModel.isFormInputValid)
When the button is tapped, it calls the save() method to save the payment activity permanently into the database. And then, it invokes the dismiss() method to dismiss the view. If you are not familiar with the environment value presentationMode, please read chapter 12.
Form Validation
That's pretty much how we layout the form UI. Let's talk about how the form validation is implemented. Basically, we followed what's discussed in chapter 15 to perform the form validation using Combine. Here is what we have done:
- Create a view model to represent the payment activity form.
- Implement form validation in the view model and publish the validation results using Combine.
We created a view model class to hold the values of the form fields. You can switch over to PaymentFormViewModel.swift to view the code:
class PaymentFormViewModel: ObservableObject {

    // Input
    @Published var name = ""
    @Published var location = ""
    @Published var amount = ""
    @Published var type = PaymentCategory.expense
    @Published var date = Date.today
    @Published var memo = ""

    // Output
    @Published var isNameValid = false
    @Published var isAmountValid = true
    @Published var isMemoValid = true
    @Published var isFormInputValid = false

    private var cancellableSet: Set<AnyCancellable> = []

    init(paymentActivity: PaymentActivity?) {

        self.name = paymentActivity?.name ?? ""
        self.location = paymentActivity?.address ?? ""
        self.amount = "\(paymentActivity?.amount ?? 0.0)"
        self.memo = paymentActivity?.memo ?? ""
        self.type = paymentActivity?.type ?? .expense
        self.date = paymentActivity?.date ?? Date.today

        $name
            .receive(on: RunLoop.main)
            .map { name in
                return name.count > 0
            }
            .assign(to: \.isNameValid, on: self)
            .store(in: &cancellableSet)

        $amount
            .receive(on: RunLoop.main)
            .map { amount in
                guard let validAmount = Double(amount) else {
                    return false
                }
                return validAmount > 0
            }
            .assign(to: \.isAmountValid, on: self)
            .store(in: &cancellableSet)

        $memo
            .receive(on: RunLoop.main)
            .map { memo in
                return memo.count < 300
            }
            .assign(to: \.isMemoValid, on: self)
            .store(in: &cancellableSet)

        Publishers.CombineLatest3($isNameValid, $isAmountValid, $isMemoValid)
            .receive(on: RunLoop.main)
            .map { (isNameValid, isAmountValid, isMemoValid) in
                return isNameValid && isAmountValid && isMemoValid
            }
            .assign(to: \.isFormInputValid, on: self)
            .store(in: &cancellableSet)
    }

}
This class conforms to ObservableObject. All the properties are annotated with @Published because we want to notify the subscribers whenever there is a value change and perform the validation accordingly.
Whenever there are any changes to the form's input values, this view model will execute the validation code, update the results, and notify the subscribers.
So, who is the subscriber?
If you go back to PaymentFormView.swift, you should notice that we have declared a variable named paymentFormViewModel with the @ObservedObject wrapper:
@ObservedObject private var paymentFormViewModel: PaymentFormViewModel
The PaymentFormView subscribes to the changes of the view model. When any of the validation variables (e.g. isNameValid) are updated, PaymentFormView will be notified and the view itself will refresh to display the validation error on screen.
if !paymentFormViewModel.isNameValid {
    ValidationErrorText(text: "Please enter the payment name")
}
Form Initialization
Do you notice the initialization method? It accepts a PaymentActivity object and initializes the view model.
var payment: PaymentActivity?

init(payment: PaymentActivity? = nil) {
    self.payment = payment
    self.paymentFormViewModel = PaymentFormViewModel(paymentActivity: payment)
}
The PaymentFormView allows the user to create a new payment activity and edit an existing activity. This is why the init method takes in an optional payment activity object. If the object is nil, we display an empty form. Otherwise, we fill the form fields with the given values of the PaymentActivity object.
Previewing the form
The instant preview feature is one of the many things I really enjoy when programming with SwiftUI. However, if your SwiftUI project integrates with Core Data, it will require some extra code to make the preview work. Here is the code for the preview:
struct PaymentFormView_Previews: PreviewProvider {
    static var previews: some View {

        let context = PersistenceController.shared.container.viewContext

        let testTrans = PaymentActivity(context: context)
        testTrans.paymentId = UUID()
        testTrans.name = ""
        testTrans.amount = 0.0
        testTrans.date = .today
        testTrans.type = .expense

        return Group {
            PaymentFormView(payment: testTrans)
            PaymentFormView(payment: testTrans)
                .preferredColorScheme(.dark)
                .previewDisplayName("Payment Form View (Dark)")

            FormTextField(name: "NAME", placeHolder: "Enter your payment", value: .constant("")).previewLayout(.sizeThatFits)
                .previewDisplayName("Form Text Field")

            ValidationErrorText(text: "Please enter the payment name").previewLayout(.sizeThatFits)
                .previewDisplayName("Validation Error")

        }
    }
}
To instantiate the PaymentFormView, you have to provide a PaymentActivity object. Since PaymentActivity is a managed object, we need to retrieve the context from PersistenceController to create one. Once we create the PaymentActivity object, we can initialize it with a test item and use it to preview the PaymentFormView. This is how you can preview a view that integrates with Core Data.
Implementing the Payment Activity Detail View
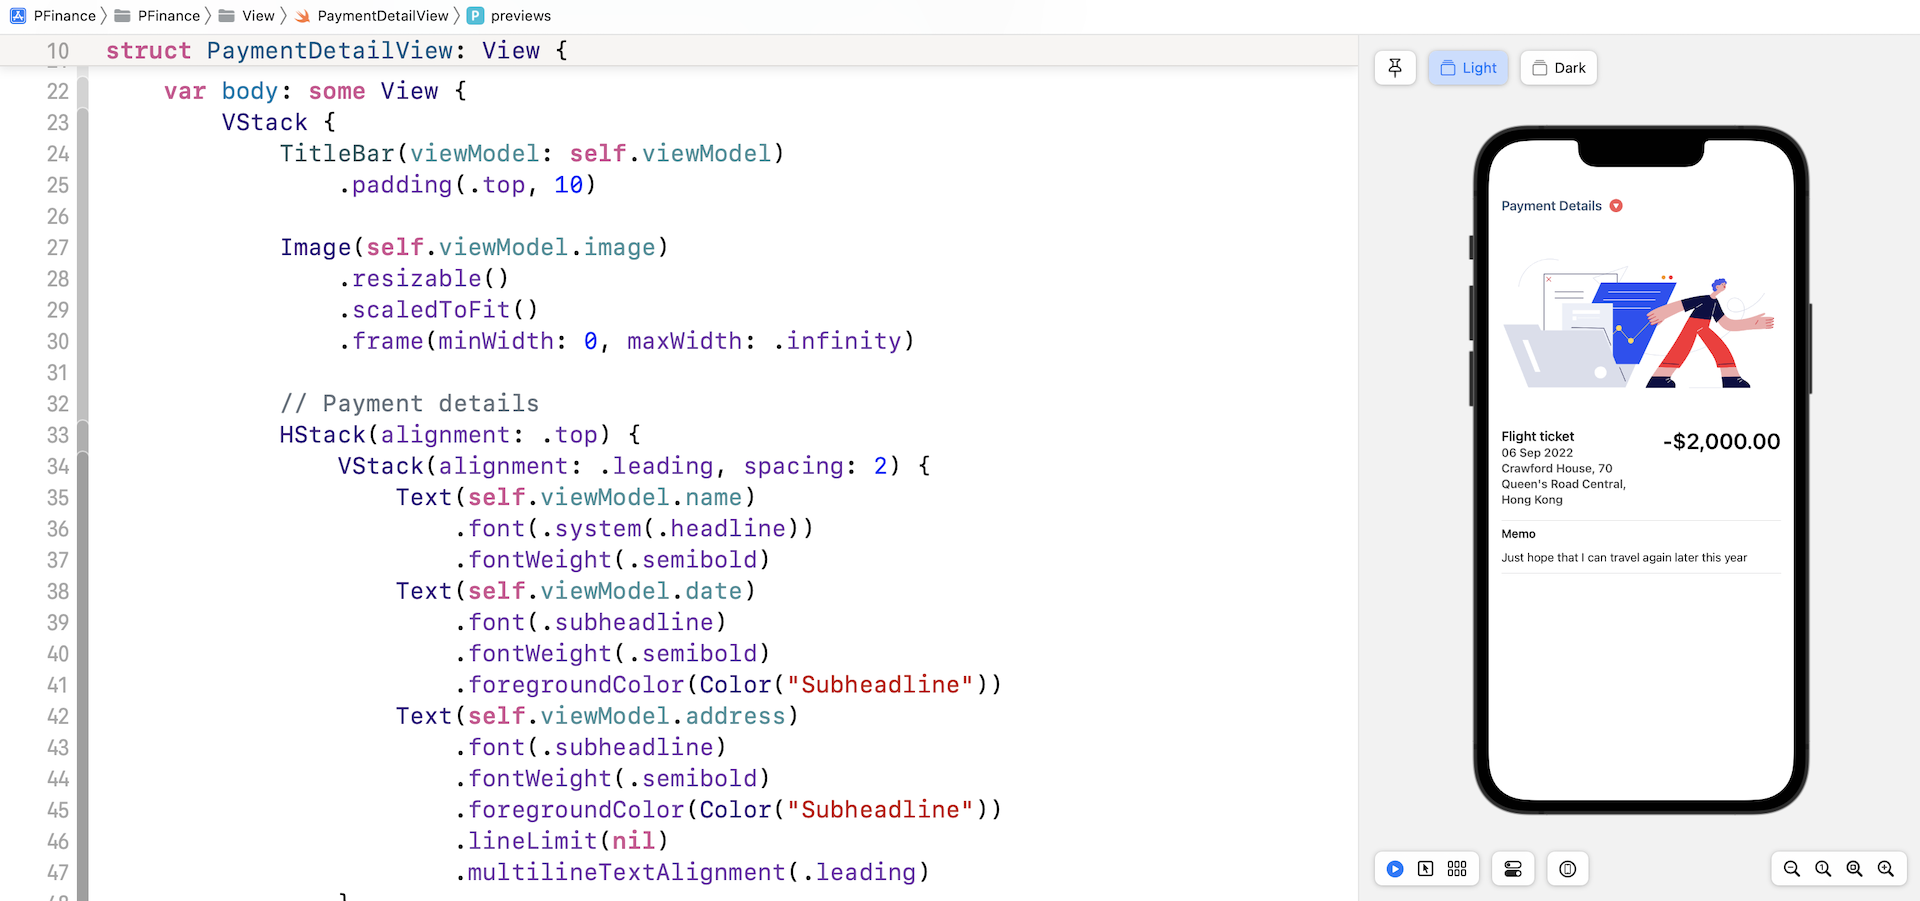
Now let's move onto the next view and discuss how the payment activity detail view is implemented. This view is activated when a user selects one of the payment activities in the Recent Transactions section. It displays the details of the activity such as amount and location. You can open PaymentDetailView.swift to see what the UI looks like. This will give you a better idea of the detail view.
The User Interface
The detail view is quite simple. I believe you know how to layout the components, so I will not explain the code line by line. One thing I want to highlight is the following lines of code:
let payment: PaymentActivity

private let viewModel: PaymentDetailViewModel

init(payment: PaymentActivity) {

    self.payment = payment
    self.viewModel = PaymentDetailViewModel(payment: payment)
}
Since we need to perform some initialization to create the view model, we implement a custom init method.
The View Model
Instead of putting everything in a single view, we can separate a view into two components: the view and its view model. The view itself is responsible for the UI layout, while the view model holds the state and data to be displayed in the view. The view model also handles the data validation and conversion. For experienced developers, we are applying a well known design pattern called MVVM (short for Model-View-ViewModel).
- See Building a Registration Form with Combine and View Model (Chapter 15)
To separate the actual view data from the view UI, we have created a view model named PaymentDetailViewModel:
private let viewModel: PaymentDetailViewModel
Why do we need to create an extra view model to hold the view's data? Take a look at the icon right next to the title Payment Details. This is a dynamic icon that changes in reference to the payment type. Additionally, do you notice the format of the amount? A requirement for our app is to format the amount with only two decimal places. We can implement all these logics in the view, but if you keep adding all the logics in the view, the view will become too complex to maintain.
One well known computer programming principle is the single responsibility principle (SRP). It states that every class or module in a program should have responsibility for just a single piece of that program’s functionality. SRP is one of the keys to writing good code, making your code easier to maintain and read.
This is why we separate the view into two components:
PaymentDetailViewis only responsible for the UI layout.PaymentDetailViewModelis responsible for converting the view's data into the expected presentation format.
Open PaymentDetailViewModel and take a look:
struct PaymentDetailViewModel {

    var payment: PaymentActivity

    var name: String {
        return payment.name
    }

    var date: String {
        return payment.date.string()
    }

    var address: String {
        return payment.address ?? ""
    }

    var typeIcon: String {

        let icon: String

        switch payment.type {
        case .income: icon = "arrowtriangle.up.circle.fill"
        case .expense: icon = "arrowtriangle.down.circle.fill"
        }

        return icon
    }

    var image: String = "payment-detail"

    var amount: String {
        let formatter = NumberFormatter()
        formatter.numberStyle = .decimal
        formatter.minimumFractionDigits = 2

        let formattedValue = formatter.string(from: NSNumber(value: payment.amount)) ?? ""

        let formattedAmount = ((payment.type == .income) ? "+" : "-") + "$" + formattedValue

        return formattedAmount
    }

    var memo: String {
        return payment.memo ?? ""
    }

    init(payment: PaymentActivity) {
        self.payment = payment
    }

}
As you can see, we implement all the conversion logic in this view model. Can we put this logic back into the view? Yes, of course. However, I believe the code is much cleaner when breaking the view into two parts.
Walking Through the Dashboard View
Now it's time to walk you through the dashboard view. Among all the views in the personal finance app, this view is the most complicated one.
The Menu Bar
Open Dashboard.swift and let's start with the menu bar:
struct MenuBar<Content>: View where Content: View {
    @State private var showPaymentForm = false

    let modalContent: () -> Content

    var body: some View {
        ZStack(alignment: .trailing) {
            HStack(alignment: .center) {
                Spacer()

                VStack(alignment: .center) {
                    Text(Date.today.string(with: "EEEE, MMM d, yyyy"))
                        .font(.caption)
                        .foregroundColor(.gray)
                    Text("Personal Finance")
                        .font(.title)
                        .fontWeight(.black)
                }

                Spacer()
            }

            Button(action: {
                self.showPaymentForm = true
            }) {
                Image(systemName: "plus.circle")
                    .font(.title)
                    .foregroundColor(.primary)
            }

            .sheet(isPresented: self.$showPaymentForm, onDismiss: {
                self.showPaymentForm = false
            }) {
                self.modalContent()
            }
        }

    }
}
The layout of the menu bar is simple. It shows the app's title, today's date, and the plus button. This menu bar view is designed to take in any modal view (i.e. modalContent). When the plus button is tapped, the modal view will be displayed. If you don't know how to create a generic view in SwiftUI, you can refer to chapter 17 on building a generic draggable view.
Income, Expense and Total Balance
Next, we have three card views to show the total balance, income, and expenses. Here is the code for the income card view:
struct IncomeCard: View {
    var income = 0.0

    var body: some View {

        ZStack {
            Rectangle()
                .foregroundColor(Color("IncomeCard"))
                .cornerRadius(15.0)

            VStack {
                Text("Income")
                    .font(.system(.title, design: .rounded))
                    .fontWeight(.black)
                    .foregroundColor(.white)
                Text(NumberFormatter.currency(from: income))
                    .font(.system(.title, design: .rounded))
                    .fontWeight(.bold)
                    .foregroundColor(.white)
                    .minimumScaleFactor(0.1)
            }
        }
        .frame(height: 150)

    }
}
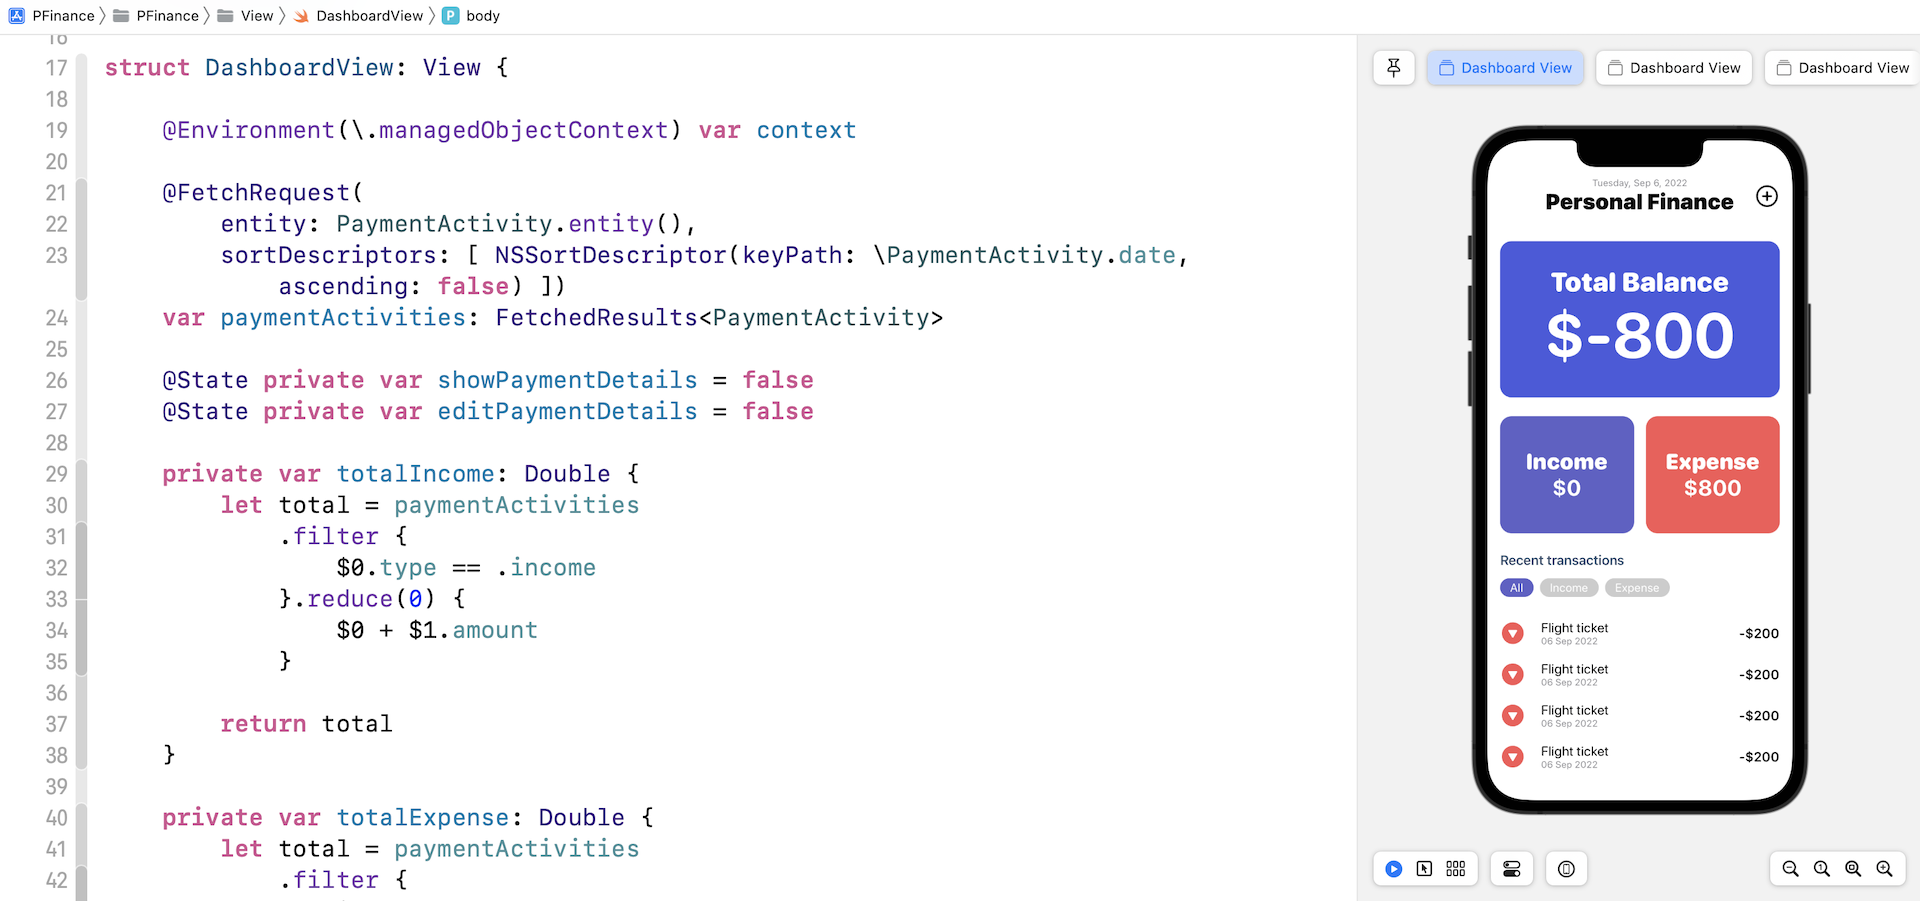
We simply use a ZStack to overlay the text on a colored rectangle. We use a similar technique to layout both TotalBalanceCard and ExpenseCard. So, how do we compute the income, expense, and total balance? We have three computed properties declared at the beginning of DashboardView:
private var totalIncome: Double {
    let total = paymentActivities
        .filter {
            $0.type == .income
        }.reduce(0) {
            $0 + $1.amount
        }

    return total
}

private var totalExpense: Double {
    let total = paymentActivities
        .filter {
            $0.type == .expense
        }.reduce(0) {
            $0 + $1.amount
        }

    return total
}

private var totalBalance: Double {
    return totalIncome - totalExpense
}
The paymentActivities variable stores the collection of payment activities. So, to calculate the total income, we first use the filter function to filter those activities with type .income and then use the reduce function to compute the total amount. The same technique was applied to calculate the total expense. Higher order functions in Swift are very useful. If you don't know how to use filter and reduce, you can further check out this tutorial (https://www.appcoda.com/higher-order-functions-swift/).
Recent Transactions
The last part of the UI is the list of recent transactions. As all the rows share the same layout (except the icon of the payment type), we create a generic view for the transaction row like this:
struct TransactionCellView: View {

    @ObservedObject var transaction: PaymentActivity

    var body: some View {

        HStack(spacing: 20) {

            if transaction.isFault {
                EmptyView()

            }  else {

                Image(systemName: transaction.type == .income ? "arrowtriangle.up.circle.fill" : "arrowtriangle.down.circle.fill")
                    .font(.title)
                    .foregroundColor(Color(transaction.type == .income ? "IncomeCard" : "ExpenseCard"))

                VStack(alignment: .leading) {
                    Text(transaction.name)
                        .font(.system(.body, design: .rounded))
                    Text(transaction.date.string())
                        .font(.system(.caption, design: .rounded))
                        .foregroundColor(.gray)
                }

                Spacer()

                Text((transaction.type == .income ? "+" : "-") + NumberFormatter.currency(from: transaction.amount))
                    .font(.system(.headline, design: .rounded))
            }
        }
        .padding(.vertical, 5)

    }
}
This cell view takes in a PaymentActivity object which is a managed object and then presents its content. To ensure the given managed object (i.e. transaction) is valid, we place a check inside the HStack by accessing the isFault property.
To list the transaction, we use ForEach to loop through the payment activities and create a TransactionCellView for each activity:
ForEach(paymentDataForView) { transaction in
TransactionCellView(transaction: transaction)
.onTapGesture {
self.showPaymentDetails = true
self.selectedPaymentActivity = transaction
}
.contextMenu {
Button(action: {
// Edit payment details
self.editPaymentDetails = true
self.selectedPaymentActivity = transaction
}) {
HStack {
Text("Edit")
Image(systemName: "pencil")
}
}
Button(action: {
// Delete the selected payment
self.delete(payment: transaction)
}) {
HStack {
Text("Delete")
Image(systemName: "trash")
}
}
}
}
.sheet(isPresented: self.$editPaymentDetails) {
PaymentFormView(payment: self.selectedPaymentActivity).environment(\.managedObjectContext, self.context)
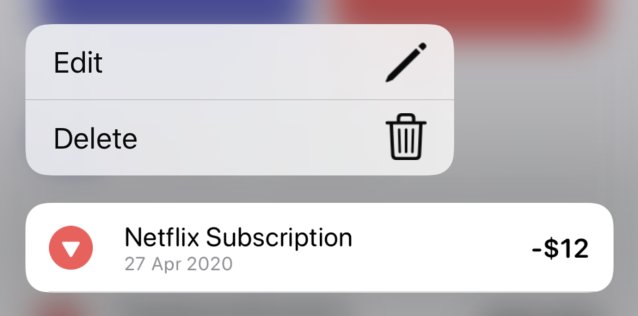
}
When a user taps and holds a row, it displays a context menu with both the delete and edit options. When selecting the edit option, the app will create the PaymentFormView with the selected payment activity. For the delete operation, the app will completely remove the activity from the database using Core Data.
Do you notice the paymentDataForView variable? Instead of using paymentActivities, the list view presents items stored in paymentDataForView. Why is that?
In the Recent Transactions section, the app provides three options for the user to filter the payment activities including all, income, and expense. For example, if the expense option is selected, the app only shows those activities related to expenses.
private var paymentDataForView: [PaymentActivity] {

    switch listType {
    case .all:
        return paymentActivities
            .sorted(by: { $0.date.compare($1.date) == .orderedDescending })
    case .income:
        return paymentActivities
            .filter { $0.type == .income }
            .sorted(by: { $0.date.compare($1.date) == .orderedDescending })
    case .expense:
        return paymentActivities
            .filter { $0.type == .expense }
            .sorted(by: { $0.date.compare($1.date) == .orderedDescending })
    }
}
The paymentDataForView is another computed property which returns a collection of payment activities that match the list type. In the code, we use the filter function to filter the payment activities and call the sort function to sort the activities in reverse chronological order.
The Bottom Sheet
The payment activity detail view is displayed as an overlay using a BottomSheet. When a user taps a payment record, the app brings up the bottom sheet and displays the payment details. This bottom sheet is expandable, so the user can drag the detail view up to expand it. Alternatively, the user can drag the view down to dismiss it.
.sheet(isPresented: $showPaymentDetails) {
    PaymentDetailView(payment: selectedPaymentActivity!)
        .presentationDetents([.medium, .large])
}
We have implemented a similar bottom sheet in chapter 18 using the .presentationDetents modifier. If you want to learn more about how the BottomSheet is built, you can re-read the chapter. Here, we define the sheet as an expandable bottom sheet. It starts with the medium size. But the user can drag up the sheet to expand it to large size.
Managing Payment Activities with Core Data
As mentioned before, all the payment activities are saved in the local database and managed using Core Data. In the code, we use the @FetchRequest property wrapper to fetch the payment activities like this:
@FetchRequest(
    entity: PaymentActivity.entity(),
    sortDescriptors: [ NSSortDescriptor(keyPath: \PaymentActivity.date, ascending: false) ])
var paymentActivities: FetchedResults<PaymentActivity>
This property wrapper makes it very easy to perform a fetch request. We simply specify the entity, which is the PaymentActivity, and the sort descriptor describing how the data should be ordered. The Core Data framework will then use the environment's managed object context to fetch the data. Most importantly, SwiftUI will automatically update the list views or any other views that are bound to the fetched results.
Deleting an activity from the database is also very straightforward. We call the delete function of the context and pass it with the activity object to remove:
private func delete(payment: PaymentActivity) {
    self.context.delete(payment)

    do {
        try self.context.save()
    } catch {
        print("Failed to save the context: \(error.localizedDescription)")
    }
}
FAdding a new activity or updating an existing activity happens in the PaymentFormView. If you look at the PaymentFormView.swift file again, you will find the save() function:
private func save() {
    let newPayment = payment ?? PaymentActivity(context: context)

    newPayment.paymentId = UUID()
    newPayment.name = paymentFormViewModel.name
    newPayment.type = paymentFormViewModel.type
    newPayment.date = paymentFormViewModel.date
    newPayment.amount = Double(paymentFormViewModel.amount)!
    newPayment.address = paymentFormViewModel.location
    newPayment.memo = paymentFormViewModel.memo

    do {
        try context.save()
    } catch {
        print("Failed to save the record...")
        print(error.localizedDescription)
    }
}
The first line of the code checks if we have any existing activity. If not, we will instantiate a new one. We then assign the form values to the payment object and call the save function of the managed object context to add/update the record in the database.
Exploring the Extensions
For convenience purposes, we have built two extensions for formatting the date and number. In the project navigator, you should find two files under the Extension folder. Let's take a look at the Date+Ext.swift file first:
extension Date {
    static var today: Date {
        return Date()
    }

    static var yesterday: Date {
        return Calendar.current.date(byAdding: .day, value: -1, to: Date())!
    }

    static var tomorrow: Date {
        return Calendar.current.date(byAdding: .day, value: 1, to: Date())!
    }

    var month: Int {
        return Calendar.current.component(.month, from: self)
    }

    static func fromString(string: String, with format: String = "yyyy-MM-dd") -> Date? {
        let dateFormatter = DateFormatter()
        dateFormatter.dateFormat = format
        return dateFormatter.date(from: string)
    }

    func string(with format: String = "dd MMM yyyy") -> String {
        let dateFormatter = DateFormatter()
        dateFormatter.dateFormat = format
        return dateFormatter.string(from: self)
    }
}
In the code above, we extend Date to provide additional functionality including:
- Get today's date
- Get tomorrow's date
- Get yesterday's date
- Get the month of the date
- Convert the current date to a string or vice versa
For formatting the amount, we extend NumberFormatter to provide an additional function:
extension NumberFormatter {
    static func currency(from value: Double) -> String {
        let formatter = NumberFormatter()
        formatter.numberStyle = .decimal

        let formattedValue = formatter.string(from: NSNumber(value: value)) ?? ""

        return "$" + formattedValue
    }
}
This function takes in a value, converts it to a string and prepends it with the dollar sign ($).
Handling the Software Keyboard
In the PaymentFormView.swift file, we added the following modifier:
.keyboardAdaptive()
This is a custom view modifier, developed for handling the software keyboard. For iOS 14, this modifier is no longer required but I intentionally added it because you may need it if your app supports iOS 13.
On iOS 13, the software keyboard blocks parts of the form when it's brought up without applying the modifier. For example, if you try to tap the memo field, it's completely hidden behind the keyboard. Conversely, if you attach the modifier to the scroll view, the form will move up automatically when the keyboard appears. On iOS 14, the mobile operating system itself automatically handles the appearance of the software keyboard, preventing it from blocking the input field.
Now let's check out the code (KeyboardAdaptive.swift) and see how we handle keyboard events:
struct KeyboardAdaptive: ViewModifier {

    @State var currentHeight: CGFloat = 0

    func body(content: Content) -> some View {
        content
            .padding(.bottom, currentHeight)
            .onAppear(perform: handleKeyboardEvents)
    }

    private func handleKeyboardEvents() {

        NotificationCenter.default.publisher(for: UIResponder.keyboardWillShowNotification
        ).compactMap { (notification) in
            notification.userInfo?["UIKeyboardFrameEndUserInfoKey"] as? CGRect
        }.map { rect in
            rect.height
        }.subscribe(Subscribers.Assign(object: self, keyPath: \.currentHeight))

        NotificationCenter.default.publisher(for: UIResponder.keyboardWillHideNotification
        ).compactMap { _ in
            CGFloat.zero
        }.subscribe(Subscribers.Assign(object: self, keyPath: \.currentHeight))

    }
}

extension View {
    func keyboardAdaptive() -> some View {
        ModifiedContent(content: self, modifier: KeyboardAdaptive())
    }
}
Whenever the keyboard appears (or disappears), iOS sends a notification to the app:
- keyboardWillShowNotification - this notification is sent when the keyboard is about to appear
- keyboardWillHideNotification - this notification is sent when the keyboard is going to disappear
So, how do we make use of these notifications to scroll up the form? When the app receives the keyboardWillShowNotification, it adds padding to the form to move it up. Conversely, we set the padding to zero when the keyboardWillHideNotification is received.
In the code above, we have a state variable to store the height of the keyboard. By using the Combine framework, we have a publisher that captures the keyboardWillShowNotification and emits the current height of the keyboard. Additionally, we have another publisher which listens to the keyboardWillHideNotification and emits a value of zero. For both publishers, we use the built-in assign subscriber to assign the value emitted by these publishers to the currentHeight variable.
This is how we detect the keyboard appearance, capture its height, and add the bottom padding. But why do we need to have the View extension?
The code works without the extension. You write the code like this to detect the keyboard events:
.modifier(KeyboardAdaptive())
To make the code cleaner, we create the extension and add the keyboardAdaptive() function. After that, we can attach the modifier to any view like this:
.keyboardAdaptive()
Since this view modifier is only applicable to iOS 13, we use the #available check to verify the OS version in the keyboardAdaptive() function:
extension View {
    func keyboardAdaptive() -> some View {
        if #available(iOS 14.0, *) {
            return AnyView(self)
        } else {
            return AnyView(ModifiedContent(content: self, modifier: KeyboardAdaptive()))
        }
    }
}
Summary
This is how we built the personal finance app from the ground up. Most of the techniques we used shouldn't be new to you. You combine what you learned in the earlier chapters to build the app.
SwiftUI is a very powerful and promising framework, allowing you to build the same app with less code than UIKit. If you have some programming experience with UIKit, you know it would take you more time and lines of code to create the personal finance app. I really hope you enjoy learning SwiftUI and building UIs with this new framework.