- Made by AppCoda
- Contact us / Support
- Tweet this book
- Preface
- 1. Introduction to SwiftUI
- 2. Getting Started with SwiftUI and Working with Text
- 3. Working with Images
- 4. Layout User Interfaces with Stacks
- 5. Understanding ScrollView and Building a Carousel UI
- 6. Working with SwiftUI Buttons and Gradient
- 7. Understanding State and Binding
- 8. Implementing Path and Shape for Line Drawing and Pie Charts
- 9. Basic Animations and Transitions
- 10. Understanding Dynamic List, ForEach and Identifiable
- 11. Working with Navigation UI and Navigation Bar Customization
- 12. Playing with Modal Views, Floating Buttons and Alerts
- 13. Building a Form with Picker, Toggle and Stepper
- 14. Data Sharing with Combine and Environment Objects
- 15. Building a Registration Form with Combine and View Model
- 16. Working with Swipe-to-Delete, Context Menu and Action Sheets
- 17. Using Gestures
- 18. Displaying an Expandable Bottom Sheet Using Presentation Detents
- 19. Creating a Tinder-like UI with Gestures and Animations
- 20. Creating an Apple Wallet like Animation and View Transition
- 21. Working with JSON, Slider and Data Filtering
- 22. Building a ToDo app with Core Data
- 23. Integrating UIKit with SwiftUI Using UIViewRepresentable
- 24. Creating a Search Bar View and Working with Custom Binding
- 25. Putting Everything Together to Build a Real World App
- 26. Creating an App Store like Animated View Transition
- 27. Building an Image Carousel
- 28. Building an Expandable List View Using OutlineGroup
- 29. Building Grid Layout Using LazyVGrid and LazyHGrid
- 30. Creating an Animated Activity Ring with Shape and Animatable
- 31. Working with AnimatableModifier and LibraryContentProvider
- 32. Working with TextEditor to Create Multiline Text Fields
- 33. Using matchedGeometryEffect to Create View Animations
- 34. ScrollViewReader and Grid Animation
- 35. Working with Tab View and Tab Bar Customization
- 36. Using AsyncImage in SwiftUI for Loading Images Asynchronously
- 37. Implementing Search Bar Using Searchable
- 38. Creating Bar Charts and Line Charts with the Charts Framework
- 39. Capturing Text within Image Using Live Text APIs
- 40. How to Use ShareLink for Sharing Data Like Text and Photos
- 41. Using ImageRenderer to Convert SwiftUI Views into Images
- 42. Creating PDF Documents Using ImageRenderer
- 43. Using Gauge to Display Progress and Create a Speedometer
- 44. Creating Grid Layout Using Grid APIs
- 45. Switching Layout with AnyLayout
- Published with GitBook
Chapter 22
Building a ToDo App with Core Data
One common question of iOS app development is how do we work with Core Data and SwiftUI to save data permanently in the built-in database. In this chapter, we will answer this question by building a ToDo app.
Since the ToDo demo app makes use of List and Combine to handle the data presentation and sharing, I'll assume that you've read the following chapters:
- Chapter 7 - Understanding State and Binding
- Chapter 10 - Understanding Dynamic List, ForEach and Identifiable
- Chapter 14 - Data Sharing with Combine and Environment Objects
If you haven't done so or forgot what Combine and Environment Objects are, go back and read the chapters again.
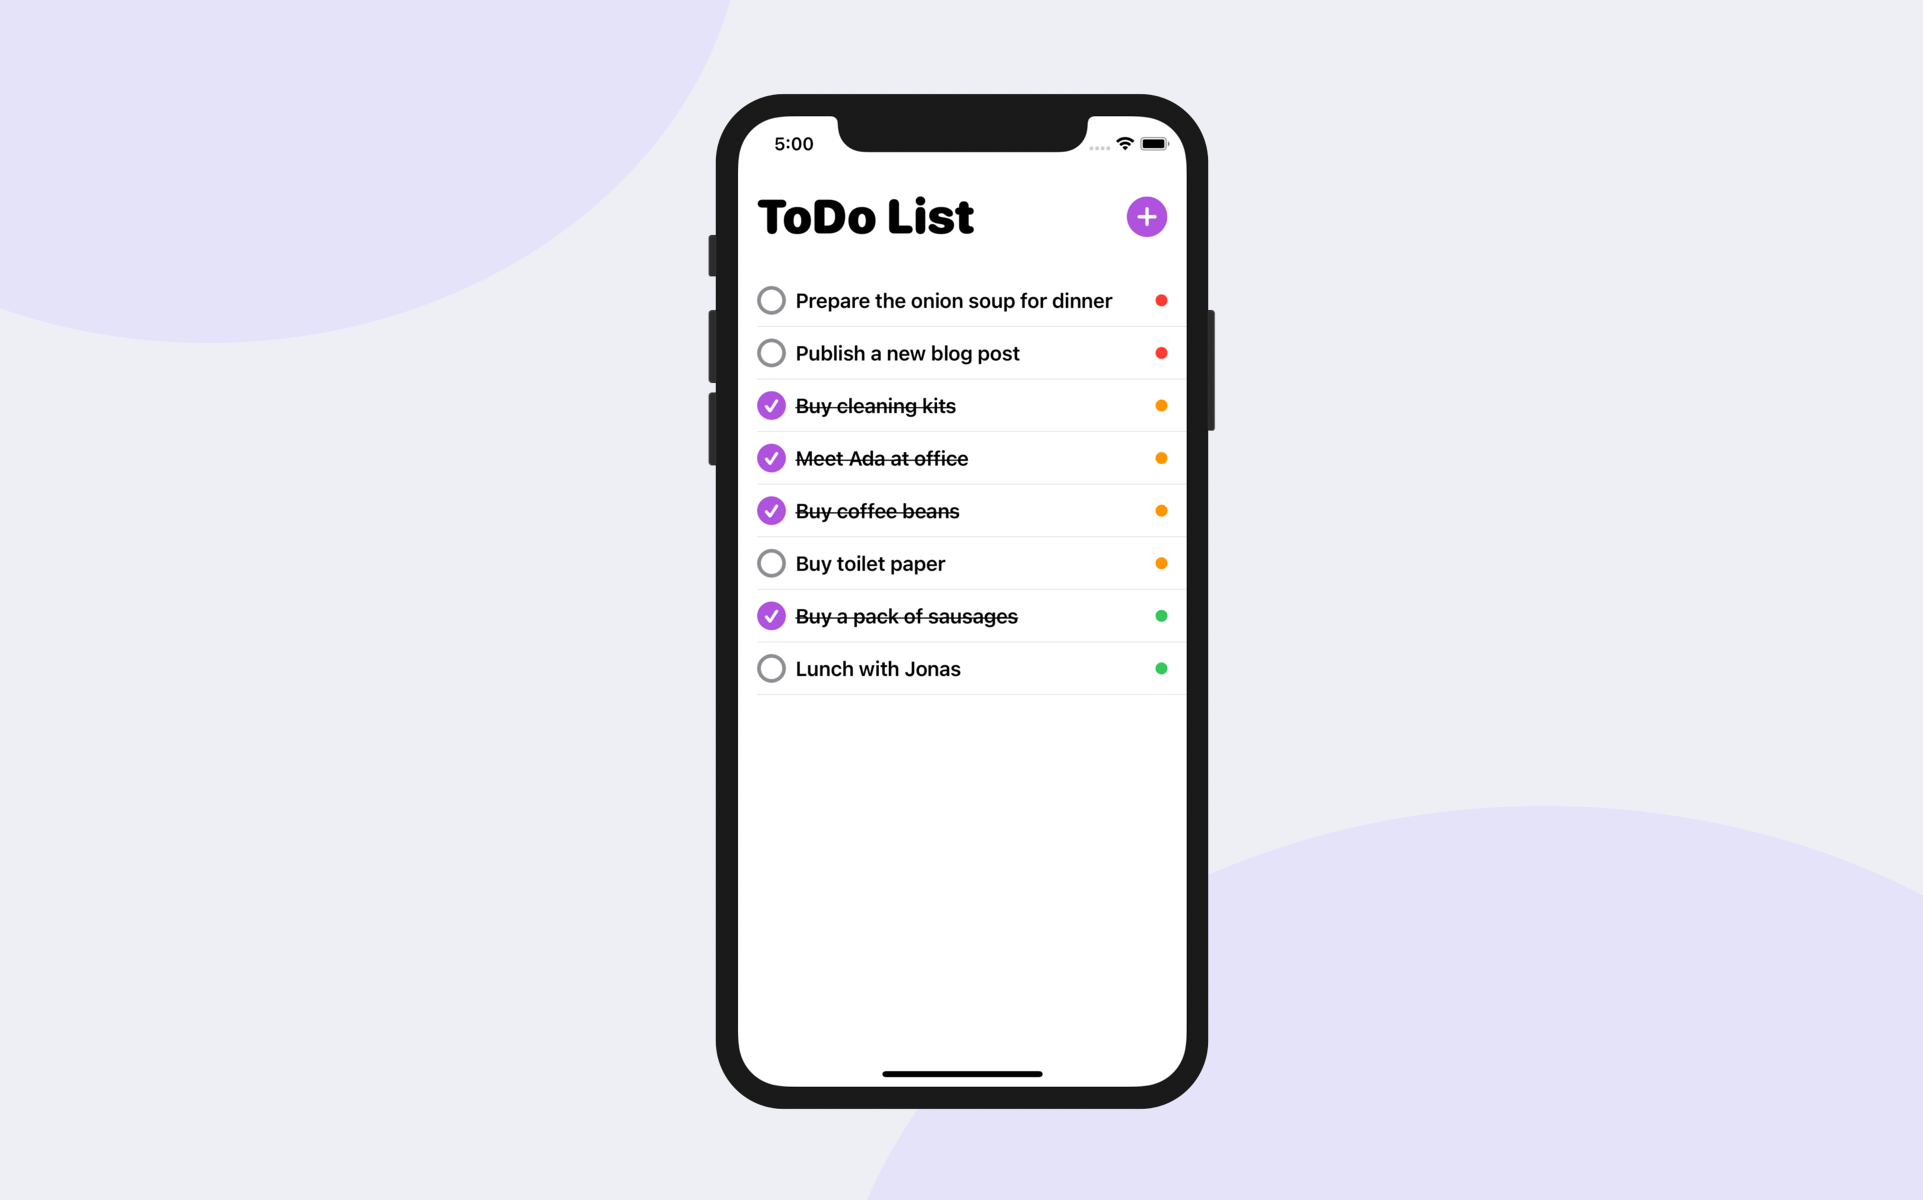
What are we going to do in this chapter to understand Core Data? Instead of building the ToDo app from scratch, I've already built the core parts of the app. However, it can't save data permanently. To be more specific, it can only save the to-do items in an array. Whenever the user closes the app and starts it again, all the data is gone. We will modify the app and convert it to use Core Data for saving the data permanently to the local database. Figure 1 shows some sample screenshots of the ToDo app.
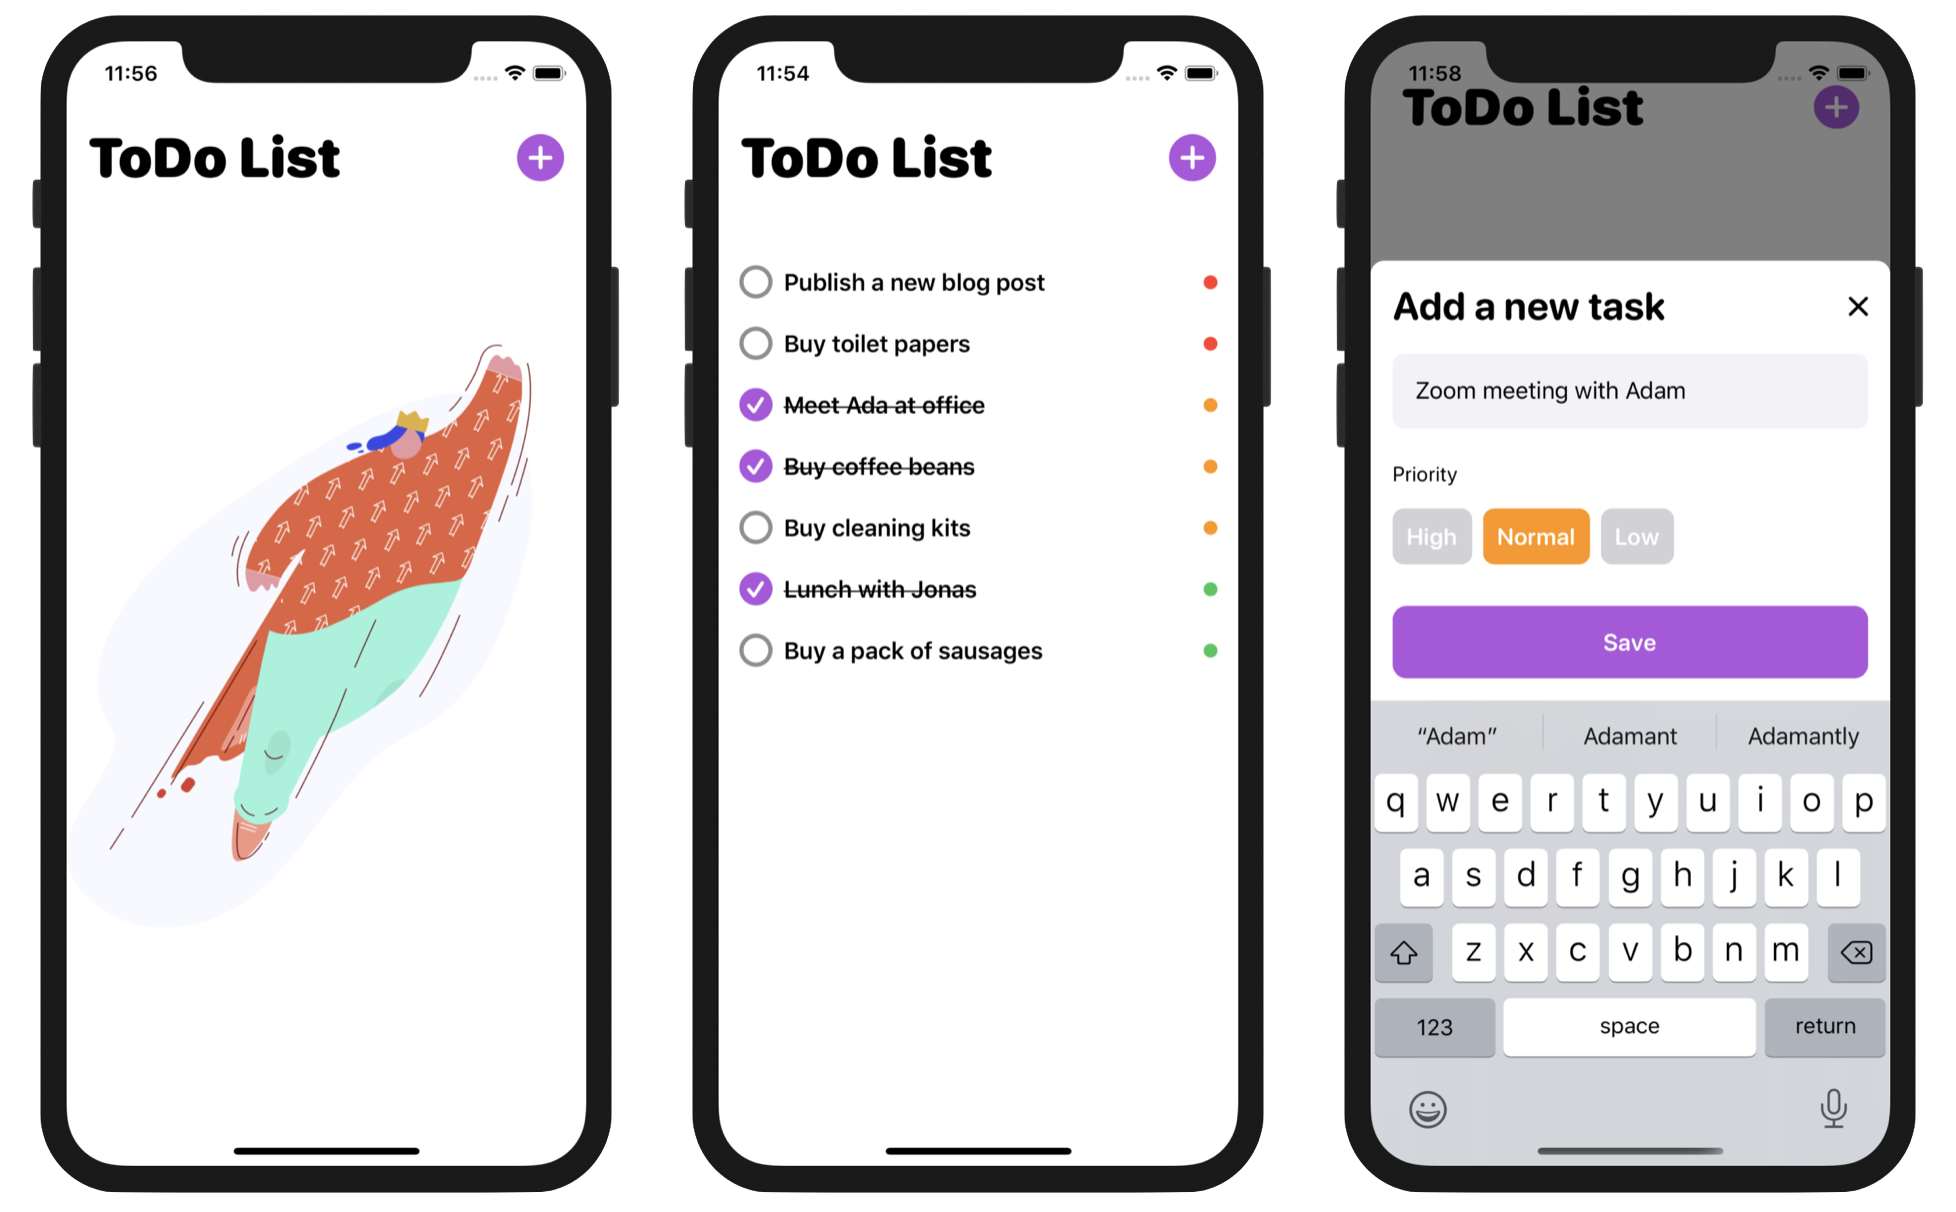
Before we perform the modification, I will walk you through the starter project so you fully understand how the code works. Other than Core Data, you will also learn how to customize the style of a toggle. Take a look at the screenshots above. The checkbox is actually a toggle view of SwiftUI. I will show you how to create these checkboxes by customizing the Toggle's style.
We've got a lot to cover in this chapter, so let's get started!
Understanding Core Data
Before we check out the starter project of the ToDo app, let me give you a quick introduction to Core Data and how you're going to work with it in SwiftUI projects.
What is Core Data?
First things first, don't confuse the Core Data framework with a database. Core Data is not a database. It's just a framework for developers to manage and interact with data on a persistent store. Though the SQLite database is the default persistent store for Core Data on iOS, persistent stores are not limited to databases. For instance, you can also utilize Core Data to manage data in a local file (e.g. XML).
The Core Data framework simply shields developers from the inner details of the persistent store. Take the SQLite database as an example. You do not need to know how to connect to the database nor understand SQL to retrieve data records. All you need to figure out is how to work with the Core Data APIs such as NSManagedObjectContext and the Managed Object Model.
Feeling confused? No worries. You will understand what I mean after we convert the ToDo app from arrays to Core Data.
Using Core Data in SwiftUI projects
If you start from a brand new project, the easiest way to use the Core Data framework is by enabling the Core Data option. You can give it a try. Launch Xcode and create a new project using the App template. Name it to whatever name you like but please ensure you check the Core Data checkbox.
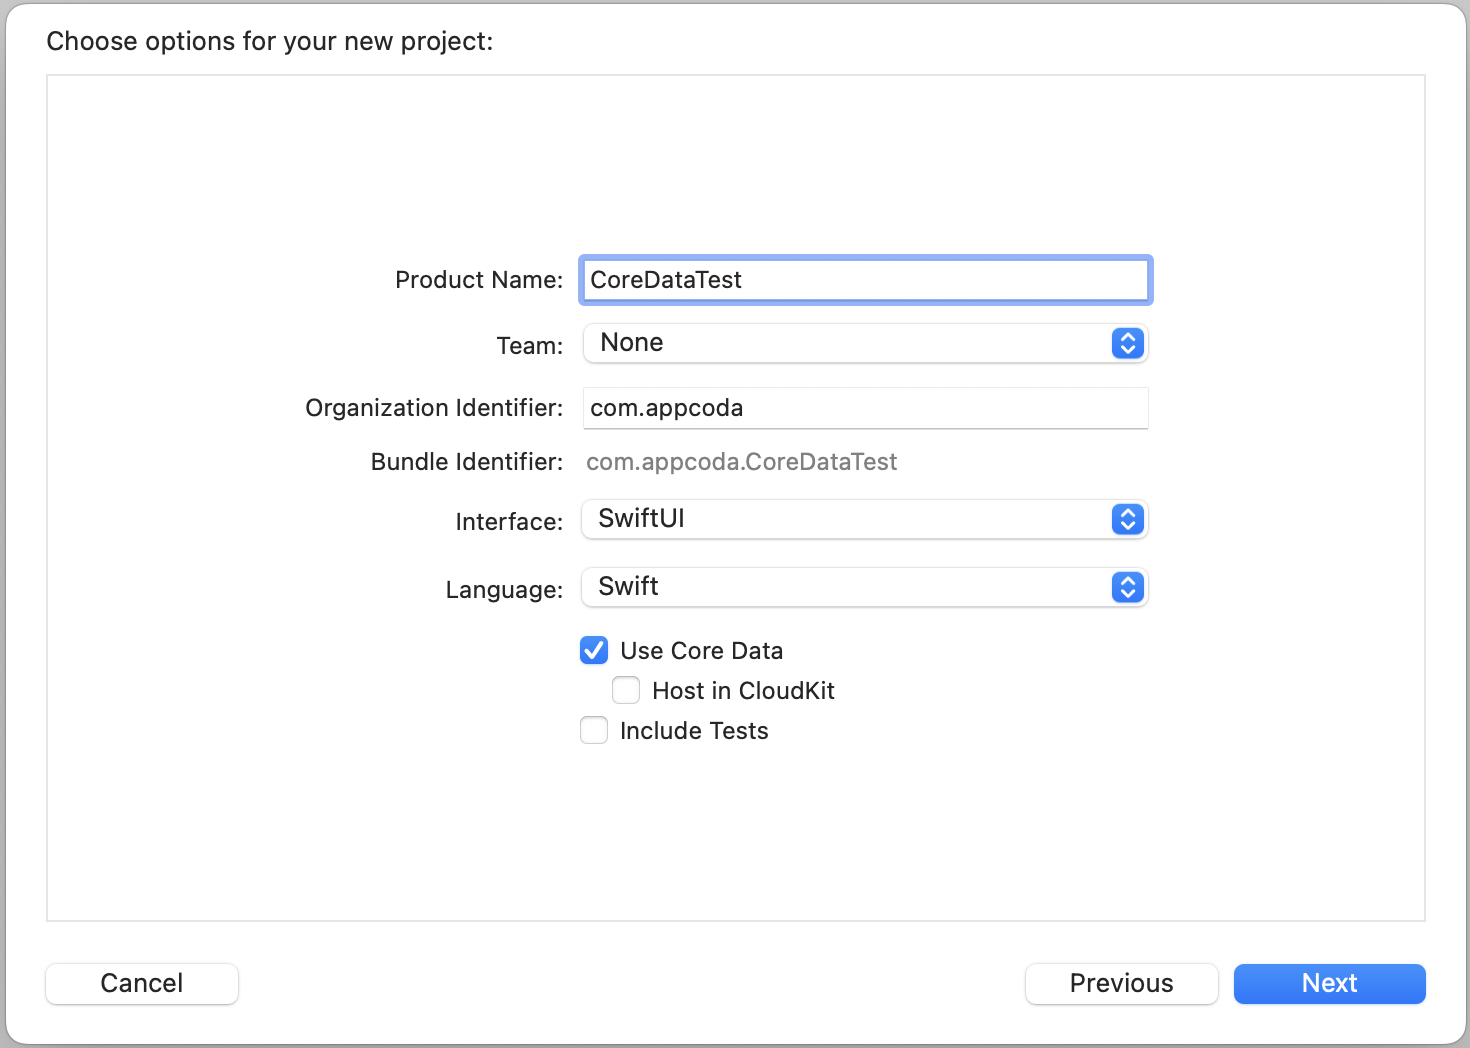
By enabling Core Data, Xcode will generate all the required code and the managed object model for you. Once the project created, you should see a new file named CoreDataTest.xcdatamodeld. In Xcode, the managed object model is defined in a file with the extension .xcdatamodeld. This is the managed object model generated for your project and this is where you define the entities for interacting with the persistent store.
Take a look at the Persistence.swift file, which is another file generated by Xcode. This file contains the code for loading the managed object model and saving the data to the persistent store.
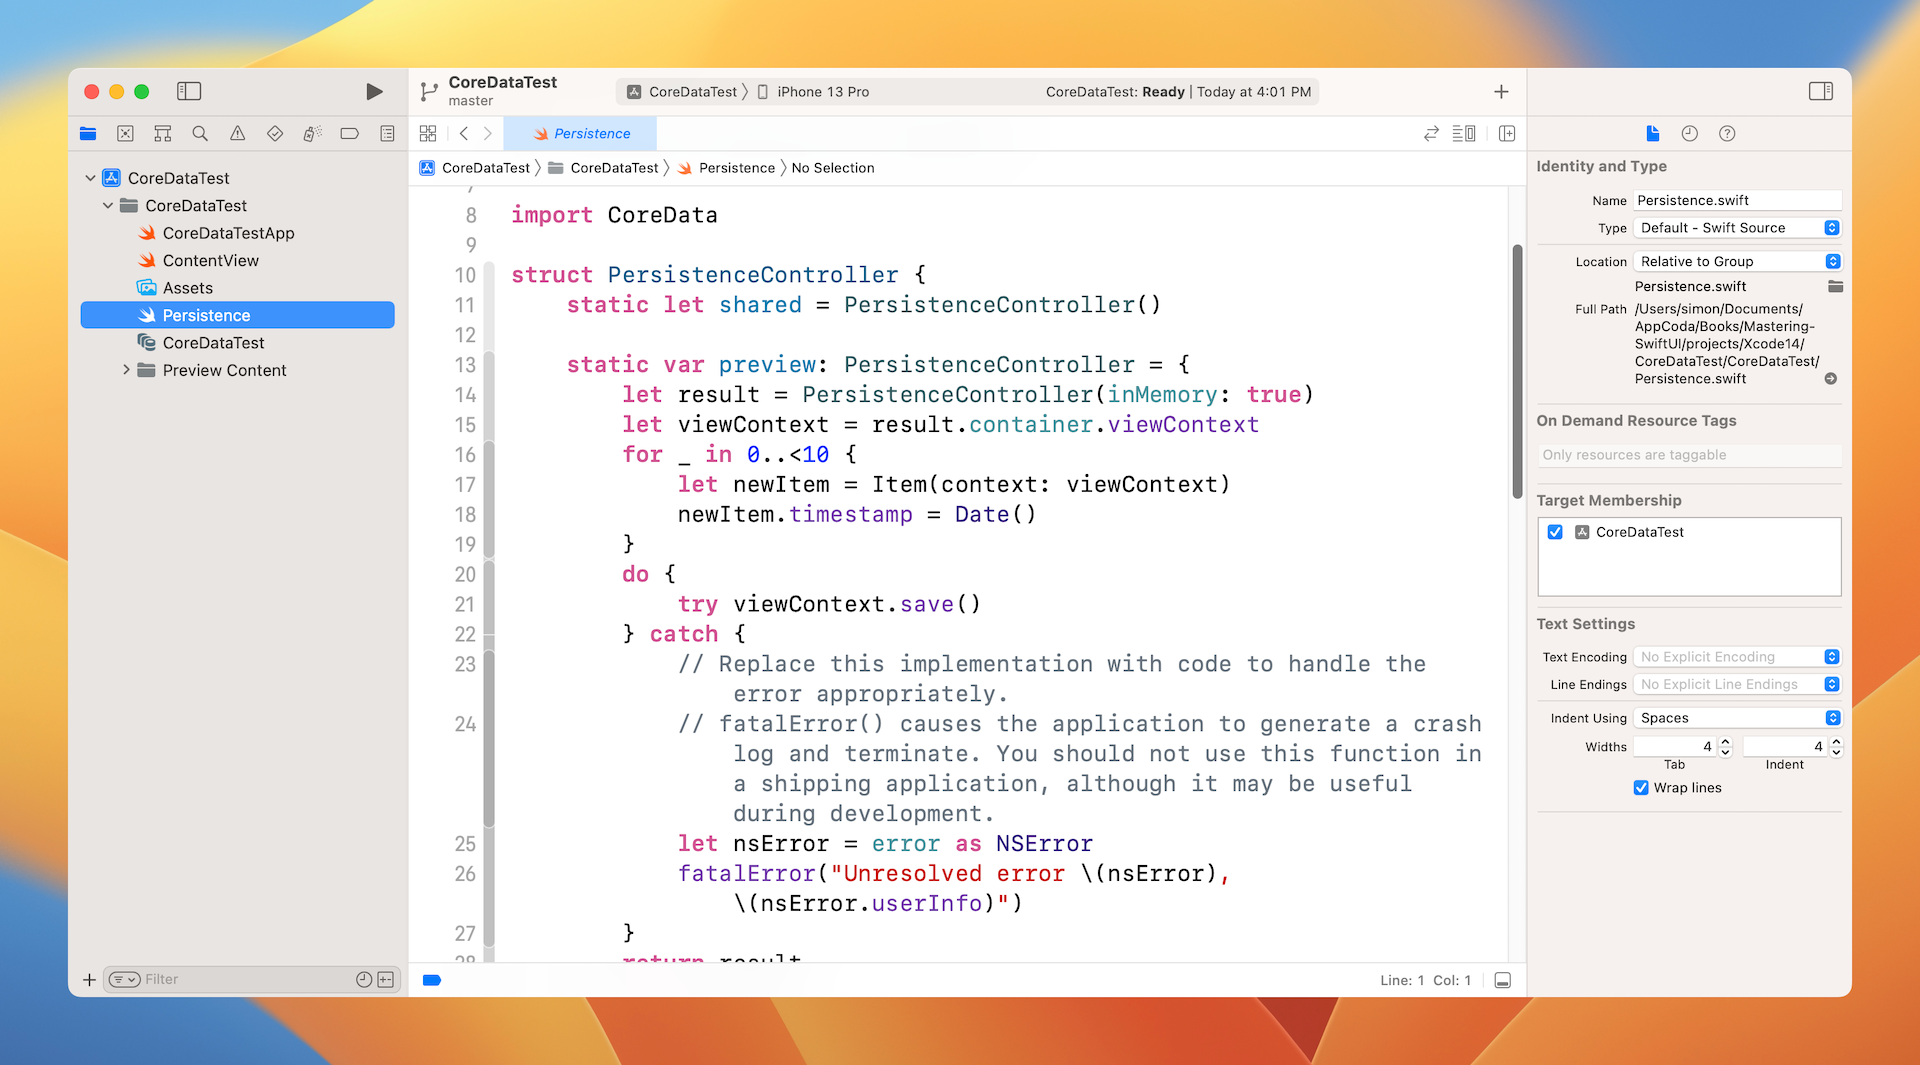
If you've developed apps using UIKit before, you usually use the container to manage the data in the database or other persistent stores. In SwiftUI, it's a little bit different. We seldom use this container directly. Instead SwiftUI injects the managed object context into the environment, so that any view can retrieve the context and manage the data.
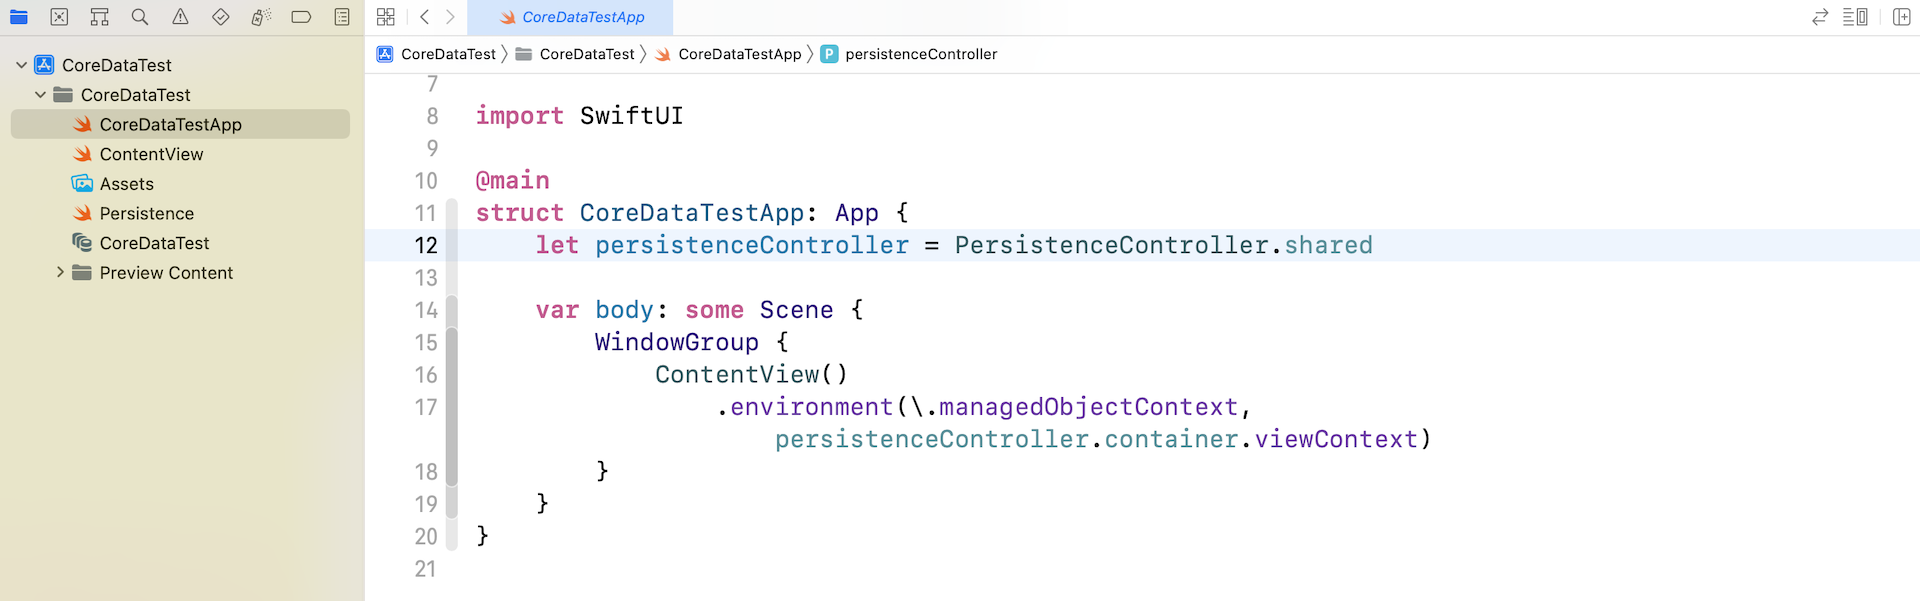
Take a look at the CoreDataTestApp.swift file. Xcode adds a constant that holds the instance of PersistenceController and a line of code to inject the managed object context is injected into the environment.
This is all the code and files generated by Xcode when enabling the Core Data option. If you open ContentView.swift, Xcode also generates sample code for loading data from the local data store. Look at the code to get an idea of how this works. In general, to save and manage data on the local database, the procedures are:
Create an entity in the managed object model (i.e.
.xcdatamodeld)Define a managed object, which inherits from
NSManagedObject, to associate with the entityIn the views that need to save and update the data, get the managed object context from the environment using
@Environmentlike this:@Environment(\.managedObjectContext) var contextAnd then create the managed object and use the
savemethod of the context to add the object to the database. Here is a sample code snippet:let task = ToDoItem(context: context) task.id = UUID() task.name = name task.priority = priority task.isComplete = isCompleteFor data retrieval, Apple introduced a property wrapper called
@FetchRequestfor you to fetch data from the persistent store. Here is sample code:@FetchRequest( entity: ToDoItem.entity(), sortDescriptors: [ NSSortDescriptor(keyPath: \ToDoItem.priorityNum, ascending: false) ]) var todoItems: FetchedResults<ToDoItem>This property wrapper makes it very easy to perform a fetch request. You just need to specify the entity object you want to retrieve and how the data is ordered. The framework will then use the environment's managed object context to fetch the data. Most importantly, SwiftUI will automatically update any views that are bound to the fetched results because the fetch result is a collection of
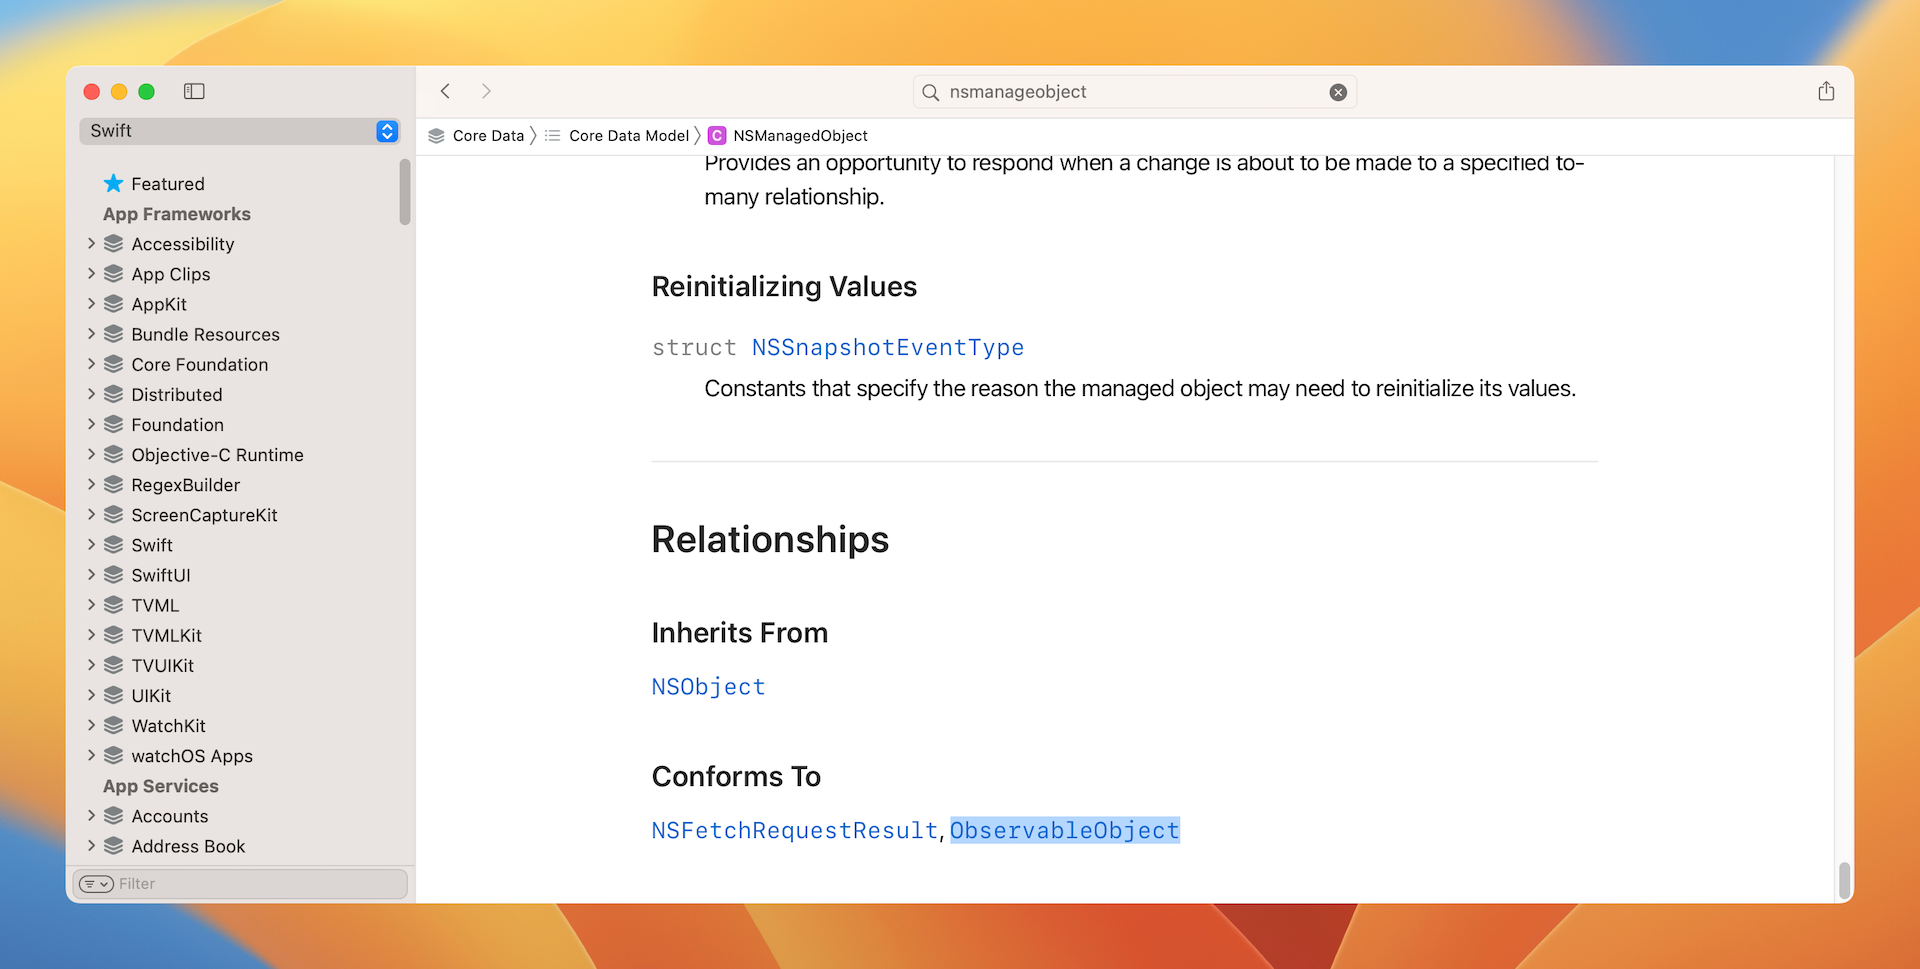
NSManagedObject, which conforms to theObservableObjectprotocol.
This is how you work with Core Data in SwiftUI projects. I know you may be confused by some of the terms and procedures. This section is just a quick introduction. Later, when you work on the demo app, we will go through these procedures in detail.
Understanding the ToDo App Demo
Now that you have a basic understanding of Core Data, let me go through the app demo with you. Later, we will convert this ToDo demo, allowing it to save the to-do items permanently. Right now, as mentioned before, all the data is stored in memory and will vanish when the app restarts.
First, please download the starter project from https://www.appcoda.com/resources/swiftui4/SwiftUIToDoListStarter.zip. Unzip the file and open ToDoList.xcodeproj in Xcode. Select the ContentView.swift file and preview the UI. You should see a screen like that shown in figure 5.
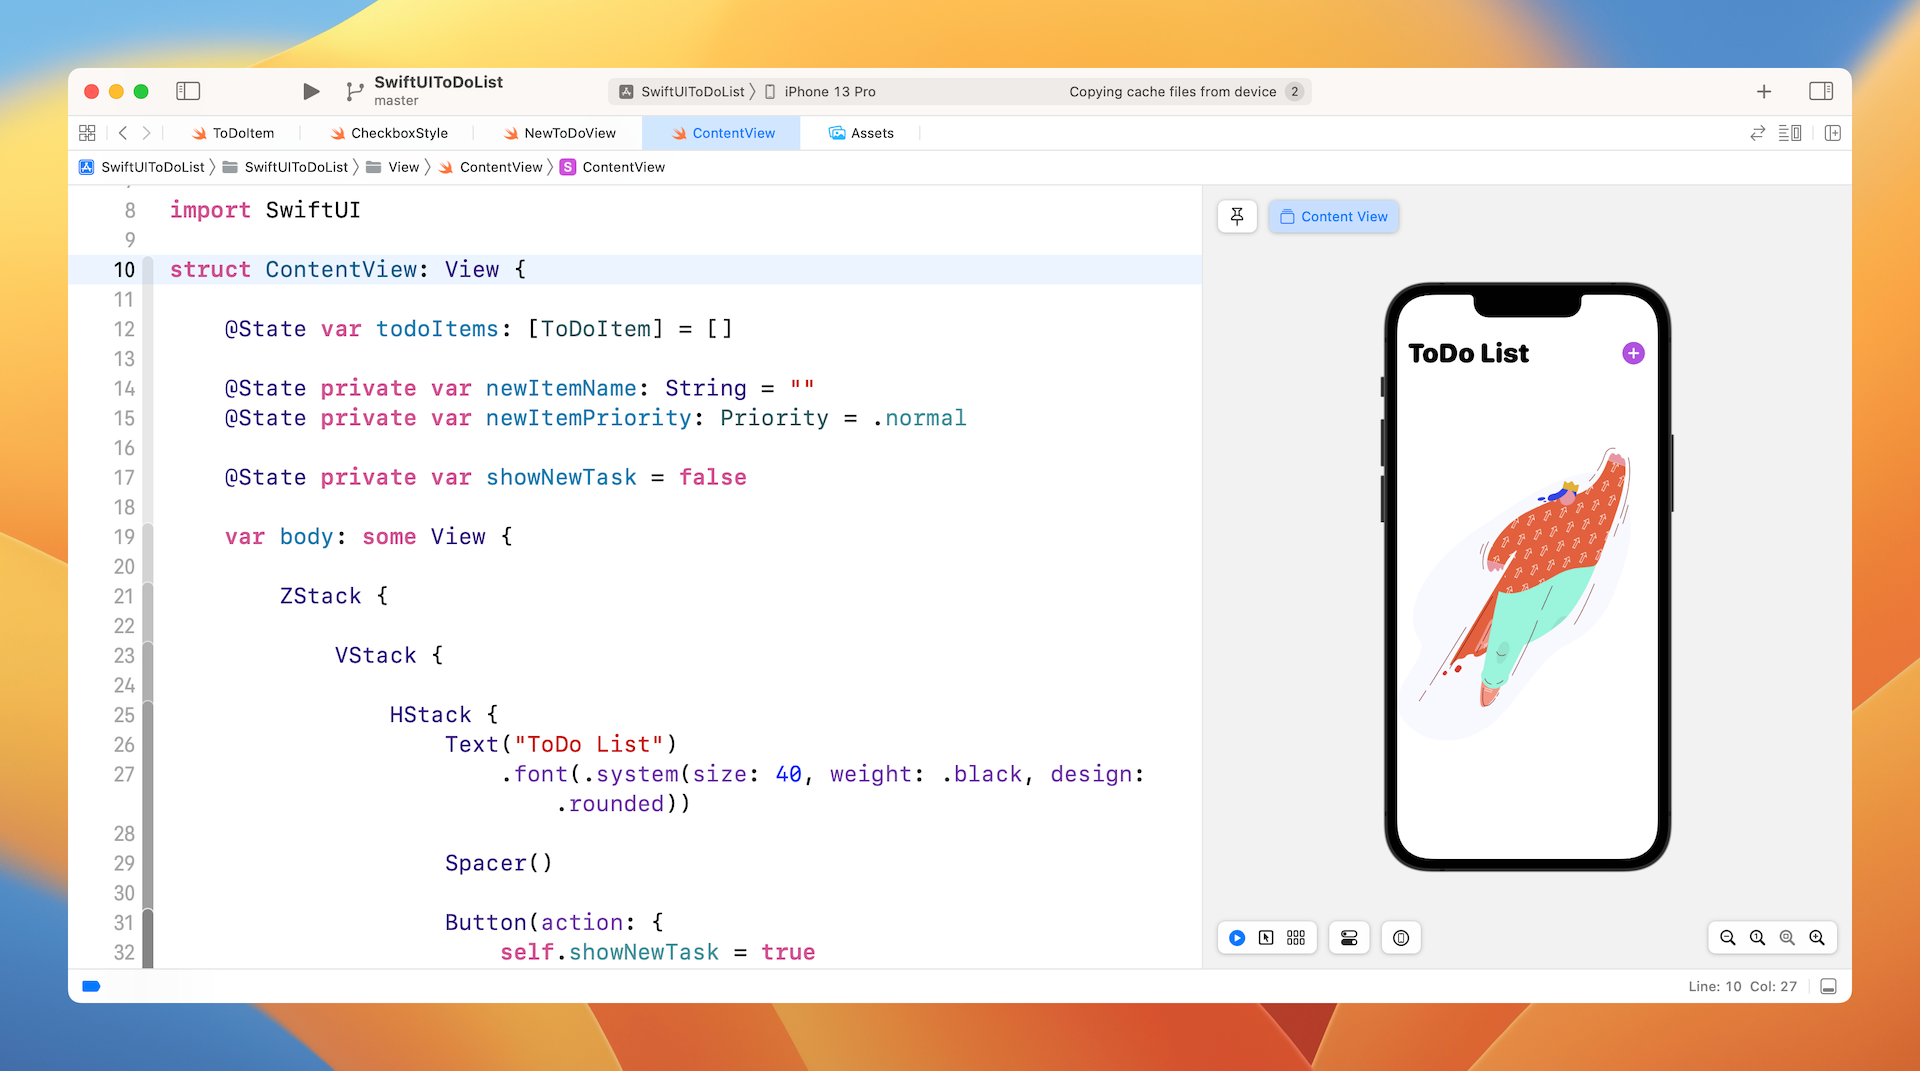
Run the app in the preview canvas or a simulator. Tap the + button to add a to-do item. Repeat the procedure to add a few more items. The app then lists the to-do items. Tapping the checkbox of a to-do item will cross out that item.
How to present the list of Todo Items
Now let us walk through the code, so you understand how the code works. First, we start with the model class. Open ToDoItem.swift in the Model folder.
enum Priority: Int {
case low = 0
case normal = 1
case high = 2
}
class ToDoItem: ObservableObject, Identifiable {
var id = UUID()
@Published var name: String = ""
@Published var priority: Priority = .normal
@Published var isComplete: Bool = false
init(name: String, priority: Priority = .normal, isComplete: Bool = false) {
self.name = name
self.priority = priority
self.isComplete = isComplete
}
}
The ToDo app demo is a simplified version of an ordinary ToDo app. Each to-do item (or task), has three properties: name, priority, and isComplete (i.e. the status of the task). This class adopts the ObservableObject protocol. The three properties are marked with @Published so that the subscribers are informed whenever there are any changes of the values. Later, in the implementation of ContentView, SwiftUI listens for value changes and updates the views accordingly. For example, when the value of isComplete changes, it toggles the checkbox.
This class also conforms to the Identifiable protocol such that each instance of ToDoItem has an unique identifier. Later, we will use the ForEach and List to display the to-do items. This is why we need to adopt the protocol and create the id property.
Now let's move onto the views and begin with the ContentView.swift file. Assuming you've read chapter 10, you should understand most of the code. The content view has three main parts, which are embedded in a ZStack:
- The list view that presents all the to-do items.
- The empty view (NoDataView) that is displayed when there are no to-do items .
- The "Add a new task" view that is shown when a user taps the + button.
Take a look at the first VStack:
VStack {
HStack {
Text("ToDo List")
.font(.system(size: 40, weight: .black, design: .rounded))
Spacer()
Button(action: {
self.showNewTask = true
}) {
Image(systemName: "plus.circle.fill")
.font(.largeTitle)
.foregroundColor(.purple)
}
}
.padding()
List {
ForEach(todoItems) { todoItem in
ToDoListRow(todoItem: todoItem)
}
}
}
.rotation3DEffect(Angle(degrees: showNewTask ? 5 : 0), axis: (x: 1, y: 0, z: 0))
.offset(y: showNewTask ? -50 : 0)
.animation(.easeOut)
I declared a state variable named todoItems to hold all the to-do items. It's marked with @State so that the list will be refreshed whenever there are any changes. In the List view, we use ForEach to loop through the items in the array.
We handle the rows of the list, by a separate view named ToDoListRow:
struct ToDoListRow: View {
@ObservedObject var todoItem: ToDoItem
var body: some View {
Toggle(isOn: self.$todoItem.isComplete) {
HStack {
Text(self.todoItem.name)
.strikethrough(self.todoItem.isComplete, color: .black)
.bold()
.animation(.default)
Spacer()
Circle()
.frame(width: 10, height: 10)
.foregroundColor(self.color(for: self.todoItem.priority))
}
}.toggleStyle(CheckboxStyle())
}
private func color(for priority: Priority) -> Color {
switch priority {
case .high: return .red
case .normal: return .orange
case .low: return .green
}
}
}
This view takes in a to-do item, which is a ObservableObject. This means for any changes of that to-do item, the view that subscribes to the item will be invalidated automatically.
For each row of the to-do item, consists of three parts:
- A toggle / checkbox - indicates whether the task is complete or not.
- A text label - shows the name of the task
- A dot / circle - shows the priority of the task
The second and third parts are pretty straightforward. For the checkbox, it's worth having a deeper discussion. SwiftUI comes with a standard control called Toggle. In an earlier chapter, we used it to create a Settings screen. The presentation of the toggle is more like a switch that lets you flip between on and off. In the ToDo app, we want to make the toggle look like a checkbox.
Customizing the look & feel of a Toggle
Similar to Button which we discussed in chapter 6, Toggle also lets developers customize its style. All you need to do is to implement the ToggleStyle protocol and provide the customizations. In the project navigator, open the CheckBoxStyle.swift file to take a look:
struct CheckboxStyle: ToggleStyle {
func makeBody(configuration: Self.Configuration) -> some View {
return HStack {
Image(systemName: configuration.isOn ? "checkmark.circle.fill" : "circle")
.resizable()
.frame(width: 24, height: 24)
.foregroundColor(configuration.isOn ? .purple : .gray)
.font(.system(size: 20, weight: .bold, design: .default))
.onTapGesture {
configuration.isOn.toggle()
}
configuration.label
}
}
}
In the code, we implement the makeBody method, which is the requirement of the protocol. We create an image view which displays a checkmark image or a circle image, depending on the status of the toggle (i.e. configuration.isOn). This is how you customize the style of a toggle.
To use the CheckboxStyle, attach the toggleStyle modifier to the Toggle and specify the checkbox style like this:
.toggleStyle(CheckboxStyle())
Handling the empty list view
When there are no items in the array, we present an image view instead of showing an empty list view. This is completely optional. However, I think it makes the app look better and let users know what to do when the app is first started.
// If there is no data, show an empty view
if todoItems.count == 0 {
NoDataView()
}
Since we have a ZStack to embed the views, it's pretty easy to control the appearance of this empty view, which is only displayed when the array is empty.
Displaying the Add Task view
When a user taps the + button at the top-right corner, the app displays the NewToDoView, which I will go through with you shortly. This view overlays on top of the list view and appears like a bottom sheet. We also add a blank view for darkening the list view.
Here is the code for reference:
if showNewTask {
BlankView(bgColor: .black)
.opacity(0.5)
.onTapGesture {
self.showNewTask = false
}
NewToDoView(isShow: $showNewTask, todoItems: $todoItems, name: "", priority: .normal)
.transition(.move(edge: .bottom))
.animation(.interpolatingSpring(stiffness: 200.0, damping: 25.0, initialVelocity: 10.0))
}
Understanding the Add Task view
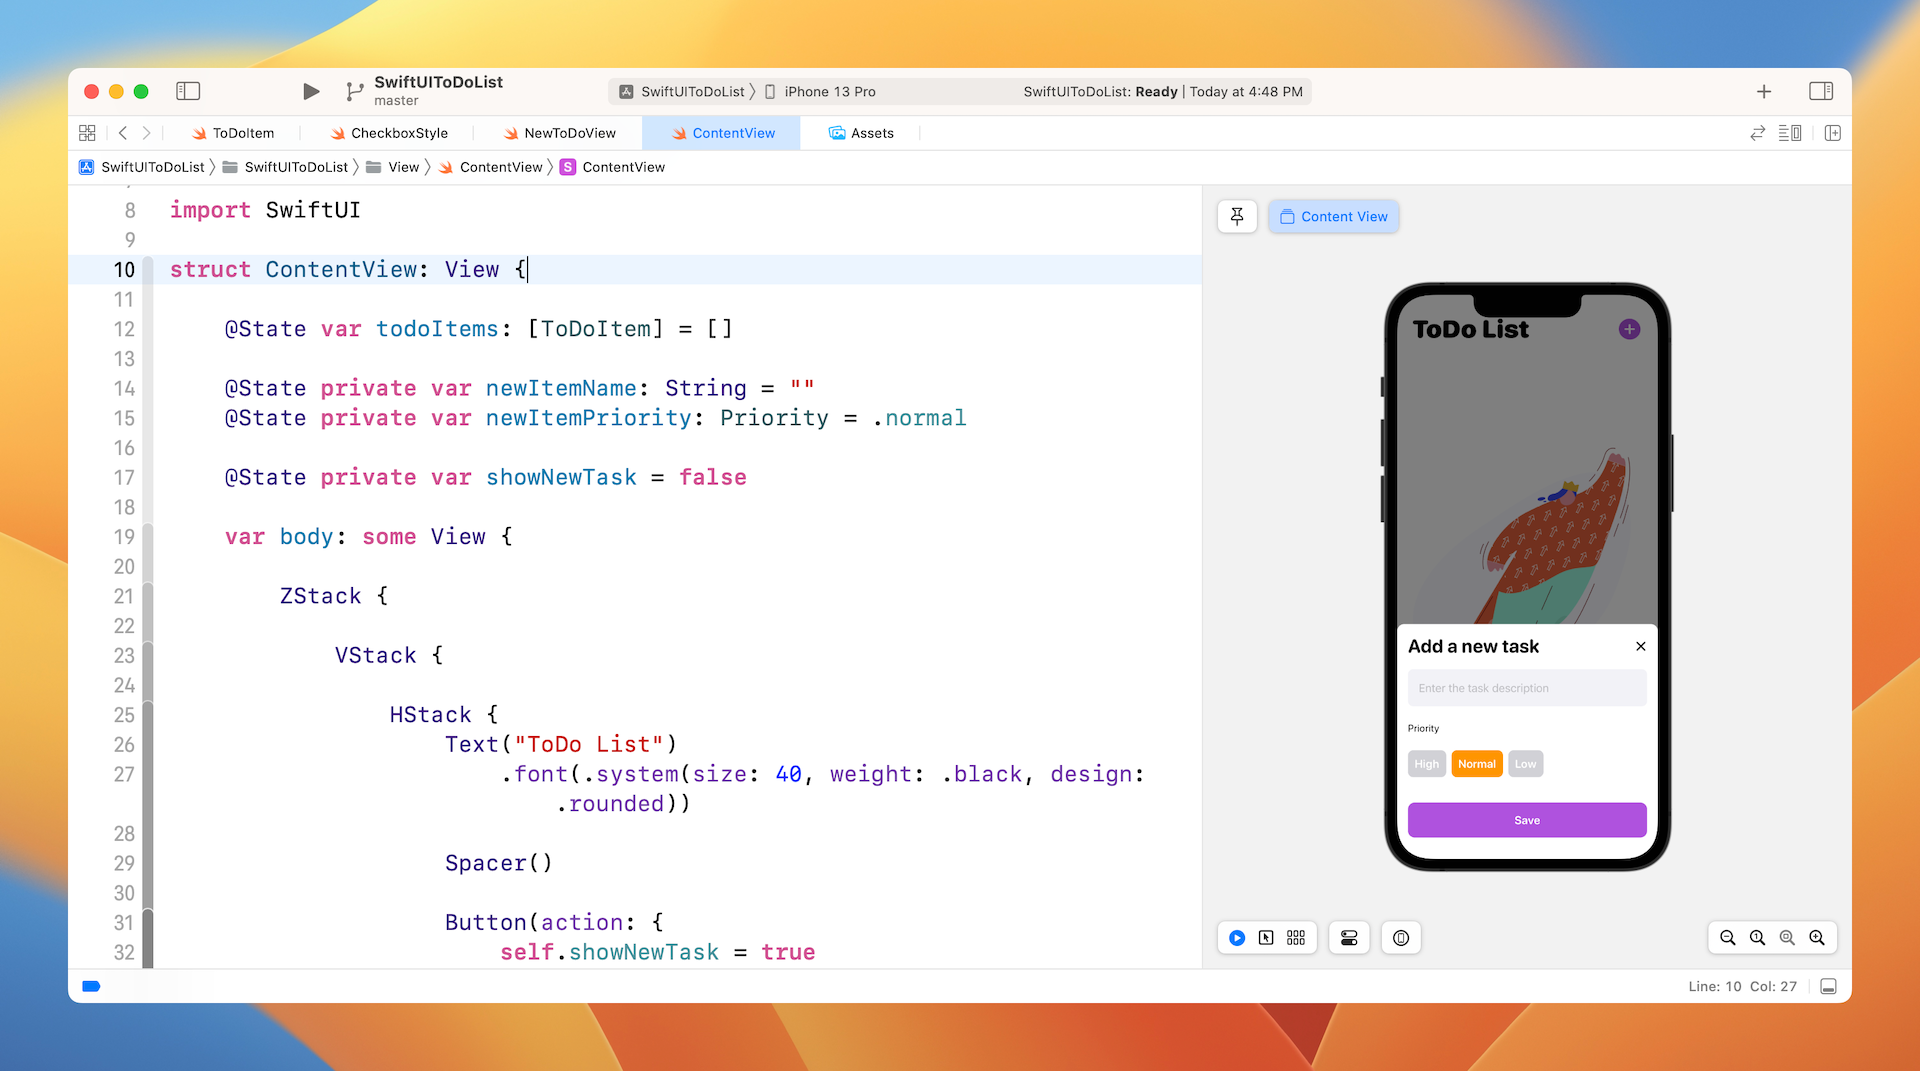
Now let me walk you through the code in NewToDoView.swift, which is for users to add a new task or to-do item. You can refer to figure 6 or simply open the file to preview it see what this view looks like.
The NewToDoView takes in two bindings: isShow and todoItems. The isShow parameter controls whether this Add New Task view should appear on screen. The todoItems variable holds a reference to the array of to-do items. We need the caller to pass us the binding to todoItems so that we can update the array with the new task.
@Binding var isShow: Bool
@Binding var todoItems: [ToDoItem]
@State var name: String
@State var priority: Priority
@State var isEditing = false
In the view, we let users input the name of the task and set its priority (low/normal/high). The state variable isEditing indicates whether the user is editing the task name. To avoid the software keyboard from obscuring the editing view, the app will shift the view upward while the user is editing the text field.
TextField("Enter the task description", text: $name, onEditingChanged: { (editingChanged) in
self.isEditing = editingChanged
})
...
.offset(y: isEditing ? -320 : 0)
After the Save button is tapped, we verify if the text field is empty. If not, we create a new ToDoItem and call the addTask function to append it to the todoItems array, otherwise we do nothing.
// Save button for adding the todo item
Button(action: {
if self.name.trimmingCharacters(in: .whitespaces) == "" {
return
}
self.isShow = false
self.addTask(name: self.name, priority: self.priority)
}) {
Text("Save")
.font(.system(.headline, design: .rounded))
.frame(minWidth: 0, maxWidth: .infinity)
.padding()
.foregroundColor(.white)
.background(Color.purple)
.cornerRadius(10)
}
.padding(.bottom)
Since the todoItems array is a state variable, the list view will be automatically refreshed and display the new task. This is how the code works. If you don't understand how the Add task view is displayed at the bottom of the screen, please refer to chapter 18 on building an Expandable Bottom Sheet.
Working with Core Data
Now that I've walked you through the starter project, it's time to convert the app to use Core Data for storing the to-do items in the database. In the very beginning, we created a blank project with Core Data enabled. By checking the Core Data checkbox, Xcode automatically generated the basic skeleton of a Core Data project. This time, I will show you how to transform the project to use Core Data manually.
Creating the Persistent Controller
Let's first create a new file called the Persistence.swift file. In the project navigator, right click Model and use the Swift file template. Name the file Persistence.swift and insert the following code in the file:
import CoreData
struct PersistenceController {
static let shared = PersistenceController()
let container: NSPersistentContainer
init(inMemory: Bool = false) {
container = NSPersistentContainer(name: "ToDoList")
if inMemory {
container.persistentStoreDescriptions.first!.url = URL(fileURLWithPath: "/dev/null")
}
container.loadPersistentStores(completionHandler: { (storeDescription, error) in
if let error = error as NSError? {
// Replace this implementation with code to handle the error appropriately.
// fatalError() causes the application to generate a crash log and terminate. You should not use this function in a shipping application, although it may be useful during development.
/*
Typical reasons for an error here include:
* The parent directory does not exist, cannot be created, or disallows writing.
* The persistent store is not accessible, due to permissions or data protection when the device is locked.
* The device is out of space.
* The store could not be migrated to the current model version.
Check the error message to determine what the actual problem was.
*/
fatalError("Unresolved error \(error), \(error.userInfo)")
}
})
}
}
You should be familar with the code because it is the same as the code generated by Xcode, except that the name of the container is changed to ToDoList.
Injecting the managed object context
Now open ToDoListApp.swift and inject the managed object context into the environment. In the ToDoListApp struct, declare the following variable to hold the PersistenceController:
let persistenceController = PersistenceController.shared
Next, in the same file, attach the environment modifier to ContentView() like this:
ContentView()
.environment(\.managedObjectContext, persistenceController.container.viewContext)
In the code above, we inject the managed object context into the environment of ContentView. This allows us to easily access the context in the content view for managing the data in the database.
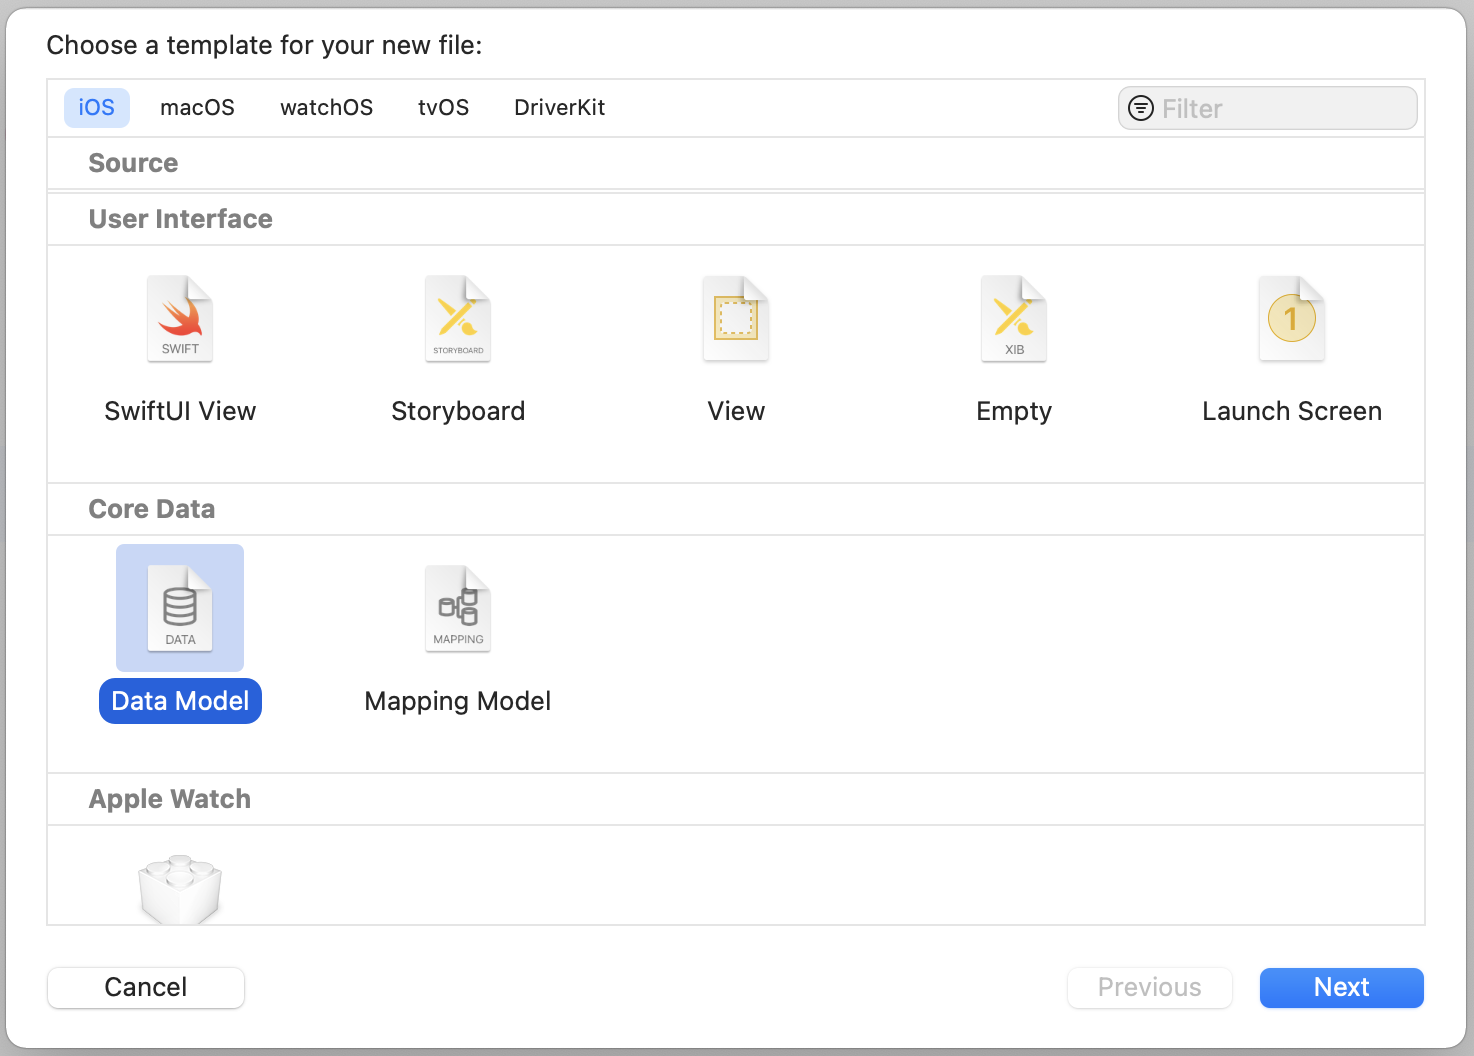
Creating the managed object model
Next, we need to manually create the managed object model. In the project navigator, right click the ToDoList folder and select New file.... Choose Data Model and name the file ToDoList.xcdatamodeld. Please make sure you name the file correctly because it should match the name for initializing the NSPersistentContainer.
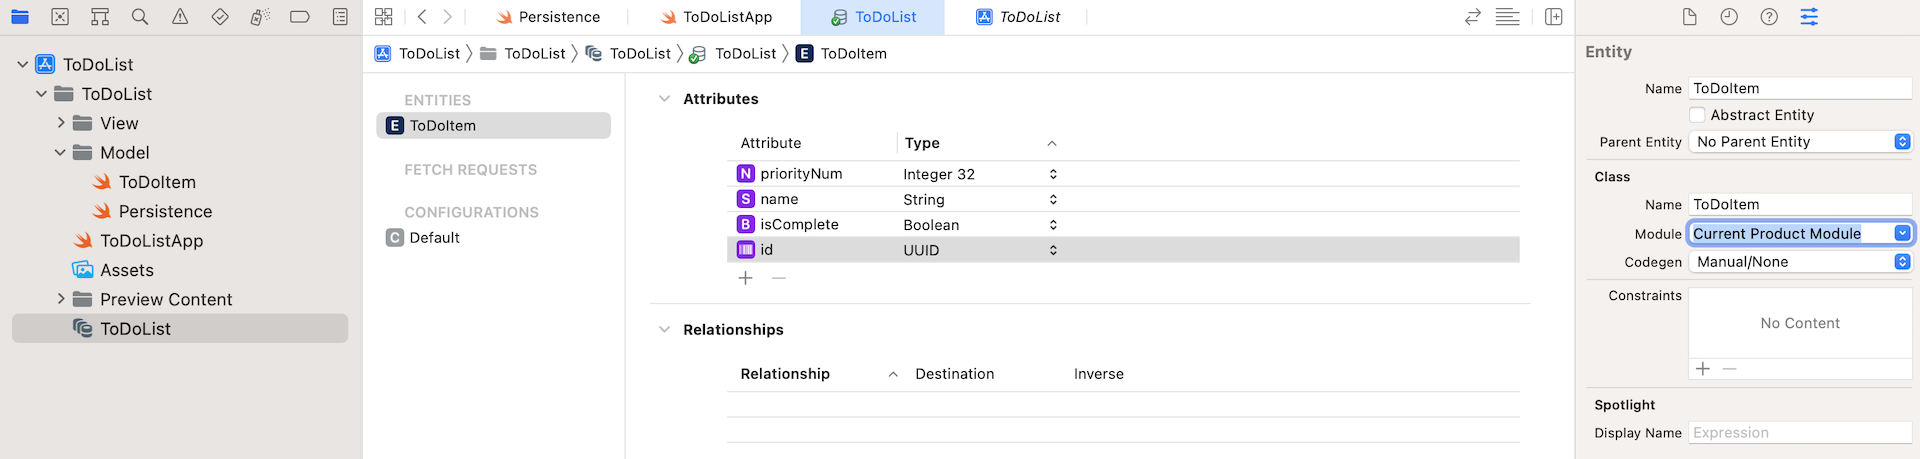
Once created, select the model file and click the Add Entity button to create a new entity. Change the name of the entity from Entity to ToDoItem. You can think of this entity as a record in the database table. Therefore, this entity should store the properties of a ToDoItem. We need to add 4 attributes for the entity including (see figure 8):
- id with the type UUID
- name with the type String
- priorityNum with the type Integer 32
- isComplete with the type Boolean
The types of id, name, and isComplete are exactly the same as that of the ToDoItem class. But why does the priority is set to the type Integer 32? If you take a look at the code in ToDoItem.swift, you see that the priority property is an Enum:
enum Priority: Int {
case low = 0
case normal = 1
case high = 2
}
To save this enum into the database, we have to store its raw value which is an integer. This is why we use the type Integer 32 and name the attribute priorityNum to avoid naming conflicts.
By default, Xcode automatically generates the model class of this ToDoItem entity. However, I prefer to create this class manually in order to have better control. So, select the ToDoItem entity and open the Data Model Inspector. If you can't see the inspector, go up to the menu and select View > Inspectors > Show Data Model Inspector. In the Class section, set the Module to Current Product Module and Codegen to Manual/None. This disables the code generation.
As you can see, everything we've developed so far does not require you have the knowledge of database programming. No SQL, no database tables. All the things you deal with are object based. This is the beauty of Core Data.
Defining the model class
In Core Data, every entity should be paired with a model class. By default, this model class is generated by Xcode. Previously, we changed the setting from code gen to manual. So, we need to implement the model class ToDoItem manually. Switch over to ToDoItem.swift and import the CoreData package:
import CoreData
Replace the ToDoItem class like this:
public class ToDoItem: NSManagedObject {
@NSManaged public var id: UUID
@NSManaged public var name: String
@NSManaged public var priorityNum: Int32
@NSManaged public var isComplete: Bool
}
extension ToDoItem: Identifiable {
var priority: Priority {
get {
return Priority(rawValue: Int(priorityNum)) ?? .normal
}
set {
self.priorityNum = Int32(newValue.rawValue)
}
}
}
The model class of Core Data should be inherited from NSManagedObject. Each property is annotated with @NSManaged and corresponds to the attribute of the Core Data model we created earlier. By using @NSManaged, this tells the compiler that the property is taken care by Core Data.
In the original version of ToDoItem, we have the priority property which has a type of Enum. For the Core Data version, we have to create a computed property for priority. This computed property transforms the priority number into an Enum and vice versa.
Using @FetchRequest to fetch records
Now that we've prepared the model class, let's see how easy it is to fetch records from database. Switch over to ContentView.swift. Originally, we have an array variable holding all to-do items, which is also marked with @State:
@State var todoItems: [ToDoItem] = []
Since we are moving to store the items in database, we need to modify this line of code and fetch the data from it. Apple introduced a new property wrapper called @FetchRequest. This makes it very easy to load data from the database.
Replace the line of code above with @FetchRequest like this:
@FetchRequest(
entity: ToDoItem.entity(),
sortDescriptors: [ NSSortDescriptor(keyPath: \ToDoItem.priorityNum, ascending: false) ])
var todoItems: FetchedResults<ToDoItem>
Recall that we've injected the managed object context in the environment, this fetch request automatically utilizes the context and fetches the required data for you. In the code above, we specify to fetch the ToDoItem entity and how the results should be ordered. Here, we would like to sort the items based on priority.
Once the fetch completes, you will have a collection of ToDoItem managed objects, these are based on the ToDoItem class we defined earlier in the model layer.
This is how you perform a fetch request and retrieve data from database. And, since the properties of ToDoItem are kept intact, we DO NOT need to make any code changes for the list view. We can use the fetch result directly in ForEach:
List {
ForEach(todoItems) { todoItem in
ToDoListRow(todoItem: todoItem)
}
}
On top of that, you can directly pass the todoItem, which is a NSManageObject to create a ToDoListRow. Do you know why we do not need to make any changes?
Take a look at the documation of NSManagedObject. It conforms to ObservableObject. This is why we can directly pass a todoItem to ToDoListRow.
One more thing. You may also wonder if we need to manually perform a fetch request when there are changes to todoItems (say, we add a new item). This is another advantage of using @FetchRequest. SwiftUI automatically manages the changes and refreshes the UI accordingly.
Adding data to the persistent store
Now, let's continue to do the Core Data migration and update the code for NewToDoView.swift. To save a new task in the database, you need to first obtain the managed object context from the environment:
@Environment(\.managedObjectContext) var context
Since we no longer use an array to hold the to-do items, you can remove this line of code:
@Binding var todoItems: [ToDoItem]
Next, let's update the addTask function like this:
private func addTask(name: String, priority: Priority, isComplete: Bool = false) {
let task = ToDoItem(context: context)
task.id = UUID()
task.name = name
task.priority = priority
task.isComplete = isComplete
do {
try context.save()
} catch {
print(error)
}
}
To insert a new record into the database, you create a ToDoItem with the managed context and then call the save() function of the context to commit the changes.
Since we removed the todoItems binding, we need to update the preview code:
struct NewToDoView_Previews: PreviewProvider {
    static var previews: some View {
        NewToDoView(isShow: .constant(true), name: "", priority: .normal)
    }
}
Now let's move back to ContentView.swift. Similarly, you should see an error in the ContentView (see figure 10).
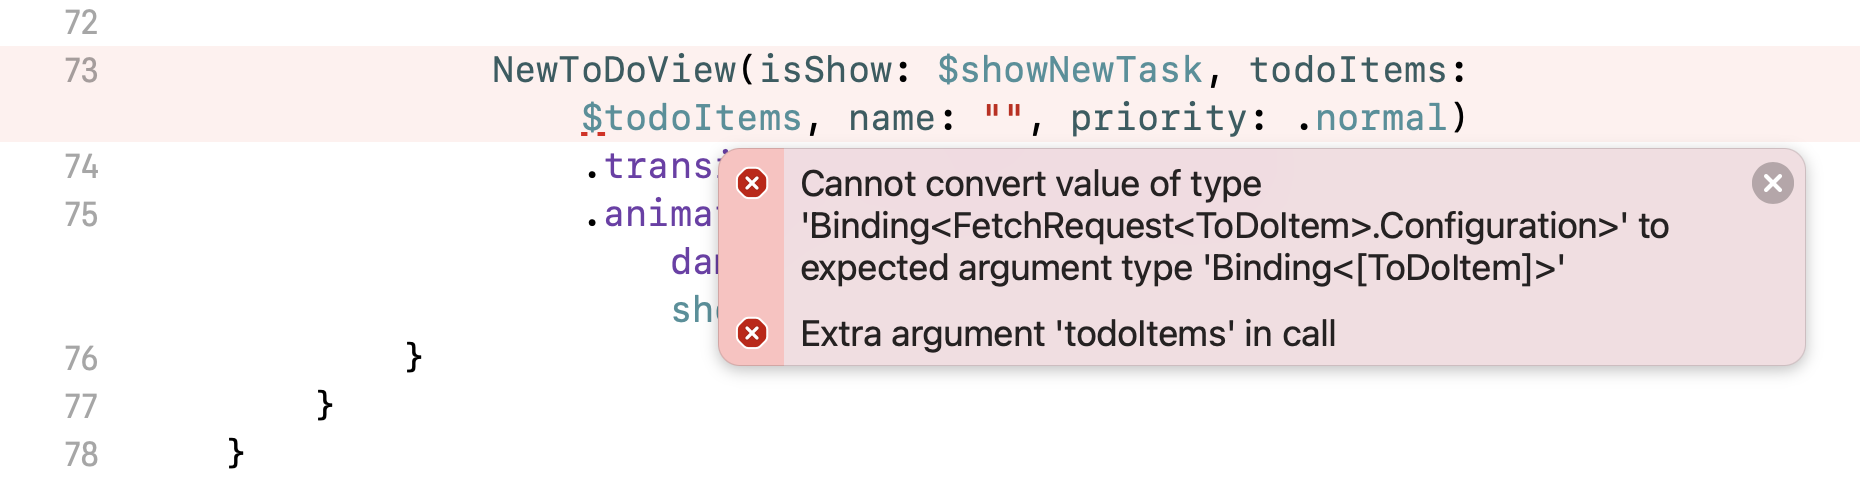
Change the line of code like this to fix the error:
NewToDoView(isShow: $showNewTask, name: "", priority: .normal)
We simply remove the todoItems parameter. This is how we convert the demo app from using an in-memory array as storage to a persistent store.
Updating an existing item
When you mark an item as complete, the app should store the change in the database. In ContentView.swift, locate the ToDoListRow struct and declare the following variable:
@Environment(\.managedObjectContext) var context
Similar to adding a new record, we also need to obtain the managed object context for record update. For the Toggle view, attach the onReceive modifier and place it right after .toggleStyle(CheckboxStyle()) like this:
var body: some View {
    Toggle(isOn: self.$todoItem.isComplete) {
       .
       .
       .
    }
    .toggleStyle(CheckboxStyle())
    // Add the following code
    .onChange(of: todoItem, perform: { _ in
        if self.context.hasChanges {
            try? self.context.save()
        }
    })
}
Whenever there is a change to the toggle, the isComplete property of a todoItem will be updated. But, how we can save it to the persistent store? Recall that the todoItem conforms to ObservableObject, this implies that it has a publisher that transmits changes in values.
Here, the onChange modifier listens for these changes (say, the change of isComplete) and saves them to the persistent store by calling the save() function of the context.
Now you can run the app in a simulator to try it out. You should be able to add new tasks to the app. Once the new tasks are added, they should appear in the list view immediately. The checkbox should work too. Most importantly, all the changes are now saved permanently in the device's database. After you restart the app, all the items are still there.
Deleting an item from database
Now that I have shown you how to perform fetch, update, and insert, how about data deletion? We will add a feature to the app for removing a to-do item.
In the ContentView struct, declare a context variable:
@Environment(\.managedObjectContext) var context
Then add a new function called deleteTask like this:
private func deleteTask(indexSet: IndexSet) {
    for index in indexSet {
        let itemToDelete = todoItems[index]
        context.delete(itemToDelete)
    }

    DispatchQueue.main.async {
        do {
            try context.save()

        } catch {
            print(error)
        }
    }
}
This function takes in an index set which stores the index of the items for deletion. To delete an item from the persistent store, you can call the delete function of the context and specify the item to delete. Lastly, call save() to commit the change.
Now that we have prepared the delete function, where should we invoke it? Attach the onDelete modifier to ForEach of the list view like this:
List {

    ForEach(todoItems) { todoItem in
        ToDoListRow(todoItem: todoItem)
    }
    .onDelete(perform: deleteTask)

}
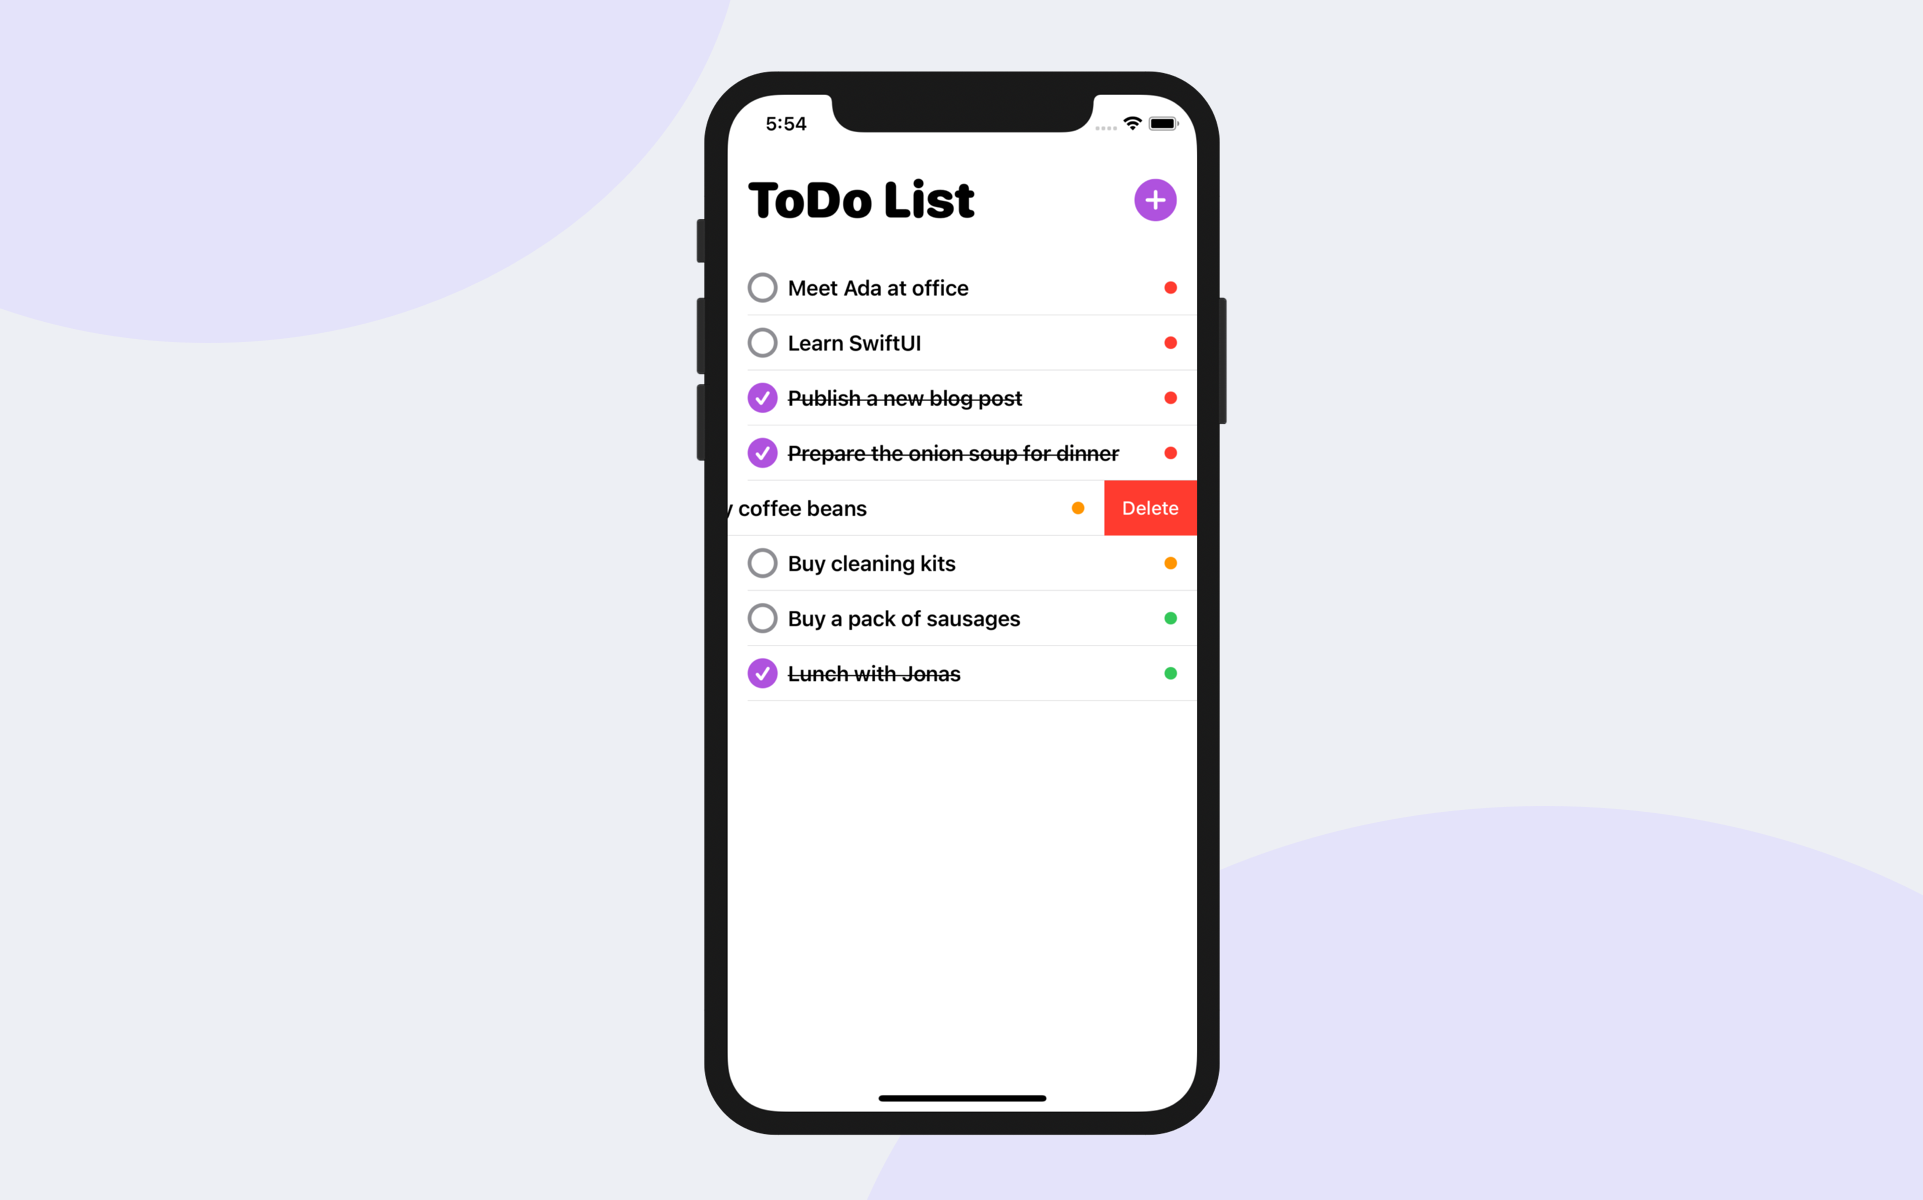
The onDelete modifier automatically enables the swipe-to-delete feature in the list view. When the user deletes an item, we call the deleteTask function to remove the item from the database.
Run the app and swipe to delete an item. This will completely remove it from the database.
Working with SwiftUI Preview
You should aware that the preview of your app doesn't work since we changed the app to use Core Data. This is understandable because we haven't injected the managed object context in the ContentView_Previews struct. So, how do we fix the issue and make the preview work.
First, we need to create an in-memory data store and populate it with some test data. Open Persistence.swift and declare a static variable like this:
static var preview: PersistenceController = {
    let result = PersistenceController(inMemory: true)
    let viewContext = result.container.viewContext

    for index in 0..<10 {
        let newItem = ToDoItem(context: viewContext)
        newItem.id = UUID()
        newItem.name = "To do item #\(index)"
        newItem.priority = .normal
        newItem.isComplete = false
    }

    do {
        try viewContext.save()
    } catch {
        let nsError = error as NSError
        fatalError("Unresolved error \(nsError), \(nsError.userInfo)")
    }

    return result
}()
In the code above, we create an instance of PersistenceController with the inMemory parameter set to true. Then we add 10 sample to-do items and save them to the data store.
Now let's switch over to the ContentView.swift and update the preview code like this:
struct ContentView_Previews: PreviewProvider {
    static var previews: some View {
        ContentView().environment(\.managedObjectContext, PersistenceController.preview.container.viewContext)
    }
}
We inject the context of the in-memory container to the environment of the content view. By doing so, the content view can now load the sample to-do items and display them in the preview canvas.
Summary
In this chapter, we converted a Todo list app from storing data in memory to a persistent store. I hope you now understand how to integrate Core Data in a SwiftUI project and know how to perform all basic CRUD (create, read, update & delete) operations. The introduction of the @FetchRequest property wrapper and the injection of the managed object context have made it very easy to manage data in a persistent store.
For reference, you can download the complete ToDoList project here: