- Made by AppCoda
- Contact us / Support
- Tweet this book
- Preface
- 1. Introduction to SwiftUI
- 2. Getting Started with SwiftUI and Working with Text
- 3. Working with Images
- 4. Layout User Interfaces with Stacks
- 5. Understanding ScrollView and Building a Carousel UI
- 6. Working with SwiftUI Buttons and Gradient
- 7. Understanding State and Binding
- 8. Implementing Path and Shape for Line Drawing and Pie Charts
- 9. Basic Animations and Transitions
- 10. Understanding Dynamic List, ForEach and Identifiable
- 11. Working with Navigation UI and Navigation Bar Customization
- 12. Playing with Modal Views, Floating Buttons and Alerts
- 13. Building a Form with Picker, Toggle and Stepper
- 14. Data Sharing with Combine and Environment Objects
- 15. Building a Registration Form with Combine and View Model
- 16. Working with Swipe-to-Delete, Context Menu and Action Sheets
- 17. Using Gestures
- 18. Displaying an Expandable Bottom Sheet Using Presentation Detents
- 19. Creating a Tinder-like UI with Gestures and Animations
- 20. Creating an Apple Wallet like Animation and View Transition
- 21. Working with JSON, Slider and Data Filtering
- 22. Building a ToDo app with Core Data
- 23. Integrating UIKit with SwiftUI Using UIViewRepresentable
- 24. Creating a Search Bar View and Working with Custom Binding
- 25. Putting Everything Together to Build a Real World App
- 26. Creating an App Store like Animated View Transition
- 27. Building an Image Carousel
- 28. Building an Expandable List View Using OutlineGroup
- 29. Building Grid Layout Using LazyVGrid and LazyHGrid
- 30. Creating an Animated Activity Ring with Shape and Animatable
- 31. Working with AnimatableModifier and LibraryContentProvider
- 32. Working with TextEditor to Create Multiline Text Fields
- 33. Using matchedGeometryEffect to Create View Animations
- 34. ScrollViewReader and Grid Animation
- 35. Working with Tab View and Tab Bar Customization
- 36. Using AsyncImage in SwiftUI for Loading Images Asynchronously
- 37. Implementing Search Bar Using Searchable
- 38. Creating Bar Charts and Line Charts with the Charts Framework
- 39. Capturing Text within Image Using Live Text APIs
- 40. How to Use ShareLink for Sharing Data Like Text and Photos
- 41. Using ImageRenderer to Convert SwiftUI Views into Images
- 42. Creating PDF Documents Using ImageRenderer
- 43. Using Gauge to Display Progress and Create a Speedometer
- 44. Creating Grid Layout Using Grid APIs
- 45. Switching Layout with AnyLayout
- Published with GitBook
Chapter 14
Data Sharing with Combine and Environment Objects
In the previous chapter, you learned how to lay out a form using the Form component. However, the form is not functional yet. No matter what options you select, the list view doesn't change to reflect the user's preference. This is what we're going to discuss and implement in this chapter. We will continue to develop the settings screen and make the app fully functional by updating the restaurant list in reference to the user's personal preference.
Specifically, there are a few topics we will discuss in later sections:
- How to use enum to better organize our code
- How to store the user's preference permanently using UserDefaults
- How to share data using Combine and @EnvironmentObject
If you haven't finished the exercise in the previous chapter, I encourage you to spend some time on it. That said, if you can't wait to read this chapter, you can download the project from https://www.appcoda.com/resources/swiftui4/SwiftUIForm.zip.
Refactoring the Code with Enum
We currently use an array to store the three options of the display order. It works but there is a better way to improve the code.
An enumeration defines a common type for a group of related values and enables you to work with those values in a type-safe way within your code.
- Apple's official documentation (https://docs.swift.org/swift-book/LanguageGuide/Enumerations.html)
Since this group of fixed values is related to display order, we can use an Enum to hold them and each case can be assigned with an integer value like this:
enum DisplayOrderType: Int, CaseIterable {
    case alphabetical = 0
    case favoriteFirst = 1
    case checkInFirst = 2

    init(type: Int) {
        switch type {
        case 0: self = .alphabetical
        case 1: self = .favoriteFirst
        case 2: self = .checkInFirst
        default: self = .alphabetical
        }
    }

    var text: String {
        switch self {
        case .alphabetical: return "Alphabetical"
        case .favoriteFirst: return "Show Favorite First"
        case .checkInFirst: return "Show Check-in First"
        }
    }
}
What makes Enum great is that we can work with these values in a type-safe way within our code. Additionally, Enum in Swift is a first-class type in its own right. That means you can create instance methods to provide additional functionality related to the values. Later, we will add a function for handling the filtering. Meanwhile, let's create a new Swift file named SettingStore.swift to store the Enum. You can right click SwiftUIForm in the project navigation and choose New File... to create the file.
After creating SettingStore.swift, insert the code snippet above in the file. Next, go back to SettingView.swift. We will update the code to use the DisplayOrder enumeration instead of the displayOrders array.
First, delete this line of code from SettingView:
private var displayOrders = [ "Alphabetical", "Show Favorite First", "Show Check-in First"]
Next, update the default value of selectedOrder to DisplayOrderType.alphabetical like this:
@State private var selectedOrder = DisplayOrderType.alphabetical
Here, we set the default display order to alphabetical. Comparing this to the previous value, of 0, the code is more readable after switching to use an enumeration. Next, you also need to change the code in the Sort Preference section. Specifically, we update the code in the ForEach loop:
Section(header: Text("SORT PREFERENCE")) {
    Picker(selection: $selectedOrder, label: Text("Display order")) {
        ForEach(DisplayOrderType.allCases, id: \.self) {
            orderType in
            Text(orderType.text)
        }
    }
}
Since we have adopted the CaseIterable protocol in the DisplayOrder enum, we can obtain all the display orders by accessing the allCases property, which contains an array of all the enum's cases.
Now you can test the Settings screen again. It should work and look the same. However, the underlying code is more manageable and readable.
Saving the User Preferences in UserDefaults
Right now, the app can't save the user's preference permanently. Whenever you restart the app, the Settings screen resets to its default settings.
There are multiple ways to store the settings. For saving small amounts of data like user settings on iOS, the built-in "defaults" database is a good option. This "defaults" system allows an app to store user's preferences in key-value pairs. To interact with this defaults database, you use a programmatic interface called UserDefaults.
In the SettingStore.swift file, we will create a SettingStore class to provide some convenience methods for saving and loading the user's preferences. Insert the following code snippet in SettingStore.swift:
final class SettingStore {

    init() {
        UserDefaults.standard.register(defaults: [
            "view.preferences.showCheckInOnly" : false,
            "view.preferences.displayOrder" : 0,
            "view.preferences.maxPriceLevel" : 5
        ])
    }

    var showCheckInOnly: Bool = UserDefaults.standard.bool(forKey: "view.preferences.showCheckInOnly") {
        didSet {
            UserDefaults.standard.set(showCheckInOnly, forKey: "view.preferences.showCheckInOnly")
        }
    }

    var displayOrder: DisplayOrderType = DisplayOrderType(type: UserDefaults.standard.integer(forKey: "view.preferences.displayOrder")) {
        didSet {
            UserDefaults.standard.set(displayOrder.rawValue, forKey: "view.preferences.displayOrder")
        }
    }

    var maxPriceLevel: Int = UserDefaults.standard.integer(forKey: "view.preferences.maxPriceLevel") {
        didSet {
            UserDefaults.standard.set(maxPriceLevel, forKey: "view.preferences.maxPriceLevel")
        }
    }

}
Let me briefly explain the code. In the init method, we initialize the defaults system with some default values. These values will only be used if the user's preferences are not found in the database.
In the code above, we declare three properties (showCheckInOnly, displayOrder, and maxPriceLevel) which are saved in key-value pairs with UserDefaults. The default value is loaded from the default system for the specific key. In the didSet, we use the set method of UserDefaults (UserDefaults.standard.set()) to save the value in the user default. All the three properties are marked with @Published so that they will notify all their subscribers when its value is updated.
With the SettingStore ready, let's switch over to the SettingView.swift file to implement the Save operation. First, declare a property in SettingView for the SettingStore:
var settingStore: SettingStore
For the Save button, find the Save button code (in the ToolbarItem(placement: .navigationBarTrailing) block) and replace the existing code with this:
Button {
    self.settingStore.showCheckInOnly = self.showCheckInOnly
    self.settingStore.displayOrder = self.selectedOrder
    self.settingStore.maxPriceLevel = self.maxPriceLevel
    dismiss()

} label: {
    Text("Save")
        .foregroundColor(.primary)
}
We added three lines of code to the exiting save button to save the user's preference. To load the user's preferences when the Settings view is brought up, you can add the onAppear modifier to the NavigationStack like this:
.onAppear {
    self.selectedOrder = self.settingStore.displayOrder
    self.showCheckInOnly = self.settingStore.showCheckInOnly
    self.maxPriceLevel = self.settingStore.maxPriceLevel
}
The onAppear modifier will be called when the view appears. We load the user's settings from the defaults system in its closure.
Before you can test the changes, you have to update SettingView_Previews like this:
struct SettingView_Previews: PreviewProvider {
    static var previews: some View {
        SettingView(settingStore: SettingStore())
    }
}
Now, switch over to ContentView.swift and declare the settingStore property:
var settingStore: SettingStore
And then update the sheet modifier like this:
.sheet(isPresented: $showSettings) {
    SettingView(settingStore: self.settingStore)
}
Lastly, update ContentView_Previews like this:
struct ContentView_Previews: PreviewProvider {
    static var previews: some View {
        ContentView(settingStore: SettingStore())
    }
}
We initialize a SettingStore and pass it to SettingView. This is required because we've added the settingStore property in SettingView.
If you compile and run the app now, Xcode will show you an error. There is one more change we need to make before the app can run properly.
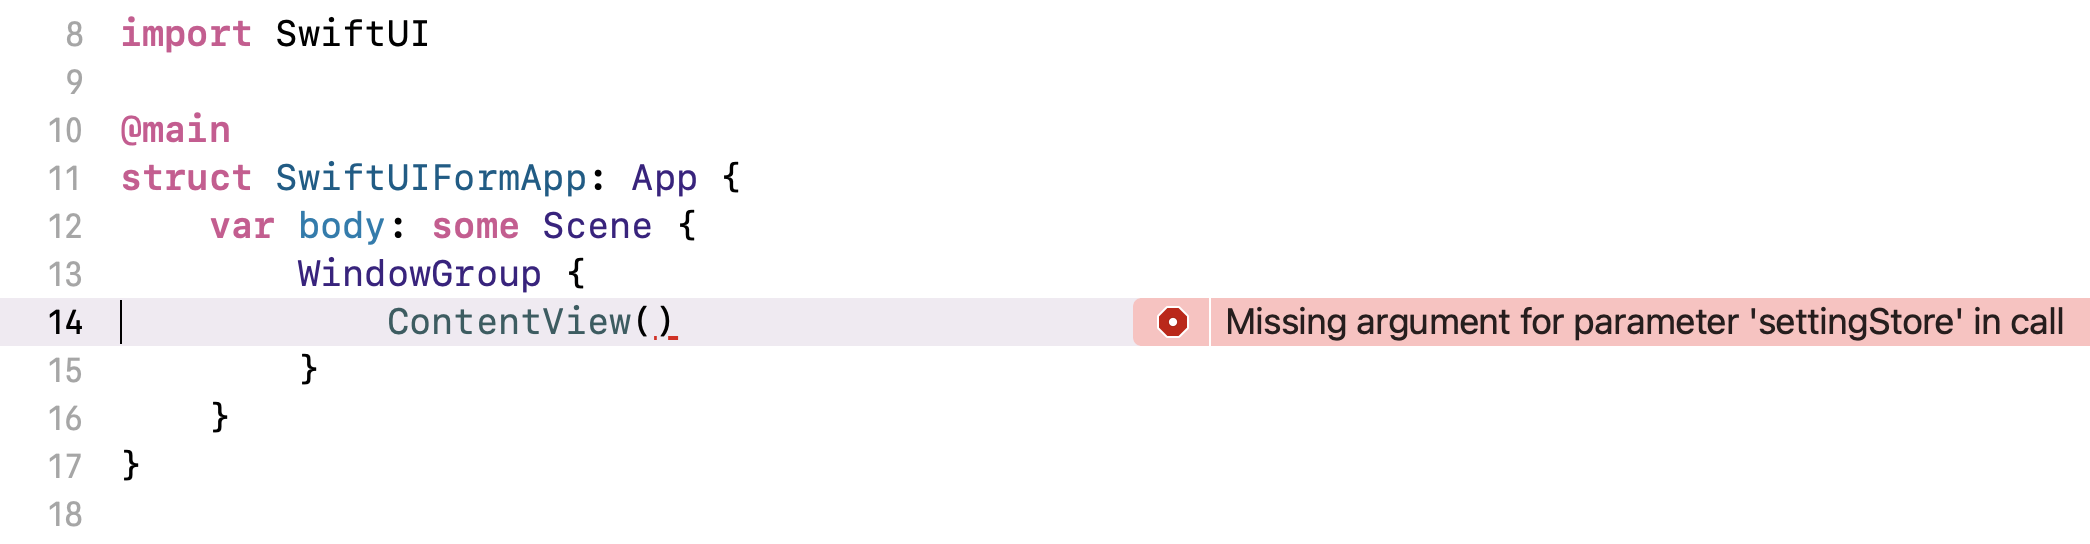
Go to SwiftUIFormApp.swift and add this property to create a SettingStore instance:
var settingStore = SettingStore()
Next, change the line code in the WindowGroup block to the following to fix the error:
ContentView(settingStore: settingStore)
You should now be able to execute app and play around with the settings. Once you save the settings, they are stored permanently in the local defaults system. You can stop the app and launch it again. The saved settings should be loaded in the Setting screen.
Sharing Data Between Views Using @EnvironmentObject
Now that the user's preferences are saved in the local defaults system, the list view doesn't change in accordance to the user's settings. Again, there are various ways to solve this problem.
Let's recap what we have right now. When a user taps the Save button in the Settings screen, we save the selected options in the local defaults system. The Settings screen is then dismissed and the app brings the user back to the list view. So, either we instruct the list view to reload the settings or the list view must be capable of monitoring the changes of the defaults system and trigger un update of the list.
Along with the introduction of SwiftUI, Apple also released a new framework called Combine. According to Apple, this framework provides a declarative API for processing values over time. In the context of this demo, Combine lets you easily monitor a single object and get notified of changes. Working along with SwiftUI, we can trigger an update of a view without writing a line of code. Everything is handled behind the scenes by SwiftUI and Combine.
So, how can the list view know the user's preference is modified and trigger the update itself?
Let me introduce three keywords:
- @EnvironmentObject - Technically, this is known as a property wrapper, but you may consider this keyword as a special marker. When you declare a property as an environment object, SwiftUI monitors the value of the property and invalidates the corresponding view whenever there are changes. @EnvironmentObject works pretty much the same as @State. But when a property is declared as an environment object, it will be made accessible to all views in the entire app. For example, if your app has a lot of views that share the same piece of data (e.g. user settings), environment objects work great for this. You do not need to pass the property between views but instead you can access it automatically.
- ObservableObject - this is a protocol of the Combine framework. When you declare a property as an environment object, the type of that property must implement this protocol. Back to our question: how can we let the list view know the user's preferences are changed? By implementing this protocol, the object can serve as a publisher that emits the changed value(s). The subscribers that monitor the value change will get notified.
- @Published - is a property wrapper that works along with
ObservableObject. When a property is prefixed with@Publisher, this indicates that the publisher should inform all subscribers whenever the property's value is changed.
I know it's a bit confusing. You will have a better understanding once we go through the code.
Let's start with SettingStore.swift. Since both the settings view and the list view need to monitor the change of user preferences, SettingStore should implement the ObservableObject protocol and announce the change of the defaults property. In the beginning of the SettingStore.swift file, we have to first import the Combine framework:
import Combine
The SettingStore class should adopt the ObservableObject protocol. Update the class declaration like this:
final class SettingStore: ObservableObject {
Next, insert the @Published annotation for all the properties like this:
@Published var showCheckInOnly: Bool = UserDefaults.standard.bool(forKey: "view.preferences.showCheckInOnly") {
    didSet {
        UserDefaults.standard.set(showCheckInOnly, forKey: "view.preferences.showCheckInOnly")
    }
}

@Published var displayOrder: DisplayOrderType = DisplayOrderType(type: UserDefaults.standard.integer(forKey: "view.preferences.displayOrder")) {
    didSet {
        UserDefaults.standard.set(displayOrder.rawValue, forKey: "view.preferences.displayOrder")
    }
}

@Published var maxPriceLevel: Int = UserDefaults.standard.integer(forKey: "view.preferences.maxPriceLevel") {
    didSet {
        UserDefaults.standard.set(maxPriceLevel, forKey: "view.preferences.maxPriceLevel")
    }
}
By using the @Published property wrapper, the publisher lets subscribers know whenever there is a value change of the property (e.g. an update of displayOrder).
As you can see, it's pretty easy to inform a changed value with Combine. Actually we haven't written any new code but simply adopted a required protocol and inserted a marker.
Now let's switch over to SettingView.swift. The settingStore should now declared as an environment object so that we share the data with other views. Update the settingStore variable like this:
@EnvironmentObject var settingStore: SettingStore
You do not need to update any code related to the Save button. However, when you set a new value for the setting store (e.g. update showCheckInOnly from true to false), this update will be published and let all subscribers know.
Because of the change, we need to update SettingView_Previews to the following:
struct SettingView_Previews: PreviewProvider {
    static var previews: some View {
        SettingView().environmentObject(SettingStore())
    }
}
Here, we inject an instance of SettingStore into the environment for the preview.
Okay, all our work has been on the Publisher side. What about the Subscriber? How can we monitor the change of defaults and update the UI accordingly?
In the demo project, the list view is the Subscriber side. It needs to monitor the changes of the setting store and re-render the list view to reflect the user's setting. Now let's open ContentView.swift to make some changes. Similar to what we've just done, the settingStore should now declared as an environment object:
@EnvironmentObject var settingStore: SettingStore
Due to the change, the code in the sheet modifier should be modified to grab this environment object:
.sheet(isPresented: $showSettings) {
    SettingView().environmentObject(self.settingStore)
}
Also, for testing purposes, the preview code should be updated accordingly to inject the environment object:
struct ContentView_Previews: PreviewProvider {
    static var previews: some View {
        ContentView().environmentObject(SettingStore())
    }
}
Lastly, open SwiftUIFormApp.swift and update the line of code inside WindowGroup like this:
struct SwiftUIFormApp: App {

    var settingStore = SettingStore()

    var body: some Scene {
        WindowGroup {
            ContentView().environmentObject(settingStore)
        }
    }
}
Here, we inject the setting store into the environment by calling the environmentObject method. Now the instance of setting store is available to all views within the app. In other words, both the Setting and List views can access it automatically.
Implementing the Filtering Options
Now we have implemented a common setting store that can be accessed by all views. What's great is that for any changes in the setting store, it automatically notifies all the views that monitor for updates. Though you don't experience any visual differences, the setting store does notify the changes to the list view when you update the options in the setting screen.
Our final task is to implement the filtering and sort options to display only the restaurants that match the user preferences. Let's start with the implementation of these two filtering options:
- Show check-in only
- Show restaurants below a certain price level
In ContentView.swift, let's create a new function called showShowItem to handle the filtering:
private func shouldShowItem(restaurant: Restaurant) -> Bool {
    return (!self.settingStore.showCheckInOnly || restaurant.isCheckIn) && (restaurant.priceLevel <= self.settingStore.maxPriceLevel)
}
This function takes in a restaurant object and tells the caller if the restaurant should be displayed. In the code above, we check if the "Show Check-in Only" option is selected and verify the price level of the given restaurant.
Next, wrap the BasicImageRow with a if clause like this:
if self.shouldShowItem(restaurant: restaurant) {
        BasicImageRow(restaurant: restaurant)
            .contextMenu {

                 ...

            }
}
Here we first call the shouldShowItem function we just implemented to check if the restaurant should be displayed.
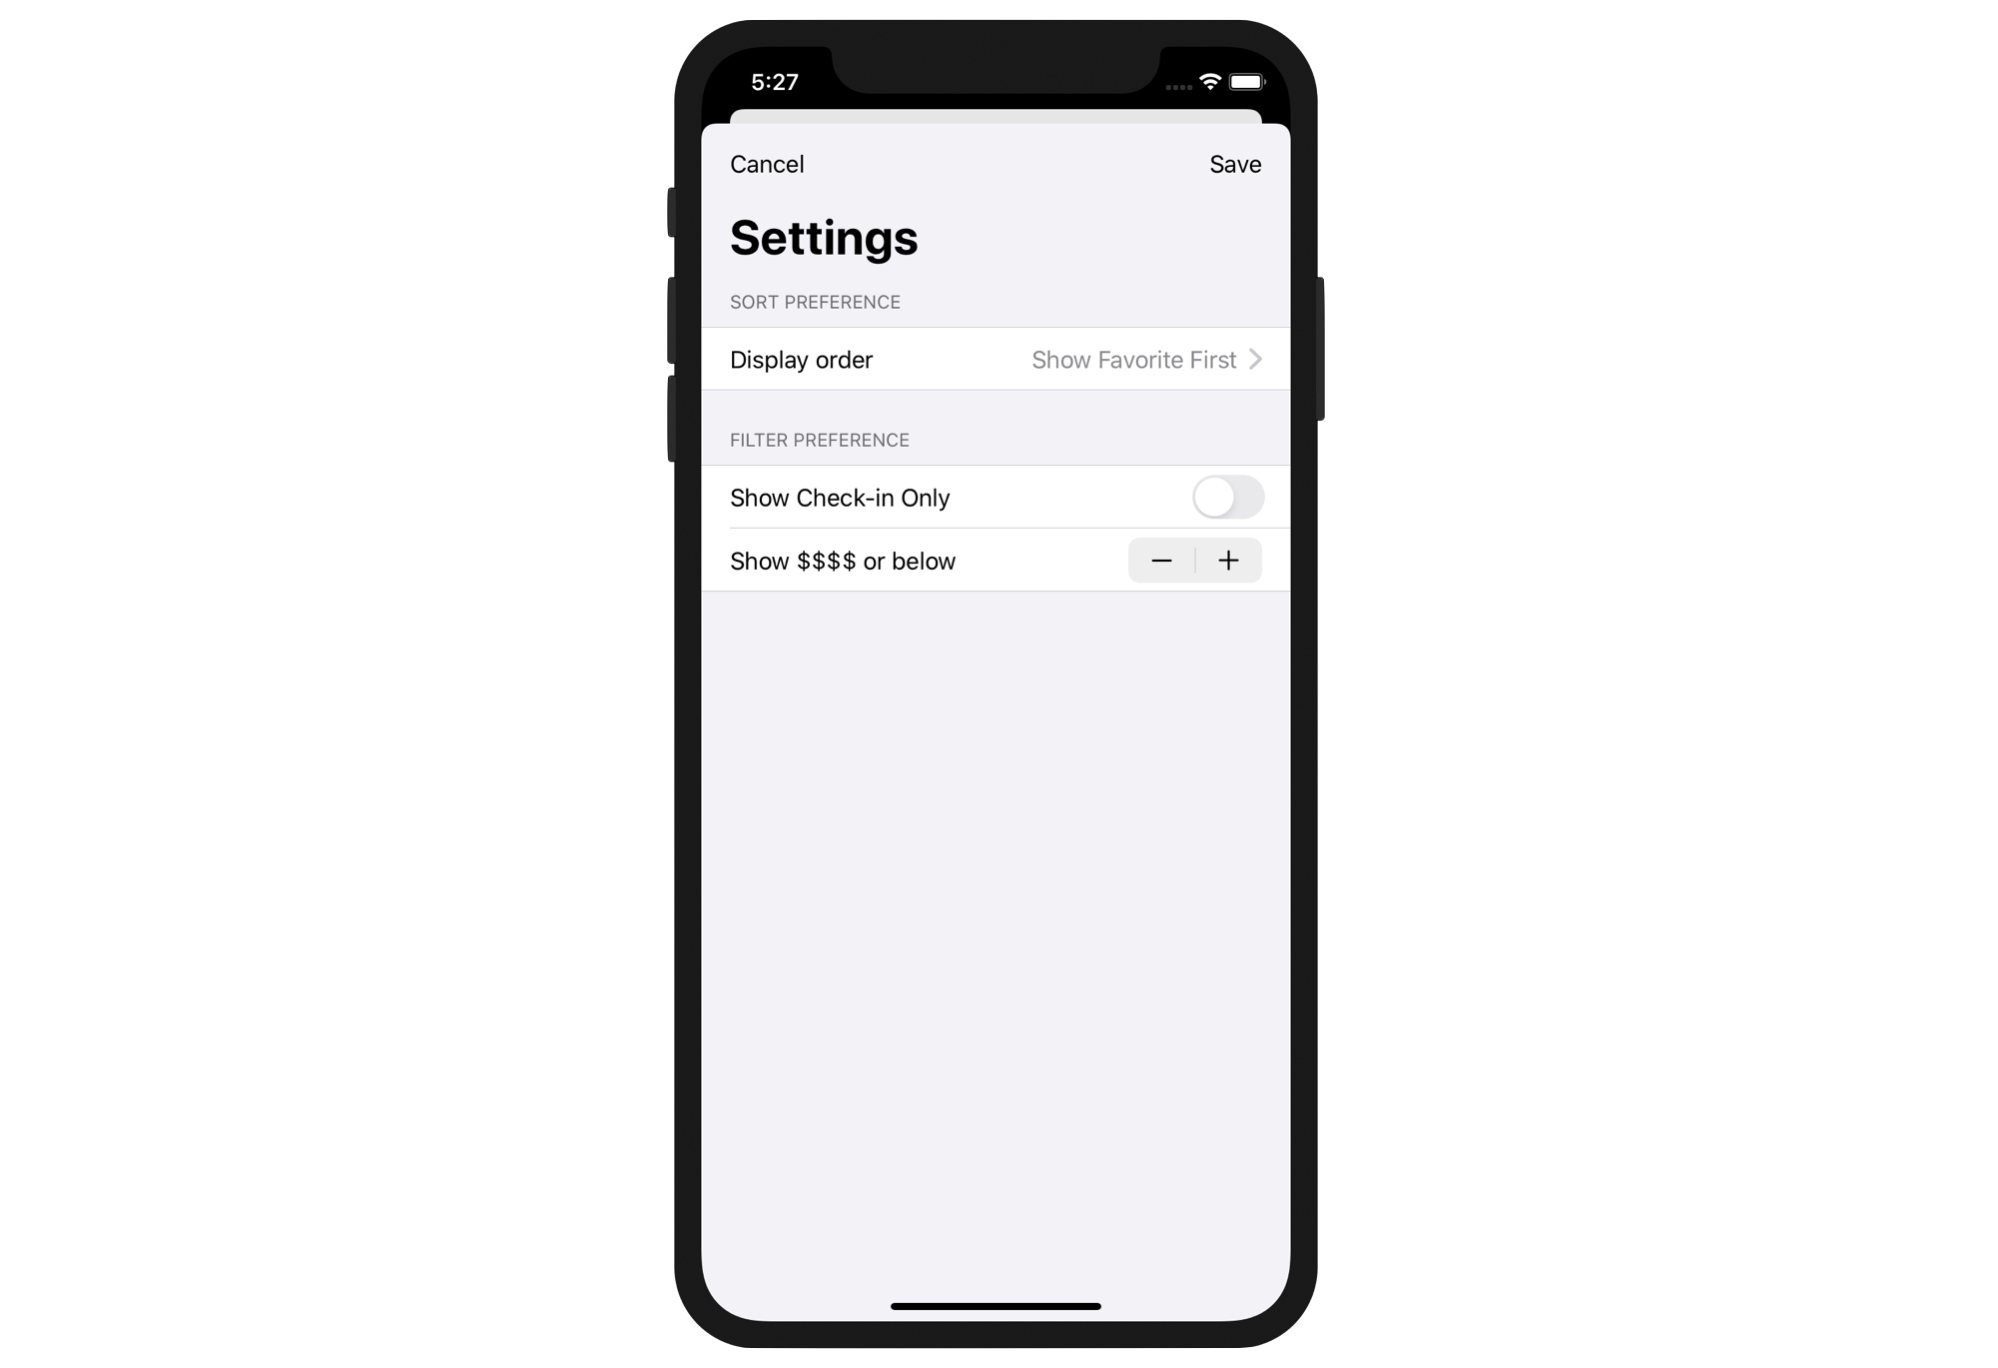
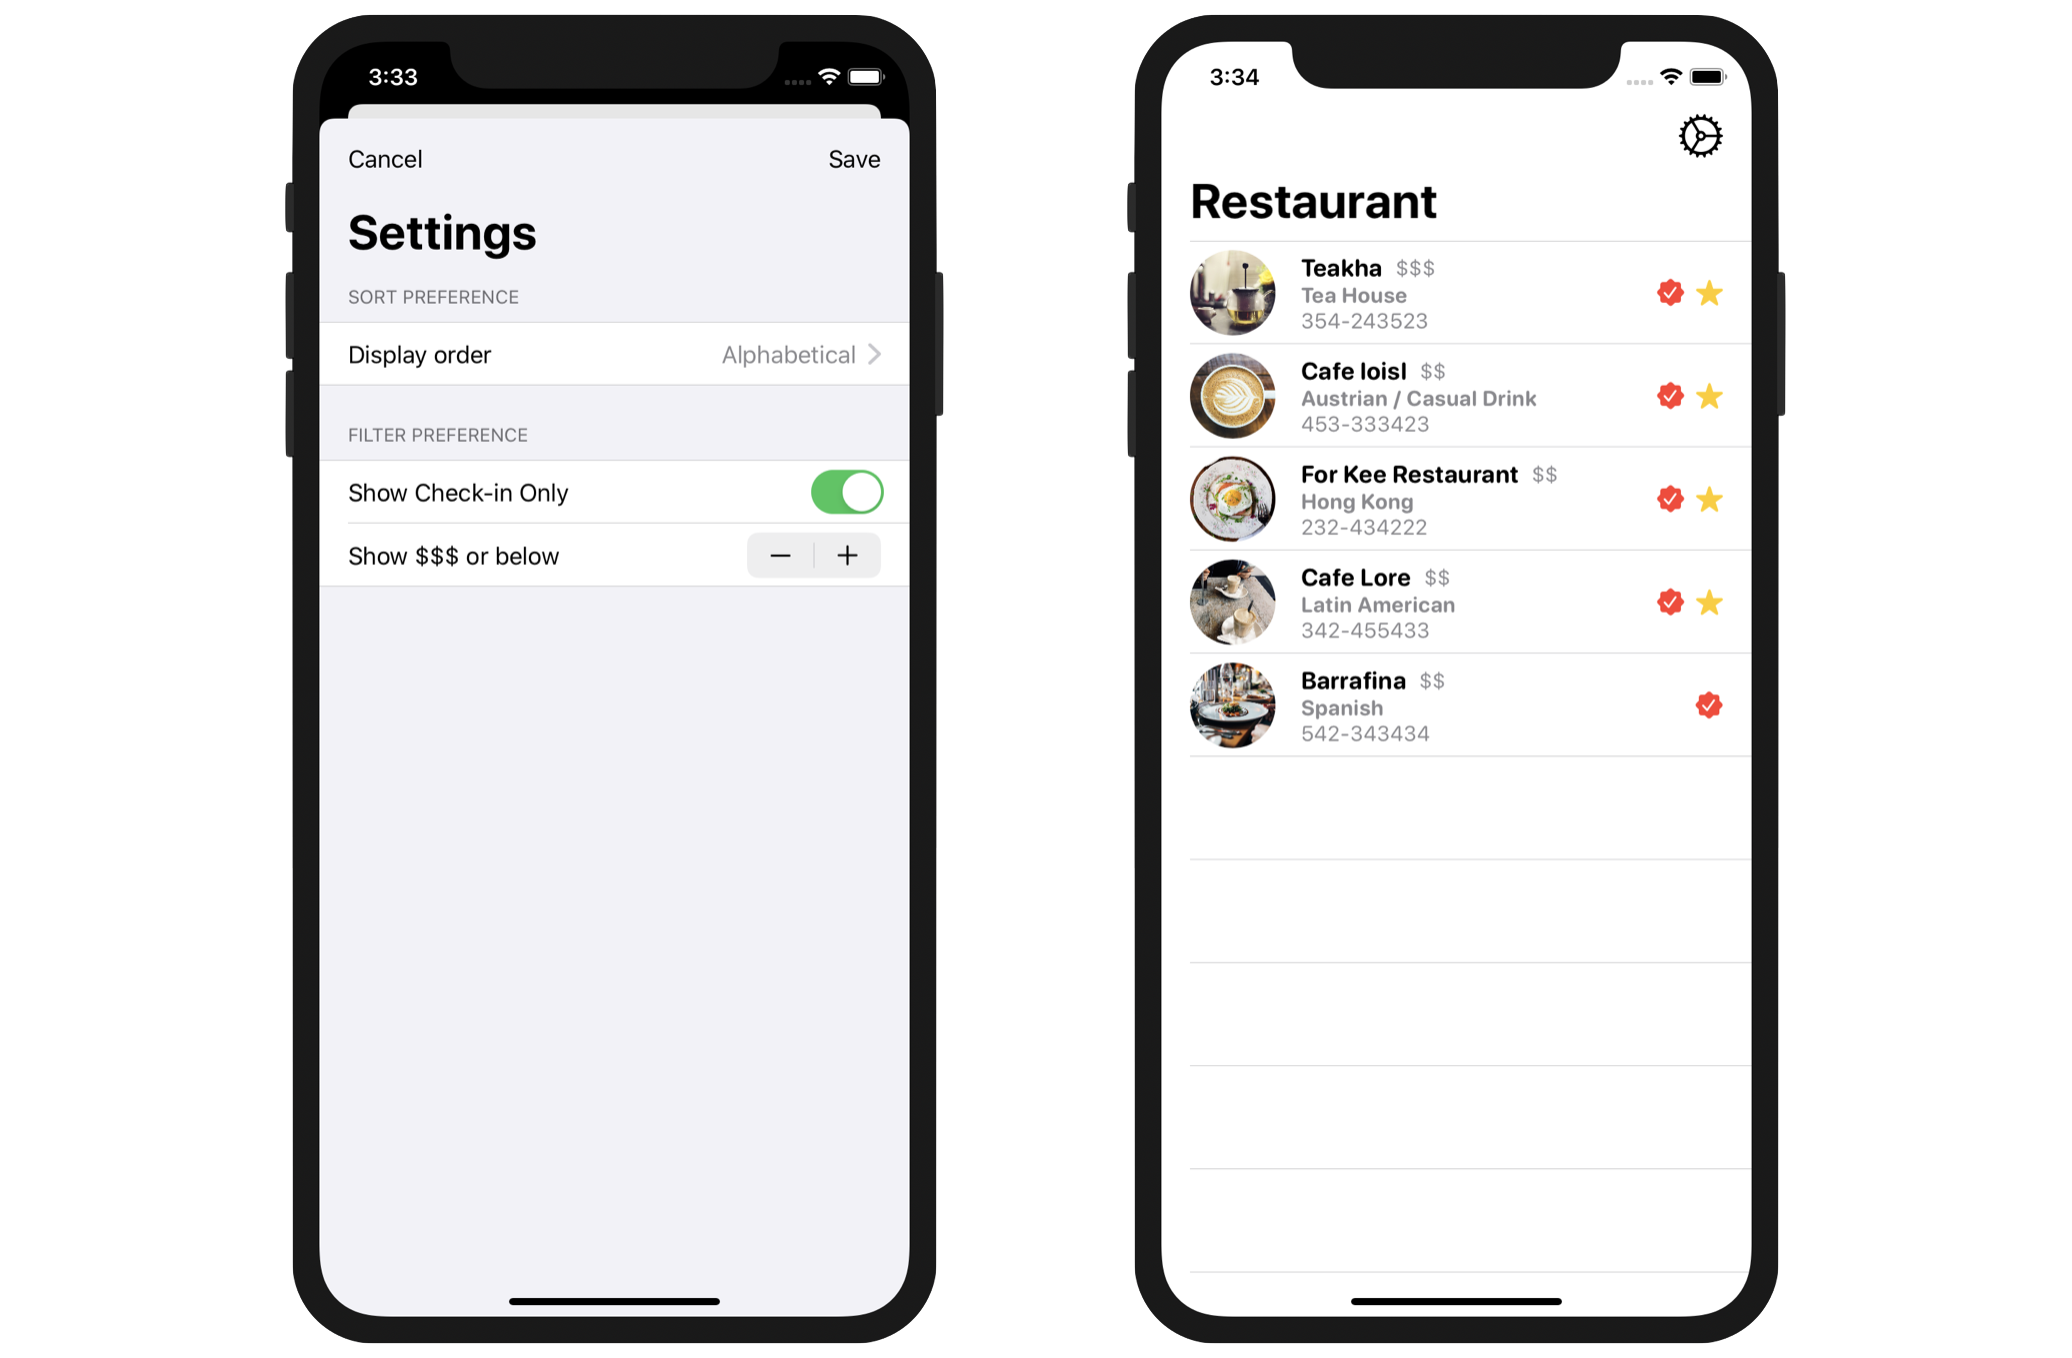
Now run the app in a simulator and have a quick test. In the setting screen, set the Show Check-in Only option to ON and configure the price level option to show restaurants that are with price level 3 (i.e. $$$) or below. Once you tap the Save button, the list view should be automatically refreshed (with animation) and shows you the filtered records.
Implementing the Sort Option
Now that we've completed the implementation of the filtering options, let's work on the sort option. In Swift, you can sort a sequence of elements by using the sort(by:) method. When you use this method, you need to provide a predicate to it that returns true when the first element should be ordered before the second.
For example, to sort the restaurants array in alphabetical order. You can use the sort(by:) method like this:
restaurants.sorted(by: { $0.name < $1.name })
Here, $0 is the first element and $1 is the second element. In this case, a restaurant with the name "Upstate" is larger than a restaurant with the name "Homei". So, "Homei" will be put in front of "Upstate" in the sequence.
Conversely, if you want to sort the restaurants in alphabetical descending order, you can write the code like this:
restaurants.sorted(by: { $0.name > $1.name })
How can we sort the array to show "check-in" first or show "favorite" first? We can use the same method but provide a different predictate like this:
restaurants.sorted(by: { $0.isFavorite && !$1.isFavorite })
restaurants.sorted(by: { $0.isCheckIn && !$1.isCheckIn })
To better organize our code, we can put these predicates in the DisplayOrderType enum. In SettingStore.swift, add a new function in DisplayOrderType like this:
func predicate() -> ((Restaurant, Restaurant) -> Bool) {
    switch self {
    case .alphabetical: return { $0.name < $1.name }
    case .favoriteFirst: return { $0.isFavorite && !$1.isFavorite }
    case .checkInFirst: return { $0.isCheckIn && !$1.isCheckIn }
    }
}
This function simply returns the predicate, which is a closure, for the corresponding display order. Now we are ready to make the final change. Go back to ContentView.swift and change the ForEach statement from:
ForEach(restaurants) {
  ...
}
To:
ForEach(restaurants.sorted(by: self.settingStore.displayOrder.predicate())) {
  ...
}
That's it! Test the app and change the sort preference. When you update the sort option, the list view will get notified and re-orders the restaurants accordingly.
What's Coming Next
Are you aware that SwiftUI and Combine work together to help us write better code? In the last two sections of this chapter, we didn't write a lot of code to implement the filtering and sort options. Combine handles the heavy lifting of event processing. When pairing it with SwiftUI, it's even more powerful and saves you from developing your own implementation to monitor the state changes of objects and trigger UI updates. Everything is nearly automatic and taken care of by these two new frameworks.
In the next chapter, we will continue to explore Combine by building a registration screen. You will further understand how Combine can help you write cleaner and more modular code.
For reference, you can download the complete project here: